
10 minute read
REPLACE FRONT SUBFRAME BUSHES


It can be a fi ddly job but replacing worn out front subframe bushes can improve your Mini’s handling and reduce the risk of failures elsewhere.
Words and photos: Jim Jupp
Replacing front subframe bushes
The front subframe bushes on our project, Mini Sheldon, were squeaking when downward force was applied to the slam panel. The subframe fi tted is a dry (post-Hydrolastic) 1976-on one. Replacing them is a job I put o for a while because it’s a bit tricky but, as with most Mini jobs, once you get stuck in it’s not that complicated. What will make the process easier is a helping hand but it is possible to complete this job on your own as long as you take care. The [1976-on] front teardrop bushes seem to be the most stubborn to replace but these were clearly the failure point in this case, going by the direction of the noise.
There is a large variety of bush and mount options available when it comes to replacing front subframe bushes for 1976-on dry front subframes, as we have here in this 1990 Mini with replacement BMH shell. This type of subframe can be identifi ed by the two large upper tower bolts that connect the subframe to the bulkhead and are visible either side of the bulkhead. The earlier versions had four long 5⁄16” bolts [or studs] through the bulkhead.
There are roughly three types of replacement bushes but people mix and match them for a number of reasons: solid mounts are mainly used on racing cars or when carrying out
Top and front teardrop polyurethane subframe bushes from Mini Mine were chosen to replace the OE ones last fitted.
bodywork (for improved panel alignment), polyurethane o ers a sti er, more-responsive ride and, fi nally, OEspecifi cation rubber.
The later type of front subframe has six bushes/ mounting points, with the rear lower mounts (21A2599) comprising two metal plates bonded together with rubber. This was a new addition in 1976, to reduce noise, as earlier front subframes bolted directly to the front bulkhead. 1976 also saw the introduction of a fi xing strap, visible from the interior, which can now be replaced with a stainless steel equivalent
RetroSport billet alloy front subframe rear mounts Smiffy's Bits stainless steel front subframe rear mount strap.


from Smi y’s Bits (www.smi ysbits.co.uk)
Solid front subframe rear mounts are an option promoted by several Mini parts suppliers, even for a road car, to sharpen up handling, and they are fi ne to use if noise transmission isn’t an issue for you. These can be sourced in mild steel from suppliers such as Mini Spares, Mini Mine and Mini Sport. Billet alloy versions are also an option from S-CAN’s RetroSport range, as well as Mini Sport.
In my view, the front teardrop mounts are the hardest to remove and it is di cult to check visually whether they have failed or not. As with the other mounts, the same alloy/polyurethane/rubber options exist. Shims may also be required to space out the front panel (part 2A4292). These can be sourced from several Mini suppliers
The two-part (each side) top-most bushes, which sandwich between the subframe towers and the bulkhead, as well as a large bush fi tted to the tower bolts directly, have a large range of material options, including nylon. If the idea of solid bushes seems a step too far for your road Mini then several Japanese suppliers (such as www.classicminisjapan.com) can supply polyurethene bushes moulded to secure onto the tops of the towers. We have found these to be e ective but they are more costly. Shaped to match the top of the tower, these cannot move, unlike some bushes we have used.
It takes more thought but it is possible to replace these bushes with the engine in situ, as I am showing you here.

RetroSport solid billet alloy subframe bushes are an alternative to the poolyurethane ones above.
The biggest problem is the signifi cant weight of the engine and the consequent hazards to yourself and the Mini. Two suitable axle stands, with two strips of wood to protect the bodywork, are needed, along with a reliable trolley jack. The latter is very important as it needs to support the weight whilst lowering the whole front assembly.
We’re mixing and matching the bushes/mounts for Sheldon, with Mini Mine polyurethane tower mountings and front teardrops. The rear mounts are mild steel as I feel that sharp handling is worth the sacrifi ce of a bit of road noise.
Front teardrop mount shims.


1


Japanese top subframe bushes follow the profile of the subframe towers.
On a level surface, jack the front of the Mini up from the front subframe with a trolley jack (I use the front tie bar mount and use a hockey puck to protect the paint). Two axle stands need to be placed under the lower bulkhead seam in front of both footwells. A small piece of timber should sit between the axle stand and the bodywork, to avoid damage, taking care not to crush hoses and cables. A single piece of wood will foul the exhaust, other pipes and battery cable if fitted. Chock the rear wheels, lower the Mini slowly onto the axle stands and check the car is stable. Once you have the front of the Mini safely raised you can remove the rear lower-most mounts, which in this case is a replacement solid steel version from Mini Mine. With all nuts and bolts removed it is then possible to remove the mount.
2
3 4
Here is the OE version of the rearmost front subframe mount which was designed to reduce road noise within the Mini. They should always be replaced in pairs. Once the road wheels are removed, the front dampers can be removed.

5 6 7


In each inner arch, just above the tie bar mount at the front of the subframe, you’ll find the nut for the bolt which passes through the front teardrop mount and front panel. The bolt is accessed via the front valance. Use a long ½” socket to avoid damaging the paintwork. Undo it with a spanner on the nut. Leave the bolt in situ for the moment, until you are supporting the engine. Sheldon has a towing eye on one side.

8 9


If the engine isn’t fitted, use the jack and a length of wood to support the subframe, but don’t lift the Mini off the axle stands – just take the weight, before you undo the remaining bolts. As the engine will be lowered you need to remove a top engine steady and possibly the earthing cable, depending on configuration.
Doing the job with the engine in place means using a trolley jack under the gearbox, which will need protecting so that the fins are not damaged. Use a piece of wood or a hockey puck as shown here. Supporting the engine puts strain on the engine mounts so, if they are worn, they should be replaced first.

10 11
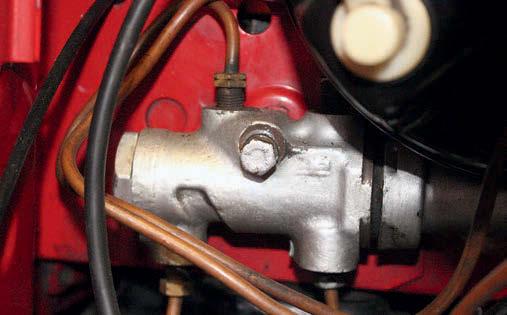
There could be a number of hoses and pipes that connect to the body which haven’t got enough slack to enable the subframe to be lowered, such as the clutch slave. In Sheldon’s case the brake valve pressure reducer needed unbolting from the bulkhead so as not to put stress on the brake pipes. Undoing just the mounting bolt, not loosening the brake pipes, did the trick.

12
Using a 1 5⁄16” six-point socket and an extension bar, the two tower bolts were loosened at either side of the engine bay. It isn’t necessary to remove the bonnet, but you may have to remove the wiper motor cover, if fitted.
13

With some play now in the subframe you should be able to remove the two bolts from the front panel (see Step 6). The teardrop mount will not come out until the 5⁄16” locating bolt is also removed, using an open-ended ½” spanner. It is reached just behind the front valance, via the grille aperture.

14
The two tower bolts can now be removed. Here is one of the bolts, now fitted with a polyurethane bush from Mini Mine. The older rubber bush is also shown.
15

Once the bolts are removed, the subframe can be lowered to expose the top of the mount. This is where another set of eyes helps, to be sure nothing is pulling tight or snagging. I lowered the subframe by 30mm with no issues. This is the tower-to-bulkhead bush replacement (right), again compared to the rubber version. When replacing, the conical top should be faced upward toward the bulkhead.

16 17
The left-hand (UK nearside) tower bolt bush is even harder to access but, with patience, I managed to remove and replace it without the need to remove the radiator.

I started with the front teardrop mount replacement first before raising the subframe again and fitting the tower bolts, with copper grease smeared on the threads. Before tightening the tower bolts the lower rear mounts were fitted. I’ve retained the mild steel solid mounts. Place the 5⁄16" bolt through the subframe first, down into the mount. Secure, using a washer and a spring-washer. The holes in the subframe can enlarge, so a flat washer used first will provide a good surface for the spring washer.

18
With the subframe lowered it’s possible to reach the OE front teardrop mount, which has clearly failed here. There is also a locating dimple to aid alignment on the front panel. The mount is held in place by the dimple and locating bolt securing the mount to the front panel at this point.
The two bolts connecting the front panel to the subframe can now be added, or RetroSport towing eye in this case, through the teardrop. Add shims if required, between the mount and subframe, to avoid stressing the front panel. With the front dampers and the road wheels re-fitted, the axle stands can be removed and the car lowered. I also re-secured the brake valve pressure reducer onto the bulkhead.
19


20

Be safety smart!
Safety should always be your first priority so always start a job like this by disconnecting the battery at the battery end. Before starting this task you shoud check the routing of the battery cable as you will need slack when you lower the front subframe by about 30mm. Some configurations will require the removal of the battery cable back to the solenoid, be it separate or integral with the starter motor. Fuel and brake pipes are another safety consideration, depending on how they are secured and positioned. If in doubt then ask a professional to do the job. Always wear appropriate attire for the task you are undertaking including personal protective equipment such as steel-toe-cap footwear.


