Design for Manufacture UCL - The Bartlett School of Architecture
Joe Krcma 1
Table of Contents •
3D Chair Leg Jig (page 3-4)
•
Hoxton Analytics (page 5-8)
•
3D Printed Tree Branches (page 9-10)
•
SKK Lighting (page 11-13)
•
VR to 3D Rose (page 14-15)
!2
3D Chair Leg Jig
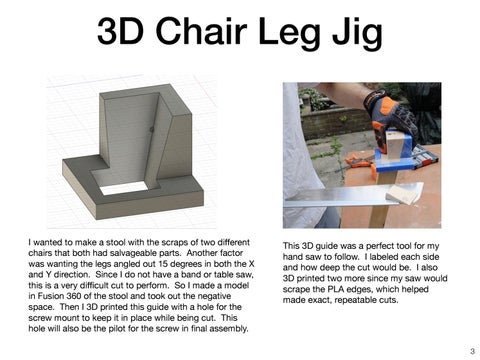
I wanted to make a stool with the scraps of two different chairs that both had salvageable parts. Another factor was wanting the legs angled out 15 degrees in both the X and Y direction. Since I do not have a band or table saw, this is a very difficult cut to perform. So I made a model in Fusion 360 of the stool and took out the negative space. Then I 3D printed this guide with a hole for the screw mount to keep it in place while being cut. This hole will also be the pilot for the screw in final assembly.
This 3D guide was a perfect tool for my hand saw to follow. I labeled each side and how deep the cut would be. I also 3D printed two more since my saw would scrape the PLA edges, which helped made exact, repeatable cuts.
!3
3D Chair Leg Jig
The touching surfaces were then glued up and screwed in the leg to the frame (from the pilot hole). The overhanging lip from the chair leg will be extra support for downward pressure.
The frame was made from 4 pieces of scrap material, which were screwed and then plugged with wooden dowels carved on my homemade CNC machine.
The final result turned out great and does not tip over. Combining CAD, 3D printing, and some hand tools, I was able to create a complex piece from up-cycling household objects.
!4
Hoxton Analytics Hoxton Analytics is a company that creates sensors to count people and monitor occupancy using artificial intelligence. This is done using cameras to capture data from feet and understand behavioural trends. They approached me to understand how they could house their hardware in a low-profile manufacturable case.
Back plate screws into front case From back –From back – Back plate screws into front case
- Note the front face only reaches down half Front case -Front case Note the front face only reaches down half way (to allow camera to see through) way (to allow camera to see through)
Small hole for cable to pass through (diameter 20mm) Small hole for cable to pass through (diameter 20mm) 130mm
200mm
200mm
130mm
130mm
Holes into which screws fit Holes into which screws fit
Sunken Screw Holes Sunken Screw Holes
200mm
130mm
200mm 100mm
65mm
It started with a simple sketch where they could explain the needs for the product.
65mm
65mm
100mm
65mm
We then made a quick diagram for dimensions and specific functions. It had to hold a unique camera filming at a certain angle and block out window reflections and peripheral video noise.
!5
Hoxton Analytics
I then made a CAD file in Autodesk Fusion 360. This would hold the camera in the same position for repeatable future designs. I also incorporated tabs for countersunk flat head screws to secure the lid to the box.
I 3D printed the prototype using polylactic acid filament. There were two parts (lid and case) and it worked well for the first camera iteration.
!6
Hoxton Analytics On the second iteration the hardware became more compact and specific uses changed depending on the desired function. For example, the low foot angle was different than the overhead version.
I made a quick cardboard case that would be used to understand dimensions. I needed to factor in the best use of space and how it would attach to the wall/ceiling.
I then made a model and created it on my personal printer. This version has the exact chamfered angles needed for the camera viewport, and clip in slots for the Raspberry Pi board.
It uses tapped threads for replacing parts and the ability to remove the lid multiple times. There is also a reset hole button that threads in perfectly to the lower corner.
!7
Hoxton Analytics The design took in considerations of weather, strength, and being able to blend into its surroundings. After testing the prototypes in the field, the company has manufactured many camera cases using sheet metal bending. The outcome has been a profitable startup story showing the process of early prototype through to final functional design.
Brixton Market
!8
3D Printed Tree Branches
I was making a 3D printed Christmas Tree and wanted the branches to each be unique. I designed “spikes” to poke out from the branch, which would give the effect of pine needles.
Since the nozzle width on the 3D printer was 0.4mm, the width of each needle was 0.8mm and height was 0.4mm. This means that the machine would travel out in space extruding at the same time and return back to its home position, to continue with the rest of the branch. Each needle was different depending on the wind direction and temperature.
!9
3D Printed Tree Branches
I then used my 3D pen to attach both branches together using the same colour filament as glue. These were placed in wooden branches that I cut and drilled holes for the printed parts.
I had all of my maker friends each design a Christmas ornament which they sent to me and put on the tree. All of these gifts were then donated to a local London charity empowering kids to create.
!10
SKK Lighting SKK Lighting is a boutique lighting company bringing many different design concepts to market.
3D Printing
The Coffee Pot Light started out as an odd idea, where I then designed and 3D printed the prototype for proof of concept.
After multiple iterations and light placement options, we adjusted the form to our desired look. These were injection moulded and sold during the London Coffee Festival.
!11
SKK Lighting Laser Cutting
The Neon Light Tube began as wire connecting the light together. I refined this to be laser cut pieces that brought another reflective element to the light. The acrylic options helped in both form and function. These came to be an entire collection of different light styles and sell very well.
!12
SKK Lighting CNC
The night stand lamp was created with the idea of convenient storage and a wireless phone charger. I made the prototype on my homebuilt Computer Numerical Control machine. This went into production and has a wonderful natural look to lighting. We have expanded the set to include a verity of materials and this has done well in the personal home and hotel markets (both domestic and internationally). !13
VR to 3D Rose For Valentines Day, I wanted to make a rose that would spell my girlfriend’s name. Traditional CAD is very difficult to create the natural lofted curves I wanted to make, so I used a Virtual Reality set to design the rose stem.
I was able to change exact details in Gravity Sketch, and even paint the colour I wanted the rose to look like.
!14
VR to 3D Rose I then imported this file to a Project 660 Pro powder printer. Since this uses plaster powder as support material and can print in colour, it was the perfect way to bring this idea to life.
After de-powdering, I then carefully glued the plaster to seal in the colour and strengthen the piece. This was a great way in showing different design capabilities and hardware creation to create a final product. !15
Thank You
Thank you for taking the time to look at some selected samples and I look forward to hopefully joining the Design for Manufacture program. !16