7 minute read
Checks and Service Scheme


Checks and service should be regularly carried out according to the intervals given below. Let an authorized Volvo Penta Service Shop look after your engine.
CHECK DAILY BEFORE STARTING that
The oil level in the engine is between the marks on the dipstick
CHECK every 14 days that
The oil level in the reverse gear is between the marks on the dipstick The electrolyte level in the battery is correct The belt tension
Page 11
11
12
SERVICE EVERY 50 HOURS OF OPERATION:
Change the oil in the engine Change the oil in the reverse gear Check and adjust the valve clearances
12 13 13
Change the oil filter Check the pulley belt Check-tighten the cylinder head bolts Check the cooling system Check the electrical system (fuses, etc.) Fuel system, filter, strainer, injector, venting
13 14 15 15 16 17-19
SERVICE IN CONJUNCTION WITH LAYING-UP AND LAUNCHING THE BOAT
Inhibiting scheme I. Inhibiting measures carried out with boat in the water. Inhibiting scheme II. Inhibiting measures carried out with boat on land. Service in connection with launching. 20 21 22
CHECK DAILY BEFORE STARTING
OIL LEVEL IN ENGINE
Each day before starting check that the oil level is between the marks on the dipstick. Top up with oil if necessary through the oil fillerhole. NOTE. Do not top up above the MAX. mark. Concerning choice of oil, see under “Technical Data”.
CHECKS every 14 days
OIL LEVEL IN REVERSE GEAR

Screw up the dipstick, wipe it clean and insert it again without screwing it down. Pull up the dipstick and check the oil level which should be between the marks. If necessary top up with oil through the oil filler hole on the opposite side of the reverse gear. Do not top up above the MAX. mark.
Screw down the dipstick again. Note that there is a sealing washer on the dipstick. Concerning choice of oil, see under “Technical Data”.
ELECTROLYTE LEVEL IN BATTERY
The level should be between 5—10mm (3/16 – 3/8”) above the cell plates in the battery. If necessary top up with distilled water. IMPORTANT. Observe great care when doing this since the electrolyte is abrasive and the gas which is formed is explosive.
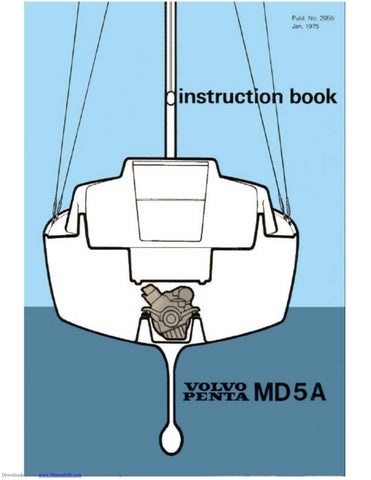
BELT TENSIONING
Correct belttension is necessary for full alternator output. The beltshould be so tensioned that itcan be depressed 5 mm (3/16”) with the thumb midway between the pulleys. To tension the belt, first slacken the alternator retaining points, stretch the belts and tighten up the points again. A well worn or crached belt should be replaced.
SERVICE EVERY 50 HOURS OF OPERATION:
CHANGE OIL IN ENGINE
With a new or newly reconditioned engine, the oil should be changed for the first time after 20 hours of operation and after that after every 50 hours of operation. Run the engine warm. Suck up the oil through the dipstick hole. Fill with oil to the correct revel. See under “Technical Data” concerning choice of oil.
NOTE! Change also the oil filter (Fram Filter PH3614) at every other oil change.
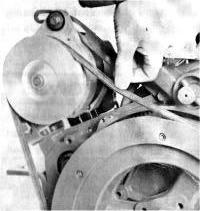
CHANGE OIL IN REVERSE GEAR
The oil can be drained from the reverse gear by removing the plug under it or by sucking up the oil through the dipstick hole with the help of an oil scavenging pump. Fill with oil through the filler hole to the correct level on the dipstick. NOTE. Do not fill above the ‘MAX. mark on the dipstick. Concerning choice of oil, see under “Technical Data”
VALVE CLEARANCE

The valve clearance should be checked and adjusted by authorized personal. See under “Valves”, in “Technical Data”.
OIL FILTER
The oil filter should be replaced for the first time after 20 hours of operation during the running in period and subsequently at every other oil change. IMPORTANT. Before removing the filter, switch off the main switch. Screw off and scrap the oil filter. It may be necessary in certain cases to lift off the belt and tension out the alternator to permit free passage for the filter.

Coat the new filter rubber gasket with oil. Check the area on the engine in contact with the filter and screw on the filter by hand until it just touches the engine. Then screw the filter a further half turn, but not
more.
NOTE. Only use a genuine oil filter. Start the engine, allow it to idle and immediately check that the oil pressure warning lamp is out. Check the oil level and also for any leakage round the oil filter.
CHECK THE BELT
Check the belt thoroughly for wear and cracks. Replace it if there is any indication of such. To remove the belt, slacken the alternator retaining points in order to be able to slip the belt off. Wipe clean the belt groove on the pulleys before fitting the new belt. Tension the belt so that it can only be depressed 5 mm (3/16”) with the thumb between the pulleys. After the engine has been run for an hour or so, re-check and if necessary adjust the belt tensioning.
CHECK-TIGHTEN THE CYLINDER HEAD BOLTS

Authorized personal should check-tighten the bolts with a torque wrench before starting a new or newly reconditioned engine for the first time and again after it has been in operation for 20 hours. Check the valve clearance after tightening up the bolts. The bolt-tightening sequence can be seen from the adjacent illustration. Concerning the tightening torque, see under “Technical Data”.
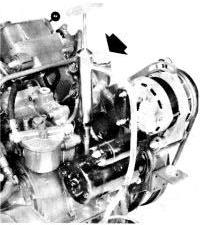
CHECK THE COOLING SYSTEM
The cooling system is functioning normally when the “Temp” lamp is out and the siren is quiet. Excessive temperature (“Temp” goes on, the siren sounds) may be due to the following: clogged water intake, defective impeller or flange in the sea-water pump, faulty thermostat or temp. gauge sender. Look out for water penetration during all work on the cooling system.
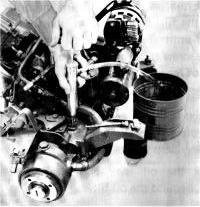
Check and replace the impeller The impeller can be damaged due to, e.g., shortage of water. Remove the cover on the water pump. Pull out the shaft the length required in order to screw out the impeller lock bolt. Hold against the shaft and pull off the impeller. If the impeller is damaged, fit a new one. NOTE! If the shaft has been removed entirely from the pump housing, check when re-fitting it that the D-ring between the sealing rings in the housing gets onto the shaft. Tighten up the impeller with the lock bolt. If the impeller and shaft can be rotated then the flange is defective. A new flange can be fitted after the pump has been removed. Fit the cover with its gasket.

ELECTRIC SYSTEM
Alternator
The engine is equipped with an alternator. To ensure that the alternator with the built-on regulator functions without interruptions the following important points must be observed: 1. Never switch off the main switch until the
engine has been stopped.
To do otherwise would be to ruin the charging regulator. 2. Do not mix up the battery connection poles. A plus sign and a minus sign are marked on the respective poles. The minus pole is connected up to the engine body. Cable shoes should be greased and wall tightened. 3. Re-wiring between the charging circuits
may not be carried out while the engine is running.
Fit a Volvo Penta charging distributor (accessory) on the alternator when more than one battery is connected up.
4. Observe the following in the event the engine is started with an auxiliary battery:
Let the ordinary battery remain connected up. Connect the auxiliary battery to the ordinary battery, plus to plus and minus to minus. When the engine has started, remove the auxiliary battery but do not break the ordinary battery’s wiring circuit. 5. Do not use a rapid charging unit when the alternator is connected to the battery. 6. Before doing any work on the alternator equipment first disconnect both the battery cables. 7. In the event any electrical welding work is done on the engine or the installation components, disconnect the charging regulator cables at the alternator and insulate the cable ends.
8. Check regularly the belt tension and the cable connections.