8 minute read
Checks and Service 11


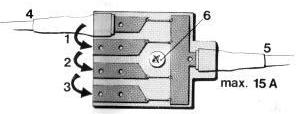
Change Fuse
A fusebox is mounted on the cylinder. A fuse breaks the electrical system when the system is overloaded. Re-connect the electrical system by transferring the cable connection to the next fuse contact.
Starter motor and alternator
All work connected with the starter motor and alternator shoold be done by an authorized service shop. Inspection and control should he carried out in connection with a general inspection of the engine.
BATTERY
Checking the state of charge of the battery The state of charge of the battery should he checked at cast once each season. This is done by using a hydrometer which shows the specific gravity of the electrolyte, this varying with the state of charge. (See the Technical Data.)
FUEL SYSTEM
Observe the greatest cleanliness when handling the fuel system. IMPORTANT: Try to avoid fuel splash.
Change fuel filter
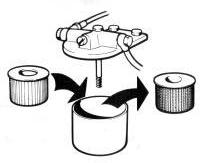
The filter element in the fuel filter should be changed at least once each season. To do this remove the filter centre screw and lift off the filter. Clean the container and contact surfaces. Fit the new filter element and its gasket. Pump up the fuel with the hand primer. Vent the fuel system. If the pumping effect is poor, turn over the engine a bit so that the drive cam alters its position.
Extra fuel filter
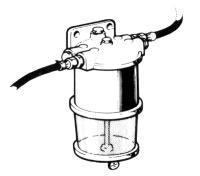
FUEL STRAINER
If an extra fuel filter is fitted together with a water separator, check the transparent bowl to see if there is any water in the fuel. If necessary, drain the filter via the cock in the bottom of the bowl.
Try to avoid fuel splash. Pump up the fuel with the hand primer and vent the system. The fuel filter element should be changed at least once a season.
The fuel pump on the engine has a built-in strainer which is accessible after removing the cover. Clean the strainer at least once a season.
Immediately after starting the engine, check for leakage.
Always vent the fuel system. See under “Venting the fuel system”.
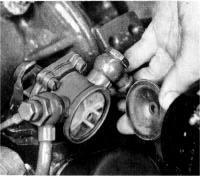
Injector
The injector should be removed once a season and handed in to a diesel shop for cleaning and checking the opening pressure, the spray pattern and for leakage. To remove the injector, unscrew the delivery pipe and the by-pass oil line. Fit protective caps over the openings. Release both the nuts over the fork holding the injector to the cylinder head and lift up the injector. If the injector feels stiff to remove due to gumming, grip it with, e.g., polygrip pliers and carefully rotate it back and forth while levering it up at the same time (with a screwdriver, e.g., under the fork(. Before fitting, check to make sure the contact surface on the injector and copper sleeve is clean. Connect up the delivery pipe and the return line but do not tighten the delivery pipe nut at the injector. Turn over the engine with the starter motor until fuel comes from the delivery pipe. Tighten up the delivery pipe nut and make sure the delivery pipe cone is fitted properly. Concerning tightening torque, see “Technical Data”.
Venting the fuel system
In order for the engine to be able to start, the fuel system must be vented on the following occasions: When changing the fine filter. With leakage and work on the fuel lines. When draining through the drain hole. When the engine has not been used for a When cleaning the fuel pump strainer. long time. After running the fuel tank empty. When installing the fuel injection pump.
Venting is as follows: 1. Open the vent screw on the fuel filter. 2. Pump forward the fuel with the help of the hand primer until fuel free from air bubbles flows out. Close the vent screw. If the pumping effect is poor, turn over the engine a bit so that the pump drive cam alters its position. 3. If the fuel injection pump has been removed, or when starting an entirely new engine for the first time, the fuel injection pump must be vent. To do this open the vent screw on the pump. Pump with the hand primer until fuel free from air comes out.
Slacken the injector delivery pipe nut and turn over the engine by means of the starter motor until fuel comes from the delivery pipe. Tighten up the delivery pipe nut and start the engine.
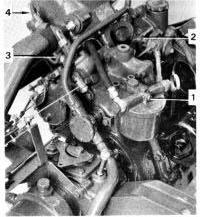
1. Vent screw, fuel filter 2. Hand primer 3. Vent screw, injection pump 4. Delivery pipe nut
SERVICE IN CONNECTION WITH LAYING-UP AND LAUNCHING THE BOAT
INHIBITING ENGINE AND REVERSE GEAR
IDLE ENGINE FOR BRIEF PERIODS WITH BOAT IN THE WATER
To prevent the engine from corrosion attacks, it must be run warm at least once every 14 days as long as the boat is in the water. If it is anticipated that the boat will not be used for more than a month, long-term inhibiting should be carried out.
INHIBITING FOR A LONG PERIOD
An authorized service shop should test the engine and equipment before inhibiting the engine for a long period acc. To Inhibiting Schemes I and II. A suitable procedure would be to test the compression.
SERVICE INSTRUCTION
Inhibiting Scheme I Carried out with the boat in the water
1
2
3 Run the engine warm.
Pump out all the oil from the engine and reverse gear. Use an oil scavenging pump.
Change the oil filter. Fill the engine and reverse gear to the correct level with Volvo Penta oil, which also has rustproofing properties, to the correct level. The lubricating system is thereafter ready for operation the next season. If rustproofing oil is used, it should be of the type Esso Rustban 623, Sheel Ensis Oil or corresponding. In this case, the oil filter should be replaced when launching.
4
5 Drain the fuel filter.
Disconnect the fuel pump flexible suction hose from the fuel system and insert the free end in a can filled with 1/3rd Volvo Penta oil or preservative oil and 2/3rds diesel fuel oil. Bleed the fuel system. Let the engine run at rapid idle for about 10 minutes. NOTE! If the fuel system has an electrically operated fuel pump, it must be switched off before the engine is started.
6
7
8 Drain the cooling water from the engine and reverse gear. Check to make sure that the water runs out since impurities can block the cock. Then close all cocks and re-fit the drain cock in the reverse gear.
Disconnect the reverse gear suction line from the reverse gear. Connect a hose with inner diameter 1/2” and, insert the free hose end in a container with fresh water. Arrange to have water added to the container and run the engine at idle for about 5 –10 minutes so that it is flushed throughout with fresh water. Make sure that there is no dirt near the exhaust outlet. Drain all water from the engine and reverse gear. Then close all drain points. Mix a rustproofing mixture consisting of 15 - 20 litres (13 Imp.qts. = 16 us qts. - 18 lmp.qts. = 21 US qts.) fresh water and 2 - 4 litres (1.8 Imp.qts. = 2.0 US qts. - 3.5 lmp.qts. = 5.3 US qts.) rustproofing oil. NOTE! Water first and then the oil. Use, e.g., Esso Cutwull 40, Shell Donax C or similar. As an alternative, a freeze-resistant 30 % glycol mixture can be used.
9
10
11
12
13 Insert the hose into the rustproofing mixture. Start the engine and allow it to idle until the mixture is finished. NOTE! The water pump must never be allowed to run dry.
Since the rustproofing mixture does not provide any protection against freezing, it must be drained from the engine and reverse gear. Remove the cover from the cooling water pump. Check to make sure the impeller is in good condition. NOTE! Do not pull out the impeller if it is in good condition.
Remove the injector and hand it in to a diesel shop for cleaning and checking. Inject Volvo Penta oil into the cylinder. Turn over the engine several turns with the starter motor or the crank. NOTE! Prevent oil splash. Fit the checked injector but do not final-tighten it. It will be removed again before launching.
Clean the outside of the engine and reverse gear. Touch up any bare patches on the paintwork with the same type of paint as the original. Spray the electrical system components and all the controls with anti-moisture spray.
Remove the battery. It needs to be maintained to prevent it from being damaged.
Service in connection with launching
14 If Volvo Penta oil has been used, only the oil level in the engine and reverse gear needs to be checked. If another type of preservative oil has been used, both oil and filter must be replaced. See under “Service 14 after every 50 hours of operation”.
15
16
17
18
19
20 Screw tight the cover with its gasket on the cooling water pump. Connect the hose between the cooling water intake and the reverse gear. Check-tighten all the hose clamps. Close the drain cocks. Clean the outside of the engine and the reverse gear.
Install the battery, which should be fully charged. Grease the cable shoes. Connect up the battery cables. IMPORTANT! Do not mix up the polarity. Tighten up the cable shoes well.
Remove the injector. Take measures to avoid oil splash and run the engine several turns so that the oil on the piston crowns is blown out. Fit the injector. See under “Tightening torques”, “Technical Data”.
Launch the boat. Change the fuel-filter cartridge. Pump forward the fuel and vent the system. See under “Venting the fuel system”.
Start the engine. See the instructions on page 5. Run the engine warm with the reverse gear engaged. Check to make sure there is no leakage of fuel, air, water or exhaust gases. Check that all the controls, etc., are functioning properly.
If necessary, contact authorized Volvo Penta service shops and let them service the engine and reverse gear according to the instructions in the servicing scheme.