3 minute read
Timing gear


30. Timing gear
Install the rear timing gear cover (1). Check that it comes into the correct groove (2) behind the coolant pump.
Install the lower belt guard.

31.Fix the camshaft toothed belt pulley with one of the three screws (1). Check through the open screw hole (2) that the screws are not in their end positions in the elongated holes (3) on the toothed belt pulley. If the screws are in their end position, it may be impossible to tension the toothed belt.
Make sure that the marking on the pulley (4) and the timing gear cover (5) line up.
Loosen the screws until the pulley can slide in the elongated screw holes.

32.Install the toothed belt jockey pulley (1). Torque the screw as in the specification in “Technical data”.
Screw the belt tensioner (2) down. Undo the center screw about one turn and turn the eccentric washer (3) with a 6 mm Allen key until it is in the position shown in the illustration. It is easiest to install the toothed belt in this position.
33.Install the toothed belts in the following order: 1. Crankshaft 2. Jockey pulley 3. Camshaft gear 4. Belt tensioner 5. Circulation pump
IMPORTANT! The toothed belts must be kept taut during installation.
NOTE! Also observe the replacement interval for toothed belts, please refer to “Technical data, Engine body”.
34.Set the belt tensioner to the tensioned position.
Then tighten the screw. No fine adjustment is necessary at this point. The illustration shows the position of the belt tensioner at various temperatures of the engine block.
Check that lock pins 9997007 for the exhaust camshaft and 9997005 for the crankshaft are in place, please refer to “Crankshaft, locking”.


35.Check that the open screw hole (1) is not in the end position in relation to the elongated hole. If the screws are in their end position, it will not be possible to tension the toothed belt correctly.
Tension the toothed belt in the direction of the arrow, using counterhold 9995199 and fix the camshaft pulley with the three screws. Torque the screws as specified in “Technical data.”
Fit the last screw and torque as specified in
“Technical data.”
IMPORTANT! Make sure that the toothed belts are taut between the crankshaft, jockey wheel and camshaft pulley during tightening.

36.Apply pressure (1) to the toothed belts and check that the belt tensioner (2) moves. NOTE! The belt tensioner must be changed if it does not move.

37.Remove locking pins 9997005 and 9997007 and install the plug in the block.
Set the belt tensioner in relation to the temperature of the engine block, please refer to the figure.
Torque the belt tensioner as specified in “Technical data”. NOTE! The illustration shows the temperature of the engine block when the belt tensioner is set up.
38.Turn the crankshaft round two rotations. Check the marking on the crankshaft pulley (1) and the marking on the camshaft pulley (2).
Check that the belt tensioner indicator (3) is within the marked temperature range. If necessary, adjust as above.
IMPORTANT! Check that the engine can be cranked without any unwanted noise or complications.
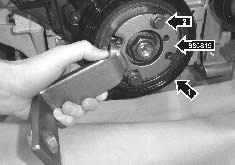
39.Install the vibration damper (1) on the crankshaft.
Screw counterhold 885819 to the vibration damper, use the four screws (2) for the vibration damper.
IMPORTANT! Check that lock pins 9997007 for the exhaust camshaft and 9997005 for the crankshaft are removed. There is a strong risk of engine damage if the pins are left in place.
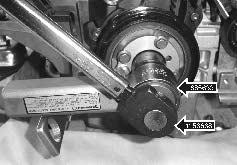
40.Torque a new center nut to the crankshaft, as specified in “Technical Data”. Use torque amplifier 885633. NOTE! If a torque of 86 Nm is applied to torque amplifier 885633, this gives a torque of 300 Nm (71 ft. lb gives 250 ft. lb).
Remove counterhold (885819) from the vibration damper. Tighten new screws on the vibration damper alternately in two stages as specified in
“Technical Data”.
Install the front timing gear cover.