3 minute read
Cam belt, change


Removal
1. Apply a tool with a T60 Torx bit (1) to the cutout in the belt tensioner (2).
Turn the belt tensioner and insert a screwdriver or similar into the hole (3) which opens up and secure the belt tensioner.
Remove the drive belt (4).
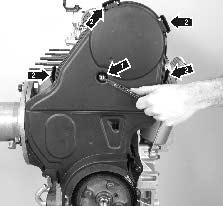
2. Undo the outer trimming gear cover screw (1) and the four hooks (2).
Fold the top of the cover forwards and then lift the cover upwards.
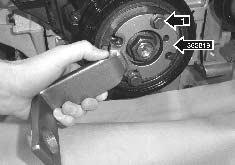
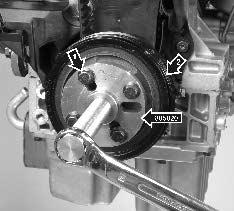
3. Use a socket (1) as a counterhold on the center nut.
Then undo all the screws on the vibration damper (2).

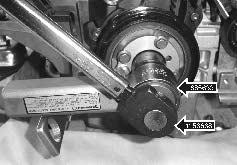
4. Install the counterhold tool 885819, using the four screws (1) for the vibration damper.
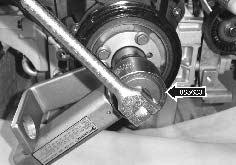
5. Install the torque amplifier (885633), together with 885648, as shown in the illustration.
Unscrew the center nut on the crankshaft.
6. Turn the crankshaft so that the marking on the camshaft is correct, please refer to the figure.
Turn the crankshaft a further quarter turn anticlockwise.
Remove the counterhold.
7. Install puller 885820 and undo the pulley, so that it comes away from the crankshaft gear.
Disassemble the tool.
Tap the gear wheel back on with a plastic faced mallet.
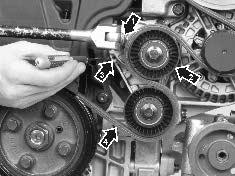
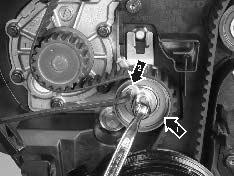
8. Undo the center screw on the belt tensioner (1) so that the eccentric washer (2) is released and can be put in the “10 o’clock” position.
Remove the toothed belt.
Installation
1. Install the toothed belts in the following order: 1.Crankshaft 2.Jockey pulley 3.Camshaft gear 4.Belt tensioner 5.Coolant pump
NOTE! Make sure that the belt is correctly seated on the toothed pulley.


2. Set the belt tensioner in relation to the temperature of the engine block, please refer to the figure. NOTE! The illustration shows the temperature of the engine block when the belt tensioner is set up.
3. Install the counterhold on the crankshaft gear and turn the crankshaft a quarter turn clockwise.
Check the marking on the crankshaft pulley and the marking on the camshaft pulley.
4. Adjust the belt tensioner, as above.
5. Apply pressure (1) to the toothed belts and check that the belt tensioner (2) moves. NOTE! The belt tensioner must be changed if it does not move.
6. Turn the crankshaft round two rotations.
Check the marking on the crankshaft pulley (1) and the marking on the camshaft pulley (2).
Check that the belt tensioner indicator (3) is within the marked range. If necessary, adjust as above.
IMPORTANT! Check that the engine can be cranked without any unwanted noise or complications.
7. Install the pulley/vibration damper (1) on the crankshaft. Screw counterhold 885819 to the vibration damper, use the four screws (2) for the vibration damper.
8. Torque a new center nut to the crankshaft, as specified in “Technical Data”. Use torque amplifier 885633. NOTE! If a torque of 86 Nm is applied to torque amplifier 885633, this gives a torque of 300 Nm (71 ft. lb gives 250 ft. lb).
Remove counterhold (885819) from the vibration damper. Tighten new screws on the vibration damper alternately in two stages as specified in
“Technical Data”.
Install the front timing gear cover.
9. Install the drive belt (4) and then release the locking of the belt tensioner. NOTE! Make sure that the drive belt has not slid out of its grooves.