7 minute read
1. Daily inspection


Perform the following checks before and after use.
! WARNING
Do not use outboard motor if any abnormality is found during pre-operation check or it could result in severe damage to the motor or severe personal injury.
Item Points to Check Remedy
Fuel System
Fuel Tank and Cap
● Check the amount of fuel in the tank. ● Check for debris or water in the fuel filters. ● Check the rubber hoses for fuel leakage. Replenish Clean or replace Replace
● Check for crack, leakage, damage in the fuel tank and cap. ● Check for crack, damage in the gasket and tether. ● Check for leakage at full close. ● Check for ratchet performance. Replace Replace Replace Replace
Engine Oil ● Check the oil level. Fill to the upper level mark on dipstick
Electrical Equipment
● Check that the main switch functions normally. ● Check that the battery electrolyte level and specific gravity are normal. ● Check for loose connections on the battery terminal. ● Check that the stop switch functions normally and make sure the lock plate is there. ● Check cords for loose connections and damage. ● Check the spark plugs for dirt, wear and carbon build-up. Replace Replenish or recharge
Retighten Remedy or replace
Correct or replace Clean or replace
Throttle System ● Check carbureter linkage is working normally when turning the throttle grip. Recoil Starter ● ● Check the rope for wear and chafing. Check the ratchet engagement.
Clutch and Propeller System
● Check that clutch engages correctly when operating the shift lever. ● Visually Check propeller for bent or damaged blades. ● Check the propeller nut is tightened and the split pin is present. Adjust
Replace
Correct
Replace Correct or replace
Installation of Motor
● Check all the bolts attaching the motor to the boat. ● Check the thrust rod installation. Tighten
Cooling Water ● Check that cooling water is discharged from the cooling water check port after the engine has started. Repair
Tools and Spares
● Check that there are tools and spare parts for replacing spark plugs, the propeller, etc. ● Check that you have the spare rope. Steering Devices ● Check the operation of the steering handle. Repair
Other Parts ● ● Check if the anode is securely installed. Check the anode for corrosion and deformation. Repair if necessary Replace
Maintaining engine oil
If the engine oil is low, the life of the engine will be shortened significantly.
■ Checking oil level ① Stop the engine and set it in a vertical position. ② Remove the top cowl. ③ Remove the oil filter cap. ④ Wipe oil on the oil dipstick with a clean rag. ⑤ Screw in the dipstick into the oil filter mouth (screw in completely). ⑥ Take out the dipstick and check the oil level. ⑦ Reset the dipstick in to the oil filter mouth.
Oil Filler Cap (Dipstick)
Upper Level 450 mL
Lower Level 350 mL
Notes
The oil level should be checked when the engine is cold.
Notes
Consult with an authorized dealer if the engine oil is milky color, or appears contaminated.
■ Replenishing engine oil If the oil level is low, or at lowest mark, 上限 450ml add recommended oil to the upper dipstick mark. 下限 350ml
! CAUTION
● Do not add engine oil of brand and grade other than existing one. In case engine oil of other brand or grade is added, drain all oil and ask dealer for treatment. ● In case other than engine oil such as gasoline is put in the oil chamber, empty the chamber and ask dealer for treatment. ● When replenishing engine oil, be careful not to allow entry of foreign matters such as dust and water into oil chamber. ● Wipe off engine oil well immediately if spilled. ● Do not replenish engine oil over upper limit. If overfilled, remove oil to upper limit. If engine oil is over the upper limit, it can leak potentially leading to engine damage.
Washing outboard motor
If outboard motor is used in salt water, brackish water or water with a high acidic level, use fresh water to remove salt, chemicals or mud from exterior and cooling water passage after every cruising or before storing outboard motor for long time. Before flushing, remove the propeller and the forward thrust holder.
! CAUTION
Keep cooling water passage free of clogs, or lack of cooling water flow could lead to engine overheating, potentially resulting in engine trouble.
Notes
It is recommended to check chemical properties of water on which your outboard motor is regularly used.
! WARNING
Do not start engine without removing propeller, or accidentally turning propeller could cause personal injury.
! WARNING
Never start or operate the engine indoors or in any space which is not well ventilated. Exhaust gas contains carbon monoxide, a colorless and odorless gas which can be fatal if inhaled for any length of time. ■ Use flushing attachment. ① Remove propeller (refer to Propeller
Replacement). Remove the water plug from the motor, and screw in the flushing attachment. ② Attach a water hose to the flushing attachment. Turn on the water and adjust the flow. (Be sure to seal the water inlet, located in the gear case, with tape.) ③ Start the engine and run it at idle speed in neutral shift position. ④ Check for a steady stream of water flowing out of the water pump indicator hole. Continue flushing the outboard motor for 3 to 5 minutes, carefully monitoring water supply at all times. ⑤ Stop the engine, turn off the water, and remove the flushing attachment and tape. Reinstall the propeller.
Flushing Attachment (option)
! CAUTION
Keep engine at idle speed during flushing.
Replacing the propeller
A worn-out or bent propeller will lower the motor's performance, and cause engine trouble. Before removing the propeller, remove the spark plug caps from the spark plugs to protect against personal injury.
① Remove the split pin, propeller nut and washer. ② Remove the propeller and thrust holder. ③ Apply genuine grease to the propeller shaft before installing a new propeller. ④ Install the thrust holder, propeller, washer and propeller nut onto the shaft. ⑤ Install a new split pin into the nut hole and bend it.
! WARNING
Do not begin propeller removal and installation procedure with spark plug caps attached, shift in forward or reverse, main switch at other than "OFF", engine stop cord attached to the switch, and starter key attached, or engine could accidentally start leading to serious personal injury. Disconnect battery cable if possible. ● Do not install propeller without thrust holder, or propeller boss could be damaged. ● Do not reuse split pin. ● After installing split pin, spread the pin apart to prevent it from falling out which could lead to the propeller coming off during operation.
Propeller shaft holder
Propeller
Washer Nut

Split pin
! WARNING
Do not hold propeller with hand(s) when loosening or tightening propeller nut. Put a piece of wood block between propeller blade and anti-ventilation plate to hold propeller.
! CAUTION

Replacing the spark plugs
! WARNING
● Do not reuse spark plug with damaged insulation, or sparks can leak through crack, potentially leading to electric shock, explosion and/or fire. ● Do not touch spark plugs immediately after stopping engine as they will be hot and could cause severe burns if touched. Allow motor to cool down first.
If the spark plug(s) is fouled, has carbon build up, or is worn, it should be replaced. When reusing spark plugs, remove dirt from the electrodes and adjust spark gap to specification.
① Stop the engine. ② Remove the top cowl. ③ Remove the spark plug caps. ④ Remove the spark plugs by turning it counter-clockwise, using a 5/8" socket wrench and handle.
Use spark plug NGK DCPR-6E. ⑤ Attach spark plug and tighten to specified torque.
Notes
When inspecting the plug, always clean the gasket surface and use a new gasket. Wipe off any dirt from the threads and screw in the spark plug to the correct torque.
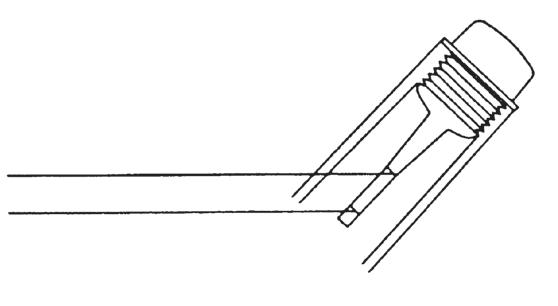
Electrode
Spark gap (0.8 to 0.9 mm, 0.031 to 0.035 in)
Notes
◎ Spark plug torque : 18.0Nm(13.3ft-lb)(1.84kgf-m) If a torque-wrench is not available when you are fitting a spark plug, a good estimate of the correct torque is 1/4 to 1/2 a turn past finger-tight. Have the spark plug adjusted to the correct torque as soon as possible with a torque-wrench.
Replacing the anode
A sacrificial anode protects the outboard from galvanic corrosion. Anode is located on the gear case and the cylinder. When the anode is eroded more than 2/3, replace it.
Notes
● Never grease or paint the anode. ● At each inspection re-tighten the anode attaching bolt. As it is likely to be subjected to electrolytic corrosion.