1 minute read
Removal and Installation of 5 Stack Solenoid


Warning ・ Be sure to release hydraulic pressure before beginning work.
Caution ・ Be sure to stop the engine before beginning work.
Items to prepare •Wrenches (13 mm, 17 mm, 19 mm, 22 mm) •Marking pen •Cap •Plug •Rag •Cleaning fluid 1.Removal of 5 stack solenoid valve [1] Attach the specialty adapter (1) to the area where the air breather is removed and set the vacuum pump (2). Create negative pressure in the hydraulic oil tank using the vacuum pump.
[2] Use a wrench (13 mm) to remove the 2 cover bolts (3) and then remove the cover (4).
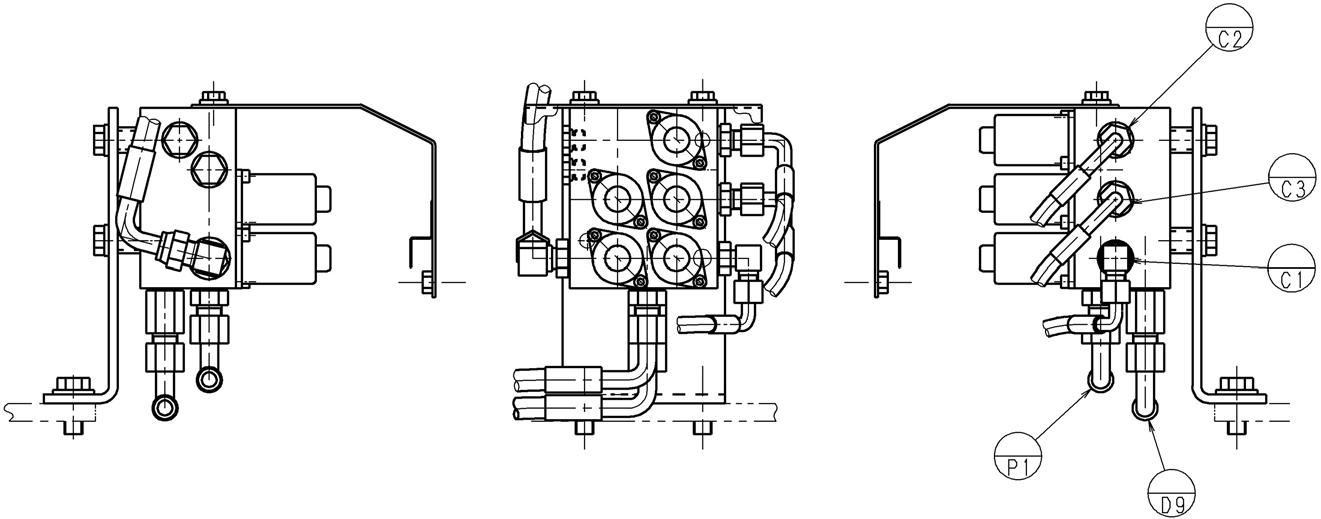
[3] Remove the 5 connectors (5).
[4] Use a wrench (19 mm) to remove the hoses (6), (7) and (8). •Mark the solenoid valve and hoses so that the connectors match at the time of assembly. •Use caps or plugs to cover the solenoid valve and hoses to prevent any entry of water, dust or dirt. •Clean the solenoid valve and hoses by spraying them with a parts cleaner to prevent scratches and prevent dirt from accumulating on the connectors.
[5] Use a wrench (22 mm) to remove the hoses (9) and (10). •Mark the solenoid valve and hoses so that the connectors match at the time of assembly. •Use caps or plugs to cover the solenoid valve and hoses to prevent any entry of water, dust or dirt. •Clean the solenoid valve and hoses by spraying them with a parts cleaner to prevent scratches and prevent dirt from accumulating on the connectors.
[6] Use a wrench (22 mm) to remove the hose (11). •Mark the solenoid valve and hose so that the connector matches at the time of assembly. •Use a cap or a plug to cover the solenoid valve and hose to prevent any entry of water, dust or dirt. •Clean the solenoid valve and hose by spraying them with a parts cleaner to prevent scratches and prevent dirt from accumulating on the connector.
[7] Use a wrench (17 mm) to remove the 2 bolts (12), and then remove the 5 stack solenoid valve (13).
2.Installation of 5 stack solenoid valve
Perform the reverse of the removal procedure.
The hose connections and electrical connector connections are indicated below.