2 minute read
Removal and Installation of Lower Roller

from Sumitomo SH250-5 SH250-5LR Hydraulic Excavator Service Repair Manual WLSM2105-00W - PDF DOWNLOAD

Warning ・ Do not get under the main unit when it is jacked up.
Make sure to place the main unit on wood planks to prevent falling. ・ When loosening the grease cylinder check valve, loosen it a little at a time and stop when any grease appears. (The pressure inside the cylinder is very high, so there is the danger of grease being expelled and the plug flying off if the check valve is loosened too much.)
Caution ・ Be sure to stop the engine before beginning work.
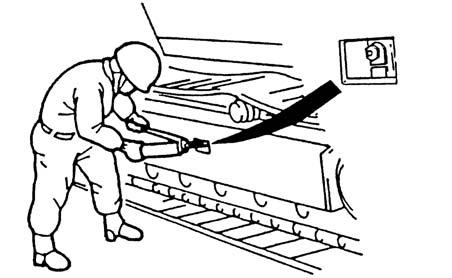
Items to prepare •Box wrenches (19 mm, 27 mm) •Rag •Cleaning fluid •Wood planks, etc. 1.Removal of Lower Roller [1] Use a box wrench (19 mm) to loosen the check valve (1), and then loosen the shoe tension. Do not loosen the check valve all at once. Loosen it slowly while monitoring the grease output and shoe loosening. •Grease drains out, so provide rag (2) close to the drain port.
1 Check valve 2 Rag
[2] Jack up the side frame as in the diagram on the side where the roller is being replaced.
Jack up so that the shoe is floating about 5 cm and insert wood planks (3) under the lower frame to prevent falling.
[3] If it is impossible to insert wood planks (3) under the lower frame, insert wood planks (4) between the side frame and the link shoe (5) to separate the link shoe and lower roller (6) by about 15 mm.
[4] Use a box wrench (27 mm) to remove the 4 bolts (7), and then remove the lower roller (6).
3 Wood plank 4 Wood plank 5 Link shoe 6 Lower roller
2.Installation of Lower Roller [1] Perform the reverse of the removal procedure. Apply Loctite to the bolts and tighten them to the specified torque. Tightening torque: 371 - 432 N•m [2] Tighten the check valve (1). While monitoring the track shoe tension, inject grease into the grease cylinder.
[3] To adjust the track shoe tension, raise the lower side frame as shown in the diagram.
Place a wood plank (2) under the lower frame to prevent falling.
Adjust the tension so that the distance indicated with A between the lower frame (3) of the center area of the lower side frame and the lowest hanging part of the shoe plate (4) is 280 - 300 mm.
1 Check valve 2 Wood plank 3 Frame 4 Shoe plate
