17 minute read
Selecting a DC-to-AC Inverter


Fig. 11-14. The “wiggle test” on a shore-power cord.
AC Resistive Equipment Checks
Advertisement
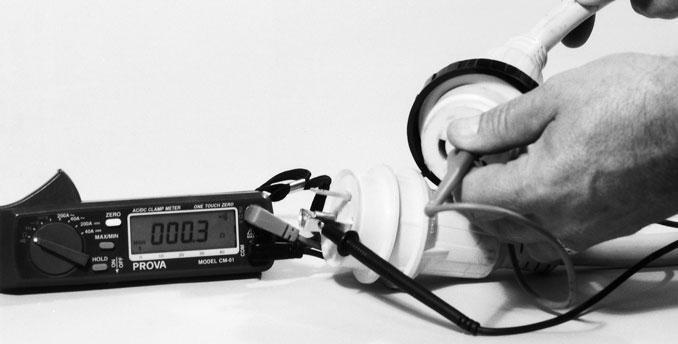
To determine if the heater element in a hot-water heater (or any other appliance using a heating element) is OK, you can also perform a continuity test. First make certain that the breaker for the heater is off, and verify that power is not present by using the inductive tester described earlier and shown in figure 11-10 on page 167. Next, attach your meter to the black and white leads, respectively, at the terminal junction on the heater and check the resistance reading through the heating element.
A resistance reading is to be expected if all is well. If you get a reading of infinity or “OL” on your meter, the element has developed an open circuit inside the heater, and the heater or the element will have to be replaced.
Figure 11-15shows this test being performed on a good element, with a typical resistance reading shown on the meter.
Popular with the sailboat crowd for some time now, 12-volt-DC-to-120-volt-AC inverters are also becoming increasingly popular among owners of small powerboats. The reasons for this trend are quite simple. Space on small boats is at a premium, so a generator installation is usually out of the question. Cost may also be a consideration. Entry into the silent world of inverter power is considerably less expensive than purchasing a generator. Noise and the exhaust fumes created by a generator are simply undesirable if a better alternative exists. Further, many of the inverters available actually work in two directions, creating the AC you want and also acting as high-end, multistage battery chargers for use at the dock when you’re plugged into shore power. At least for limited use, the DC-to-AC inverter has changed the way many small-boat owners satisfy their craving for AC power on board. Engineers have designed inverters that can produce as little as 50 watts to as much as 3,000 watts of continuous power—more than enough for most small powerboats.
Fig. 11-15. A continuity test on a hot-water heater element.

Selecting an Inverter
Nothing comes without a price, and although these electronic marvels are quite capable of producing adequate AC power, they need a fairly substantial DC power source to keep them running. This in itself can be the limiting factor on some boats. Batteries are heavy, and they too take up space. When selecting an inverter and designing the system that will support it, there are some important considerations you must make to ensure your ultimate satisfaction.
Classically, people go through a period of denial about their personal AC consumption whenever the topic of inverters or generators comes up. Daily power consumption is the key to sizing not only the inverter itself, but also the battery bank that’s going to feed it. Use of an inverter on board ties into much of the discussion throughout this book. Battery types, amp-hour ratings, reserve capacity, wattage—all of these factors must be given serious consideration if you hope to be successful with an inverter selection and installation. AC Need Analysis
The first step in inverter consideration is to perform an honest and accurate analysis of your daily AC usage. If all you want is to occasionally recharge a laptop computer or rechargeable electric-drill battery, your needs are minimal. You’ll be served well by one of the small portable inverters on the market today. But, if you intend to run a TV, microwave oven, and possibly a refrigeration system in addition to supplying outlets for use with things like hair dryers and coffee makers, you’re going to need an inverter that packs some real punch. What this all boils down to is wattage and how many hours per day you’ll be using these appliances.
Be sure to consider usage; many of the appliances you’ll be running from the inverter will be used intermittently. If you’re going to be running a microwave simultaneously with a coffee maker, your total wattage needs could easily be as much as about 2,500 watts. Your inverter will need to have the power to deliver at least 2,500 watts in this scenario; the smaller 1,000-watt inverter simply won’t do the job.
Determining the AC wattage you need is easy. As already stated, wattage, or possibly volts and amps, must be indicated on the appliance. If the value is given in volts and amps, simply multiply the voltage by the amperage to determine the wattage of the appliance. Make a list of all the appliances you intend to run with the inverter, and pay particular attention to the subtotals of gear you expect to run simultaneously. If money is no object, simply add up the wattage for all the appliances you expect to use. Size your inverter to handle all the possible loads you’ll run simultaneously.
The bottom line here? Don’t cheat! Remember, as already stated, people tend to underrate their AC usage, buy too-small inverters, and end up disappointed after all is said and done. This can’t be emphasized enough.
Figure 11-16on page 172 shows a sample wattage load-analysis sheet for determining the size of the inverter to select based on wattage.
Next, you’ll need to make some decisions about how many hours each day you’ll be running the various appliances listed in your inventory. This will help determine battery-bank size. You must also take into account the loss through the inverter as it performs its magic. This loss is really a form of voltage drop and represents the conversion of some of the DC to heat as it’s inverted. Typically, inverters are about 90 percent efficient, so you can expect to lose about 10 percent of the available amp-hours from your supplying battery bank through the inverter. That, and the fact that you really don’t want to discharge even the best batteries much below 50 percent of their capacity, should tell you that you’re going to need some serious DC capacity (i.e., big batteries) to make this all work as it should.
Figure 11-17on page 172 shows a typical amphour calculation table that should be used to determine total amp-hour consumption between battery charge cycles when plugged into shore power.
Once you have determined your daily amp-hour requirements, you need to think about how many days you might be away from shore power and how frequently you’ll be charging your batteries with the
Wattage Calculation Worksheet
Appliance . . . . . . . . . . . . .Rated Wattage . . . Start-up Wattage
Total wattage Use this table to list all of your AC appliances. Find out the wattage by checking the UL labeling on the appliance. Start-up wattage applies to appliances such as refrigeration devices (refrigerators, ice makers, air conditioners). In the case of inverters, the medium- to larger-sized units all have an intermittent-output rating that’s usually more than twice the rated continuous output in watts; this is to allow for the needed start-up watt requirements of these appliances. Be sure to check the specifications of the unit you’re working with to make sure its rating is adequate. In the case of generators, if sized properly, a typical 20–30 percent overrating for total maximum draw will take care of this momentary need, especially since it’s unlikely that you’ll have all of your appliances running simultaneously for an extended period of time.
Fig. 11-16. Wattage load analysis sheet for inverter or generator selection.
Use Time/Minutes-Hours Amp-Hours Used (Typical) Appliance . . . . . . . . . . .5 min. . .15 min. . .30 min. . . .1 hr. . . . .2 hr. . . . .3 hr. . . . .8 hr. . . . .24 hr. 13-inch color TV . . . . . . . . . . . .0.5 . . . . . . .1 . . . . . . . .2 . . . . . . . .5 . . . . . . . .9 . . . . . . .14 . . . . . . .37 . . . . . .110 VCR . . . . . . . . . . . . . . . . . . . .0.5 . . . . . . .1 . . . . . . . .2 . . . . . . . .5 . . . . . . . .9 . . . . . . .14 . . . . . . .37 . . . . . .110 Curling iron . . . . . . . . . . . . . . .0.5 . . . . . . .1 . . . . . . . .2 Table lamp . . . . . . . . . . . . . . . .1 . . . . . . . .2 . . . . . . . .5 . . . . . . . .9 . . . . . . .18 . . . . . . .28 . . . . . . .74 . . . . . .221 3-cu. ft. refrigerator . . . . . . . . . . . . . . . . . . . . . . . . . . . . .2 . . . . . . . .5 . . . . . . . .9 . . . . . . .14 . . . . . . .37 . . . . . .110 Blender . . . . . . . . . . . . . . . . . .2 . . . . . . . .7 . . . . . . .14 3⁄8-inch drill . . . . . . . . . . . . . . . .4 . . . . . . .12 . . . . . . .23 20-cu. ft. refrigerator . . . . . . . . . . . . . . . . . . . . . . . . . . .12 . . . . . . .23 . . . . . . .46 . . . . . . .69 . . . . . .183 . . . . . .550 Mid-size microwave . . . . . . . . . .7 . . . . . . .21 . . . . . . .41 . . . . . . .83 . . . . . .166 . . . . . .249 Coffee maker . . . . . . . . . . . . . .8 . . . . . . .23 . . . . . . .46 . . . . . . .92 . . . . . .183 Vacuum cleaner . . . . . . . . . . . . .8 . . . . . . .25 . . . . . . .50 . . . . . .101 . . . . . .202 . . . . . .302 Full-size microwave . . . . . . . . . .12 . . . . . . .34 . . . . . . .69 . . . . . .138 . . . . . .275 . . . . . .413
Fig. 11-17. Amp-hour calculation table for determining the correct size of an inverter battery bank.
engine’s alternator while underway. If you expect to be using this system for weekend jaunts at anchor, you must multiply everything by two. If you expect to be away from shore power for a week, multiply by seven, and so forth. Once this is done, go back to chapter 5 and refer to figure 5-2 on page 71, which shows typical battery amp-hour ratings. Take a common group 27 battery, for example. It has a typical amp-hour rating of about 105 amps. You can only use a little over 50 of these to prevent excessive battery discharge, so if your daily consumption requires 100 DC amps, you’ll need at least two of these group 27 batteries for each day away from the dock.
Figure 11-18shows two formulas for determining battery-bank size based on known amps or watts. Figure 11-19lists some common AC appliances and their approximate wattage ratings.
Installing an Inverter
After determining inverter and battery-bank sizing, you may be considering the possibility of installing an inverter on your own. The truth is, to install all but the simplest inverter with its own self-contained plug outlets goes well beyond the scope of this book and certainly the abilities of the average boatowner. There are many considerations to make, and even experienced electricians often overlook some of the fine points of the ABYC’s recommendations for inverter installation. If you’re thinking of adding an inverter to your boat, the best bet is to try and find an ABYCcertified marine electrician. The certified tech will be quite familiar with all the nuances of inverter installation, and the end result will be well worth the labor expense here.
Having said that, the list of general guidelines that follows will enable you to at least converse with a professional electrician intelligently to come up with an installation solution that satisfies your needs.
Presently no one makes an ignition-protected inverter. The nature of the beast is that internal switching must be accomplished during operation, and this switching process can create some arcing as the unit is working. For this reason, extreme care must be taken when selecting a location to mount the unit. If your boat is gasoline fueled, the inverter must be located in a compartment outside the engine room. Further complicating the issue is the fact that manufacturers of inverters prefer to have them mounted as close to the battery bank feeding them as possible. The reason for this is to minimize the effects of voltage drop in the DC feeder wires to the inverter.
Minimal voltage drop is a must if the unit is going to achieve the 90 percent efficiency mentioned ear-
Formula for Determining Battery-Bank Size
(taking inverter inefficiency into consideration) To find the amp-hours drawn from the batteries by any given AC appliance powered by the inverter, you must find the AC amperage or wattage consumed and apply one of the equations shown here.
DC Amp/Hours = AC amps × 10 × 1.1 × hours of use
DC Amp/Hours = AC watts ÷ 12 × 1.1 × hours of use
Fig. 11-18. Battery-bank size determination.
Fig. 11-19. Common AC appliances and their wattage requirements.
Typical AC Appliance Wattage Requirements
Appliance . . . . . . . . . . . . . . . . . . . . . . .Wattage Television . . . . . . . . . . . . . . . . . . . . . . . . . . . . .80–100 VCR . . . . . . . . . . . . . . . . . . . . . . . . . . . . . . . . . . .50 Stereo . . . . . . . . . . . . . . . . . . . . . . . . . . . . . . . . . .50 Curling iron . . . . . . . . . . . . . . . . . . . . . . . . . . . . . .50 Lamp . . . . . . . . . . . . . . . . . . . . . . . . . . . . . . . . . .100 Blender . . . . . . . . . . . . . . . . . . . . . . . . . . . . . . . .300 3⁄8-inch drill . . . . . . . . . . . . . . . . . . . . . . . . . . . . . .500 Orbital sander . . . . . . . . . . . . . . . . . . . . . . . . . . . .500 Ice maker . . . . . . . . . . . . . . . . . . . . . . . . . . . . . . .200 Small refrigerator . . . . . . . . . . . . . . . . . . . . . . . . . .150 Mid-size microwave . . . . . . . . . . . . . . . . . . . . . . . .900 Hand-held vacuum . . . . . . . . . . . . . . . . . . . . . . . .1,100 Hair dryer . . . . . . . . . . . . . . . . . . . . . . . . . . . . . .1,500
lier. Batteries give off explosive hydrogen gas when being charged and so need to be well ventilated to remove this gas.
Mounting an inverter close to batteries in an unventilated compartment, such as under a V-berth, is not a good choice unless adequate ventilation is added to create sufficient air exchange. Also, the inverter itself is heavy and must be securely mounted to a panel or bulkhead. Inverters must be kept cool to keep the efficiency up and to ensure the long life of the inverter itself. So again, the ventilation issue comes up. The inverter-location checklist that follows highlights these key points.
Inverters must be located in a compartment separate from gasoline engines and tanks.
Inverters must be located as close as possible to the batteries.
Inverters must be securely mounted to a bulkhead and through-bolted with adequate backing washers.
Inverters must be located in a well-ventilated location to allow for cooling of the unit and to allow any hydrogen gas that builds up as part of batterycharging to escape.
Further considerations, once a suitable spot for the inverter has been decided upon, have to do with proper circuit protection and system monitoring.
As for overcurrent protection, consider that both the AC and DC sides of the inverter will need some form of overcurrent protection installed. The output side of the inverter may have a circuit breaker built in, but it pays to double-check. As for the DC side, protection will need to be installed.
The special fuses (slowblow) used for this purpose are generally not provided as standard with the units, but are available as an option from the inverter manufacturers. These fuses and holders are rated for extremely high amperage and are generally described as class “T” fuses. As for the location of these fuses, the 7–40–72 inch rule applies. Refer back to chapter 4 if you need to refresh your memory. Figure 11-20shows this fuse installed in the DC positive feed to an inverter. As for system monitoring, to comply with ABYC recommendations your inverter will need to have some form of indication installed in or very near your existing AC panel (or if none exists as yet, near the existing DC panel) to let folks know that an inverter is installed on board, and when it’s on-line. This can be accomplished via the installation of a voltmeter, indicator light, or both. To simplify all this, spend the extra money and buy the inverter manufacturer’s optional system monitor! You can cover all the compliance issues in one shot, and get some features built into the dedicated system monitor that are extremely worthwhile. These monitors can provide important data such as volts, amps, amp-hours consumed, and time remaining on the supplying battery bank, to name just a few of the available functions. Figure 11-21 on page 175shows a typical inverter-monitoring system. This one is a “Link” unit from Heart Interface, now part of Xantrex. Fig. 11-20. A T-type fuse installed in an inverter DC feed cable.


