
10 minute read
Testing Your Batteries


Figs. 5-15a, b. The Blue Sea System battery combiner.
Advertisement
no battery isolator. Figure 5-13 shows a similar arrangement with the isolator. Figure 5-14 shows a twin-engine installation with dual battery switches and an isolator.
Battery Combiners
Relative newcomers to battery interconnectivity are devices known as battery combiners. These devices, available from all major marine equipment vendors, offer significant advantages over diode-type battery isolators. Unlike conventional isolators, combiners don’t suffer from the inherent voltage drop caused by diodes, which results in more precise battery charging control. These new combiners incorporate voltage-sensing circuitry that automatically connects or disconnects multiple batteries (combined) based on whether they are charging or discharging. You can think of these combiners as electronic devices with some built-in intelligence. Diode isolators do not have such intelligence, which requires you to make some compromises, especially when you are combining different kinds of batteries, such as a cranking battery and a deep-cycle battery. Cranking batteries recharge much more quickly than deep-cycle batteries. In the old days, this meant that when combining batteries, cranking batteries were typically overcharged while deep-cycle batteries continued to charge. The Blue Sea unit shown in figure 5-15a overcomes that problem by just turning off the charge to the cranking battery in the circuit once the battery reaches a prescribed voltage level. Additionally, the new combiners allow temporary isolation of house loads from the engine circuit during engine cranking to protect sensitive electronics. So there is no more “blinking out” of electronic gear during engine starting, when the whole system used to experience so much voltage drop that many electronic devices couldn’t function normally.
Even with proper maintenance, all batteries wear out eventually. The trick is to know when replacement is really required. In my 35 years of experience dealing with storage batteries, I’d say that they are the most frequently misdiagnosed component in any electrical system. People assume that because their engine is turning over more slowly than usual, the battery is at fault and it needs replacement. More often than not, the battery is not the culprit, but rather a loose or poor connection, or perhaps a fault with the charging system. Before you can make any real determination of the condition of your battery or begin any other serious testing, you must first test your battery. You need to recharge your battery first, then check the battery’s load-handling capability.
Hydrometer Test
So, what are these tests and what do they mean? Let’s start with the hydrometer test. Hydrometers are used to measure the specific gravity, the ratio of one liquid density against another. You’re likely to encounter two and possibly three types of hydrometers used to check battery electrolyte condition, antifreeze strength, and diesel-fuel quality. These hydrometers are all different and cannot be interchanged, and they are designed and calibrated against a standard for the liquid you’re checking.
A battery hydrometer is used to check the state of charge for each cell of a wet-cell battery. This test can only be performed on batteries that have removable cell caps—not gel-cells, AGMs, or sealed nomaintenance batteries.
Do you remember when I explained how a battery works? I described a chemical reaction where the acid is absorbed into the battery plates, leaving only water. The hydrometer measures the change of the electrolyte from acid to water and tells us the percent of charge of each cell in the battery. Knowing the percent of charge does not tell you whether or not you need a new battery. If all the cells are equally low, something is either discharging the battery or you have a charging-system problem. The only other possibility is that there are one or two bad cells, and the battery has discharged the good cells into the bad cells, equalizing the hydrometer readings.
You’re looking for a different reading between cells. If all the cells are equally low, recharge the battery and recheck the specific gravity for any variation between cells. One low cell after recharging indicates a battery on its way out.
Three very important points must be made regarding specific-gravity testing: 1. Don’t attempt the test immediately after adding water to a cell. 2. Don’t test immediately after charging. 3. Do test only after the electrolyte mixes and the battery stabilizes.
This stabilization may take an hour or so, or you can bring down what is known as the static charge by putting a load on the battery for about 15 seconds after the recharge to stabilize the battery. It’s still better to wait a while, but loading the battery will give a quick stabilization. Remember that the variation between cells is more important than the actual maximum specific gravity reading.
Most quality hydrometers have a built-in thermometer, and it’s not there to tell you it’s time to go to the beach. Specific gravity is calibrated at 80°F. To compensate for readings above or below this temperature, add or subtract 4 points for each 10° your reading is below or above 80°. This compensation can make the difference between condemning your battery or hanging onto it for another season. Maximum specific gravity readings for electrolyte from a charged battery will range from 1.260 to 1.280, as compared to pure water with a specific gravity of 1.000.
At a hydrometer reading of 1.260, the electrolyte
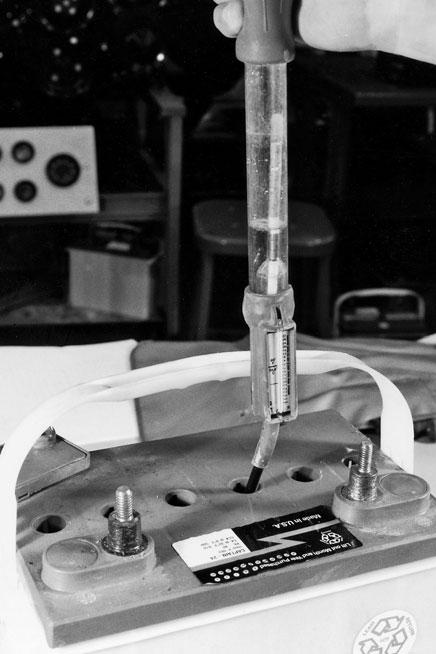
Fig. 5-16. Temperature-compensated hydrometer in use.
is 0.260 times as heavy as water because of the sulfuric acid in the solution. As the battery discharges, the acid leaves the water and goes into the plates in the cell, and the specific gravity moves closer to 1.000. A specific gravity reading that shows a 50point difference between any two cells after recharge and stabilization indicates that your battery needs replacement.
Figure 5-16shows a hydrometer in use. Experiment a little if you’re going to use this method of checking your batteries.
Always wear safety goggles when working around batteries. Hold the hydrometer in an upright position and draw in just enough electrolyte to float the bulb—no more or less. Too much electrolyte in the hydrometer tops out the bulb and gives you a false high reading. When not enough electrolyte is drawn into the hydrometer, the bulb float indicates a bad cell that’s really good. Carefully squeeze the electrolyte back into each cell as you check and record each cell’s reading. When you have taken a reading from each cell, wipe away any electrolyte drips from the battery top and throw out the rag.
Open-Circuit Voltage Test
The newer sealed batteries cannot be checked with a hydrometer, but you can still test the specific gravity on these batteries. You can’t compare individual cells within a sealed battery, because you don’t have a way to get into them. However, this test is still a good way to evaluate the overall state of charge of a sealed battery. If you have a digital voltmeter built into your boat’s instrumentation, you can continually monitor the state of charge.
This test is called the open-circuit voltage test. If you don’t have a built-in meter, you can use your multimeter and take a reading right at the battery terminals.
Figure 5-17shows the voltmeter connected to a battery for an open-circuit voltage test. Be sure all accessories are turned off when performing this test; otherwise you’ll get a low reading.
There is a direct relationship between specific gravity and a battery’s open-circuit voltage. You need a digital voltmeter for this test, as the accuracy required is difficult to read on an analog unit. As with the hydrometer test, the battery must be stable. A heavy load or a recharge just before doing this test will give you a totally inaccurate reading. Let the battery sit for an hour or so before the test, and your multimeter will give you a meaningful reading. Use a digital voltmeter hooked up as shown in figure 5-17, and compare the reading to the table at right; this will give you a good indication of your battery’s state of charge.
Battery
Fig. 5-17. Voltmeter connected for an open-circuit voltage test. This test will give you an indication of the battery’s state of charge, but can’t tell you which cell within the battery is the culprit.
Load Test
The load test tells you whether the battery has enough amperage to back up the open-circuit voltage
Open-Circuit Voltage versus State of Charge/Specific Gravity
Open-Circuit State of Specific Voltage . . . . . . . .Charge (%) . . . . . . . . .Gravity
11.7 . . . . . . . . . . . . . . . . .0 . . . . . . . . . . . . . . . . .1.120 12.0 . . . . . . . . . . . . . . . . .25 . . . . . . . . . . . . . . . .1.155 12.2 . . . . . . . . . . . . . . . . .50 . . . . . . . . . . . . . . . .1.190 12.3 . . . . . . . . . . . . . . . . .75 . . . . . . . . . . . . . . . .1.225 12.6 or more . . . . . . . . . .100 . . . . . . . . . .1.260–1.280
reading you took above. Open-circuit voltage readings can be misleading and give you a false sense of security due to a phenomenon known as the surface charge. A battery in poor condition may give you a reading as high as 12.5 volts or more if it has been sitting idle for a few hours. However, as soon as you try to crank your engine with this battery, you’ll hear that disheartening “click-click-click” sound that tells you there’s a battery problem. Load testing will give you some real answers about how your battery will perform when the chips are down.
An easy way to load-test your battery requires no special tools and is quite conclusive. Make sure all battery-cable connections are clean and tight. Next, disable your engine’s ignition system, or, if you have a diesel engine, activate the fuel shutoff so the engine won’t start during the test. To disable the ignition system on a gasoline engine, follow the workshop manual for the engine. On engines built from about 1992, you should be able to disconnect either a plug at the coil or distributor to disable the ignition system. Do not try to disable the ignition by removing the center high-tension lead on the coil; not only is this dangerous, but it could damage the ignition system. (More on this in chapter 7.) Once the ignition or diesel engine shutoff has been dealt with, hook up your voltmeter across the battery you’re testing, just as you did with the opencircuit voltage test. With the meter set to the DC volts scale, crank the engine over for no more than about 15 seconds. Carefully observe the meter’s lowest reading in volts during the cranking. If it drops below 9.6 volts, perform a three-minute charge test to determine if the battery is worth saving. With electronically fuel-injected engines, the minimum cranking voltage allowed is 10.5 volts.
Three-Minute Charge Test
Begin the three-minute charge test by disconnecting the battery’s ground cable to take the battery out of the boat’s circuitry. This will prevent any voltage spiking of precious electronic equipment you have on board. Next, connect your multimeter set to measure voltage across the battery terminals. Connect a battery charger with a quick-charge capability to the battery. The charger should have 40 to 50 amps of output, so it’s not your typical trickle-charger. Turn the charger on to about 40 amps and maintain this charge rate for three minutes while you observe your voltmeter. The battery is serviceable if the voltage reads less than 15.5 volts during the three minutes. Recharge the battery and redo the load test to be sure everything is OK. If the battery reaches more than 15.5 volts during this three-minute period, it’s time to replace the battery.
After going through this series of tests, you’ll know for sure whether you need a new battery or not. It may sound like a lot of effort, but really, these tests can be performed in less than half an hour. I don’t know about you, but I’d rather spend half an hour than $75 to $400 for a new battery.


