3 minute read
Main dimensions F156.7/F156.7A

from New Holland F106.7 F106.7A F156.7 F156.7A Grader Tier III Operator's Manual 84147951 - PDF DOWNLOAD

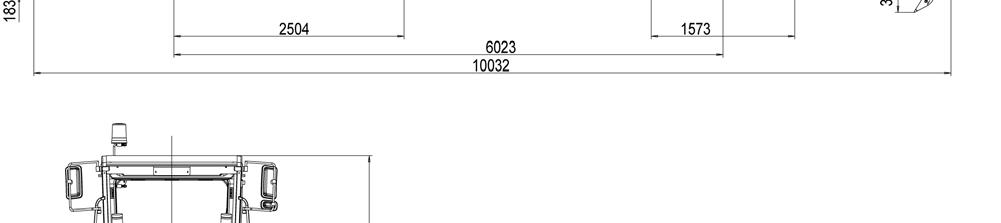
Main dimensions F156.7/F156.7A
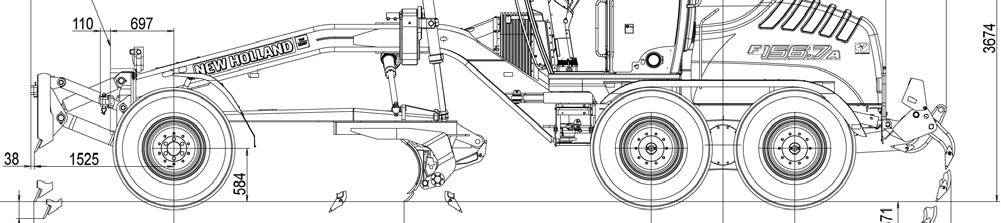

The Grader F156.7A with standard tyres 17.5-25 EM SGL Goodyear is shown. The dimensions that are influenced by tyres change when other tyres are used.
The Grader F106.7A with standard tyres 405/70 R20 SPT9 is shown. The dimensions that are influenced by tyres change when other tyres are used.
Tyres F106.7/F106.7A Height Tread Width across tyres
405/70 R20 SPT9 Dunlop 0 0 0 420/75 R20 XMCL Michelin +29 +60 +110 455/70 R20 SPT9 Dunlop -9 0 +4
The Grader F156.7A with standard tyres 17.5-25 EM SGL Goodyear is shown. The dimensions that are influenced by tyres change when other tyres are used.
Tyres F156.7/F156.7A Height Tread Width across tyres
17.5-25 EM SGL Goodyear 0 0 0 17.5-R25 EM XHA Michelin +2 0 -7 17.5-R25 EM XTLA Michelin -9 0 +4 17.5-R25 RM94 Pirelli +31 0 -23
Instrument panel warning and monitoring elements
40001278.00-en
Fig. 1
1 Brake pressure warning lamp 9 Steering pressure/emergency steering pressure warning lamp 2 Main beam indicator lamp 10 Parking brake indicator lamp 3 Transmission oil temperature indicator 11 Turn signal monitoring lamp – right 4 Main warning indicator (YELLOW) 12 Fuel gauge 5 Multi-function LCD display 13 Fuel tank warning lamp 6 Main warning indicator STOP (RED) 14 Engine coolant 7 Hydraulic fluid temperature indicator 15 Turn signal monitoring lamp – left 8 Preheating monitoring lamp
The combination instrument monitors numerous functions and can be adapted to the respective requirements of the driver. It not only monitors vehicle functions, but it also attracts the driver’s attention to potential malfunctions and indicates the necessity of taking appropriate measures after the occurrence of possibly critical malfunctions. After the ignition is turned on, the combination instrument performs the following self-test: 1. Set the ignition switch to position I. 2. The combination instrument automatically checks all monitored systems. 3. All light-emitting diodes (LEDs) light up for 2-3 seconds. 4. The four analogue instruments are initialised and are switched on for 2-3 seconds. 5. The warning tone sounds for 2-3 seconds. 7. If no faults are detected during the test, all monitored systems reset to their normal function. 8. If only some of the LEDs light up, the combination instrument must be replaced. 9. If the LEDs light up without a warning tone being sounded, the combination instrument must be replaced. 10. If a warning is sounded without the LEDs being lit up and if the power supply to the acoustic warning system is not in order, the combination instrument must be replaced. If the power supply of the acoustic warning system is in order, the warning system is defective and must be replaced. 11. If no warning is sounded and if the LEDs in the combination instrument do not light up, the power supply must be checked as described below.
Operation of the multi-function LCD display
40001315.00-en
Switching between individual screens of the multi-function LCD display
Fig. 1
There is a keypad for below the steering column. The keypad can be used by the driver to proceed from one screen to the next, to select different items, to monitor the vehicle functions and to recall info texts. All functions can be accessed in the same way. A Interrupt key/Escape: With this key, the driver can exit a submenu screen and go back to the travel information screen, discard changes made and recall active fault codes.
B Entry key/Enter: This key confirms the selection of a specific function and stores the entry C Up key: This key is used for scrolling up through the screen selection. D Down key: This key is used for scrolling down through the screen selection.
NOTE: The scrolling direction (up or down) from the actual position is indicated by arrows on the screen.
Using the arrow keys
During operation or when the ignition is on, the driver can use the arrow keys (C/D, Fig. 1) to select between three independent data screens and two travel information screens. These five screens are arranged in a loop and can be called up one after another with the arrow keys. For the screen sequence shown below only the DOWN key is used (D, Fig. 2).
NOTE: Pressing the interrupt key (A, Fig. 1) switches the LCD display back to normal main screen.
Fig. 2