3 minute read
sleeve replacement

from MTU 12V4000M23F_ 12V4000M23S_ 16V4000M23F_ 16V4000M23S_ MS150068_01E Diesel Engine Operating Instruc

Preconditions
☑Engine is stopped and starting disabled.
Special tools, Material, Spare parts
Designation / Use Torque wrench, 6-50 Nm Filter wrench Cleaner Hakutex 60 Grease (Kluthe Hakuform 30-10/emulsifier) Filter sleeve Sealing ring Sealing ring Sealing ring
Part No. Qty. F30027336 F30379104 1 1
X00029933 (→ Spare Parts Catalog) (→ Spare Parts Catalog) (→ Spare Parts Catalog) (→ Spare Parts Catalog) 1
WARNING
WARNING Hot oil. Oil can contain combustion residues which are harmful to health.
Risk of injury and poisoning!
• Wear protective clothing, gloves, and goggles / safety mask. • Avoid contact with skin. • Do not inhale oil vapor.
Compressed air gun ejects a jet of pressurized air.
Risk of injury to eyes and damage to hearing, risk of rupturing internal organs!
• Never direct air jet at people. • Always wear safety goggles/face mask and ear defenders.
1. Remove clamp (14). 2. Release Tommy nut (2) and take off cover (1). 3. Carefully lift rotor (11), allow oil to drain and remove from housing. 4. Holding the rotor (11) firmly, release rotor cover nut (3). 5. Take off rotor cover (4). 6. Remove filter sleeve (6). 7. Measure layer thickness of oil residues on filter sleeve (6). Result: If the oil residues exceed the maximum layer thickness of 45 mm, shorten the maintenance interval. 8. Disassemble rotor tube (7), conical disk (8) and rotor base (10). 9. Wash rotor cover (4), rotor tube (7), conical disk (8) and rotor base (10) with cold cleaner. 10. Blow out with compressed air. 11. Check sealing ring (9), fit new one if necessary. 12. Assemble rotor tube (7), conical disk (8) and rotor base (10) with sealing ring (9). 13. Insert new filter sleeve (6) in rotor tube (7) with the smooth paper surface facing the outer wall. 14. Check sealing ring (5), fit new one if necessary. 15. Mount rotor cover (4) with sealing ring (5). 16. Tighten rotor cover nut (3) with torque wrench to the specified torque.
Name
Nut Size Type Tightening torque Lubricant Value/Standard 35 Nm to 45 Nm
17. Place rotor (11) in housing (12) and check for ease of movement. 18. Check sealing ring (13), fit new one if necessary. 19. Fit sealing ring (13) on housing (12). 20. Fit hood (1). 21. Tighten Tommy nut (2) by hand. 22. Install clamp (14) and tighten with torque wrench to the specified torque.
Name
Clamp Size Type Tightening torque Lubricant
23. Tighten cover nut (2) with torque wrench to the specified torque.
Name
Screw Size Type Tightening torque Lubricant Value/Standard 8 Nm to 10 Nm
Value/Standard 5 Nm to 7 Nm
Cleaning centrifugal oil filter and replacing filter sleeve (engines with switchable oil filter)
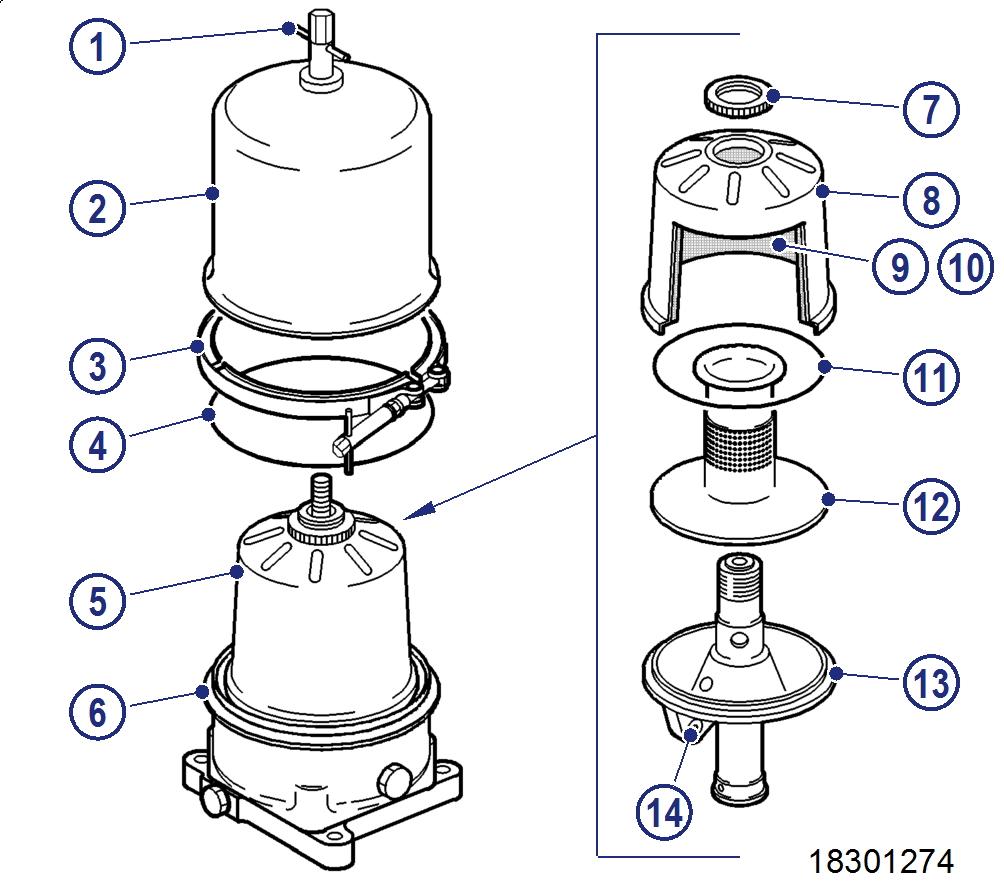
1. Undo and remove screw (1). 2. Remove clamp (3) and take off hood (2). 3. Carefully remove rotor (5) from housing. 4. Hold rotor assembly (5) firmly in position with filter wrench and undo knurled nut (7). 5. Take off rotor cap (8). 6. Remove filter sleeve (9), stiffener plate (10) and sealing ring (11). 7. Measure thickness of oil residues on filter sleeve. 8. If maximum layer thickness of oil residues exceeds 30 mm, shorten maintenance interval. 9. Remove standpipe (12) from lower rotor section (13). 10. Wash hood (2), rotor cap (8), stiffener plate (10), standpipe (12), lower rotor section (13) and nozzles (14) with cleaner and blow out with compressed air. Do not use sharp objects for cleaning. 11. Check nozzles (14) for obstructions. 12. Push standpipe (12) onto rotor lower section (13). 13. Insert new filter sleeve (9) with stiffener plate (10) into rotor cap (8), ensuring that the smooth surface of the filter sleeve (9) faces the rotor cap (8). 14. Check sealing ring (11), replace if necessary. Coat sealing ring with grease and insert in groove of rotor cap (8). 15. Place rotor cap (8) onto standpipe (12). 16. Hold rotor assembly (5) firmly in position with filter wrench and tighten knurled nut (7). 17. Lubricate bearings of rotor (5), insert in housing (6) and check for ease of movement. 18. Check sealing ring (4), replace if necessary. Fit sealing ring on housing (6). 19. Fit hood (2). 20. Tighten screw (1) by hand. 21. Install clamp (3) and tighten to specified torque using a torque wrench:
Name
Clamp Size Type Tightening torque Lubricant Value/Standard 6 Nm + 1 Nm
22. Tighten screw (1) to specified torque using a torque wrench:
Name
Screw Size Type Tightening torque Lubricant Value/Standard 6 Nm + 1 Nm