72 minute read
Internal Equipment


Sunroof
The sunroof is electrically controlled and can only be operated with the ignition key in the MAR (ON) position. It can slide and be raised at the rear (tilting).
The sunroof is equipped with a fingertrap prevention system designed to control sliding when the roof is being closed or tilted. If an obstacle interferes with the roof travel during the closing stage, the sunroof stops and reverses its travel a short way back.
WARNING: In the event of rain, always close the sunroof to prevent the water from staining the fabric/leather upholstery.
Improper use of the sunroof can however be dangerous, even with the finger-trap prevention system. Before and during the sunroof operation, always make sure that passengers are not exposed to the risk of injuries caused both by the moving roof and by personal objects dragged or hit by the sunroof itself. When you exit the vehicle, always remove the ignition key to avoid that the sunroof, if operated inadvertently, becomes a danger for passengers remaining onboard.
WARNING: Do not open the sunroof if there is ice on it: risk of damage.
Opening and closing
The selector switch A controls all the roof's movements.
There are 6 positions to open the sliding roof and 3 three positions for the tilted opening.
When the selector switch position has been chosen, the sunroof moves until it stops automatically in the position chosen.
Upon opening the sunroof, a front flap rises automatically in order to deflect the air flow.
WARNING: If the guide needs to be cleaned with solvents, the mechanisms, Bowden cables and sliding parts, such as the water channel slide, must be then greased.
Front dome light
The dome light includes a central light and two reading lights. The central light, which turns on automatically when one of the doors is opened and turns off following the door closing (timed switching off) may be switched on manually by pressing button B. The reading lights are controlled by the respective buttons C.
If they are turned on pressing the button, both the central and reading lights will remain on for about 15 minutes after turning the engine off, and then will turn off. When the exterior lights are turned on, the two night LEDs D illuminate.
Opening one or more doors, the front and rear dome lights will turn on for approx. 3 minutes. If the door is closed before this time has elapsed, the lights will switch off after about 10 seconds. Upon removing the key from the switch and activating the centralized door lock with the remote control, the dome lamps turn on for about 10 seconds. In the event of a collision causing the inertia switch to turn on, the dome lights turn on automatically for approx. 15 minutes.
Rear dome light
The dome light includes a central light and two reading lights. The central light, which turns on automatically when one of the doors is opened and turns off following the door closing (timed switching off) may be switched on manually by pressing button E. The reading lights are controlled by the respective buttons F.
If they are turned on pressing the button, the reading light will remain on for about 15 minutes after turning the engine off, and then will turn off.
When the exterior lights are turned on, the two night LEDs G illuminate.
HomeLink
This system allows you to control automatic gate and garage door opening devices, as well as lighting or alarm systems from inside the vehicle. Programmable directly on the transmitting station by means of the original remote controls for the devices to be controlled, it adapts to the existing systems. The control and programming panel is composed of three keys: H, I, J and a LED K.
Customer Assistance
If you have problems with training the HomeLink Universal Transceiver, or would like information on home products that can be operated by the transmitter, call (800) 355-3515. On the Internet, go to www.Homelink.com.
Important Safety Precautions
Always refer to the operating instructions and safety information that came with your garage door opener or other equipment you intend to operate with the HomeLink Universal Transceiver. If you do not have this information, you should contact the manufacturer of the equipment. While training or using HomeLink, make sure you have a clear view of the garage door or gate, and that no one will be injured by its movement.
General Information
If you are training HomeLink to operate a garage door or gate, it is recommended that you unplug the motor for that device during training. Repeatedly pressing the remote control button could burn out the motor.
HomeLink stores the code in a permanent memory. There should be no need to retrain HomeLink if your car’s battery goes dead or is disconnected.
If your garage door opener was manufactured before April 1982, you may not be able to program HomeLink to operate it. Garage door openers manufactured before that date do not have a safety feature that causes them to stop and reverse if an obstacle is detected during closing, increasing the risk of injury. If you have questions, call (800) 355-3515.
Programming
–Press and hold down the keys H and J;
–after about 20 seconds, the LED K starts flashing; –release the keys;
–hold the remote control for the device to be controlled close to the HomeLink control panel (12 in);
–simultaneously press and hold down the key of the hand-held remote control and one of the three HomeLink keys H, I or J;
–successful programming is signaled by the LED K flashing faster –release the keys.
To program the other keys, repeat the operations skipping the first three steps.
Use
–When the signal of the device to be activated reaches its operating range, press the dedicated HomeLink key.
–The LED K remains on while the signal is being transmitted. The devices controlled via the HomeLink function can, in any case, still be activated from the original remote controls.
Should the programmed HomeLink not activate the system to be controlled, it may be that it is controlled by a remote control with a rolling code.
A rolling activation code can be recognized in the following ways:
–consulting the instruction manual provided with the device to be controlled;
–despite the HomeLink programming procedure having been carried out correctly, the HomeLink function does not activate the device; –holding the dedicated HomeLink key pressed down, the LED K briefly flashes fast and then stays on for 2 seconds; this sequence is repeated for about 20 seconds.
Programming for devices controlled by rolling code
–Locate the specific setting key by consulting the user manual of the system to be controlled. This is normally located on the motor which drives the device.
–Press the key and, in normal conditions, a LED will come on.
WARNING: Normally, after this operation you have 30 seconds to start the next one.
–Briefly press the HomeLink key you have chosen to control the device (H, I, J).
–Press it a second time; when it is released the operation should be completed. For some types of motors, the key might have to be pressed a third time.
Reprogramming a single key
If you want to program activation of a new system on an already used HomeLink key, proceed as follows:
–press and hold down the HomeLink key selected;
–after about 20 seconds, the LED K starts flashing; keep the key pressed down;
–hold the original remote control of the device to be controlled close to the HomeLink control panel (12 in);
–press and hold down the original remote control key;
–successful programming is signaled by the LED K flashing faster; –release both keys.
The system previously programmed on HomeLink has thus been replaced with the new programming and is ready to be used.
This operation has no impact on the other HomeLink keys.
Deleting the programmed keys
Unlike programming which is done for each individual key, deletion is done for all three keys simultaneously. To delete, proceed as follows:
–press and hold down the keys H and J;
–after about 20 seconds, the LED K starts flashing; –release the keys.
WARNING: It is advisable to carry out the HomeLink deletion procedure when selling the vehicle.
As required by the FCC:
This device complies with Part 15 of the FCC rules. Operation is subject to the following two conditions: (1) This device may not cause harmful interference, and (2) this device must accept any interference received, including interference that may cause undesired operation.
Changes or modifications not expressly approved by the party responsible for compliance could void the user’s authority to operate the equipment.
This device complies with Industry Canada Standard RSS-210. Operation is subject to the following two conditions: (1) this device may not cause interference, and (2) this device must accept any interference that may cause undesired operation of the device.
Sun visors
They can be folded to the front and to the side of the vehicle. To move the visor to the sides, lower and release it from the catch L.
By lowering the visor on the passenger's side you can access the courtesy mirror with incorporated light; the light turns on automatically (with the ignition key in the MAR (ON) position) raising the mirror protective cover. Before raising the visor, close the mirror cover.
Clock
The clock is adjusted automatically by setting the time with the Bose® Infotainment.
The clock illuminates when the external lights are turned on.
Rear window sunshade
The electrical sunshade works with the ignition key in the MAR (ON) position. The control buttons are located both on the front and on the rear dashboard.
WARNING: Before activating the sunshade, make sure that there are no objects that may interfere with its travel.
Press button M to raise the sunshade and button N to lower it.
WARNING: If the sunshade guide needs to be cleaned with solvents, it must then be greased in the area where the sunshade slides using Teflon based grease.
WARNING: If the sunshade is moved up and down at least 4 times within a time period of 25 seconds, the system deactivates for 30 seconds. Before disabling the sunshade, the system will complete the movement in progress. The last movement performed will be opposite to the starting movement.
Rear door sunshades (optional)
Housed on the rear doors, they retract automatically. To pull out the sunshade, pull on the grip O and latch it into the catches P located on the top edge of the door.
Front ashtray and cigarette lighter
They are found on the central console, hidden by a cover. To open the cover, slide it forward.
Pressing the lighter Q downwards activates the cigarette lighter. After about 20 seconds, this returns automatically to the initial position and is ready for use. Remove the tray in order to clean the ashtray.
WARNING: Always make sure that the cigarette lighter has been switched off.
The cigarette lighter reaches high temperatures. Handle it carefully and do not allow children to use it: risk of fire and burns!
Rear ashtray
It is located on the rear central console, hidden by a cover. To open the cover, hold and pull it from the protruding part.
Pressing the lighter R downwards activates the cigarette lighter. After about 20 seconds, this returns automatically to the initial position and is ready for use. Remove the tray in order to clean the ashtray.
Beverage holder on center console
This is found behind the gearbox lever.
Glove compartment
Positioned in the lower part of the dashboard, on the passenger side, it can be opened pressing button S. The button only works with the ignition key turned to MAR (ON) and for about 10 minutes after having extracted the key or rotated it to the STOP position. The compartment is lit by a courtesy light when it is open.
To help ensure passenger safety, the compartment must always remain closed while driving.
If the button controlled opening is faulty, the compartment can be opened by pulling the emergency cable behind the compartment itself.
WARNING: Do not place objects weighing over 22 lb (10 kg) in the glove compartment.
S
Temperature controlled beverage holder
The front armrest houses a beverage holder into which air is sent directly from the air conditioning/heating system.
To access the compartment, pull the armrest holding it from the handgrip. To activate the air-conditioning/ heating ventilation inside the compartment, move control T upwards. To stop it, move control T downwards.
WARNING: The temperature of the air inside the beverage holder is the same as that coming out from the air conditioning/heating vents, it therefore depends on the temperature set via the relative control panel.
Map pockets
The front seats are fitted with map pockets located on the rear of the seatbacks.
WARNING: Do not put heavy or sharp objects in the map pockets.
Handholds
Usually laying in a horizontal position, the handhold U can rotate until reaching a vertical position. A return spring automatically repositions the handhold in the horizontal position. The rear handholds also include a clothing hook, V.
Tables (optional)
They are installed on the back of the front seats.
Opening: lift the table W until the supporting mechanism clicks in place.
When one or more tables are open, passengers traveling in the rear seats must fasten their seat belts as indicated on the table.
When traveling with one or more child seats fitted on the rear seat of the vehicle, the tables must be closed.
When closing the table always guide it down: risk of crushing.
WARNING: As the table is not equipped with beverage holders, do not place open drink containers on the tables while driving, as the surrounding upholstery could be stained or damaged if they fall over.
Closing: press the support bracket X to release the mechanism and then lower the table W.
When you are not using the table W, you should close it to prevent passengers sitting in the rear seats from being hit by its edges and corners.
Doors Before opening a door, ensure the maneuver can be performed safely.
Opening doors from the outside
Switch off the alarm and the centralized locking system by pressing button A on the radio control (see chapter “Electronic alarm system”, page114) or insert and turn the key in the lock on one of the front doors. To open the door, press button C on the inside of each handle.
The vehicle is equipped with power latches which move the mechanical parts during door-opening maneuvers. In the event of an emergency (e.g., dead battery or electric system failure) to open the doors when the locks are released, press button D for the front and rear doors. Otherwise, if the doors are locked, you must release them by turning the key in the lock to open them, then press button D. On the front door panels, in a position which is visible from the outside, there is a dual-color (green/red) LED E which indicates the locks’ status (locked/ unlocked). The red LED lights up for 3 seconds after the locks are engaged and the green LED for the same amount of time when they are released.
WARNING: The door LEDs remain lit for approximately 3 seconds and therefore, in normal conditions, the LEDs are turned off.
When the alarm system is activated and the doors are locked, the LEDs on the doors flash.
The remote control allows you to operate the centralized opening of all the doors or only the driver’s door depending on the setting in the Bose® Infotainment.
If, when the doors are closed from outside, one or more of the doors and/ or the luggage compartment lid are not properly closed, the direction indicators flash quickly for a few seconds.
WARNING: The internal door lock/ unlock buttons are disabled when the doors are locked from the outside.
WARNING: In the event that the inertia switch trips, the doors are electrically unlocked and the vehicle can be accessed by pressing button D.
100 Doors
Opening from the inside
To open the front doors even if the locks are engaged pull the interior handle F.
To open the rear doors, the lock must also be manually released by lifting the door lock button G, located on both doors.
WARNING: There is no warning light or message on the panel to signal the door lock button position to the driver.
There are two buttons on the front and rear consoles which control the electric locking and unlocking of the doors: K
Door locking
Door unlocking
WARNING: When the door is open, the door lock cannot be activated either electrically or mechanically.
WARNING: If the door is partially latched, do not attempt to close it by pushing it, but open and close it again.
WARNING: When pulling the interior handle on the driver’s door, either all the locks are released or only that of the driver’s door, depending on the settings of the Bose® Infotainment.
Doors open warning lights
If the doors and the engine/luggage compartment lids are not closed properly, it is signalled by the relative warning lights on the instrument panel display illuminating, accompanied by the messages “Door open” or “Doors open”.
Child safety device
This device is used to prevent the rear doors from being opened from the inside.
It is enabled/disabled by inserting the ignition key into device M and rotating it to the following positions:
1 – device disabled (unlocked);
2 – device enabled (locked).
When the device is enabled on the relevant door, it cannot be opened from the inside in any condition.
WARNING: When pulling the interior handle F on the rear doors and noticing that the handle moves freely, do not exert excessive force on the handle as the child safety device is enabled.
The child safety device remains enabled even when the central door locking is activated.
Easy entry/exit system cut-out device
This device is used to activate/ deactivate the Easy entry/exit system. Deactivation is signalled by the illumination of the LED on button J.
Automatic door locking over 10 mph (16 km/h)
Using the Bose® Infotainment system, the doors, engine and luggage compartment lids and fuel tank door can be set to lock automatically when the vehicle speed exceeds 10 mph (16 km/h).
To activate/deactivate this function, please see the "Bose® Infotainment" manual.
WARNING: If you need to have the vehicle tested on a roller bench with nobody onboard, you must verify, through the Vehicle Options menu, that the automatic door locking feature - that is activated upon exceeding 10 mph (16 Km/h) is disabled, or that a window is open, or that you have an additional key left out of the vehicle.
Door release in the event of an accident
In the event of a collision with activation of the inertia switch, the door locks are automatically released to allow rescuers to access the passenger compartment from outside.
If the centralized locking has been activated from the inside and, following a collision, the inertia switch was unable to activate the door release function due to loss of the battery or damage to it, it will not be possible to access the passenger compartment from outside. However, whether the doors can be opened or not depends on the condition they are in and, in fact, if a door is damaged it may be impossible to open it, even if the lock is not engaged. In this case, attempt to open the other doors.
Door lock ECU initialization
Every time the battery is connected or a fuse replaced, to restore correct operation, the system initialization procedure must be performed. This consists in a door lock/release cycle effected using the door remote control.
Door open indicator
Each door is provided with a reflector N fitted on the lower side of the door panel.
Underdoor courtesy light
Each door panel is fitted, on the lower side, with a courtesy light O to illuminate the area where passengers enter/exit the vehicle.
Gearshifting is always active and may be performed even when one or more doors, the engine compartment lid or the luggage compartment lid are open. Therefore, in these conditions, take great care to avoid moving the gearshift lever and accidentally engaging the gears.
Power windows
Finger-trap prevention device
The system is designed to detect the presence of an obstacle, during the window’s upwards stroke, consequently interrupting the upwards travel and reversing it immediately.
If the finger-trap prevention function is activated 5 times within a minute, the system automatically enters the “recovery” mode, which is indicated by the window moving upwards in a jogging motion. To restore normal operation, press the control once again or turn the key to the STOP position and subsequently to the MAR (ON) position.
If there are no system malfunctions the window operation will return to normal. If this is not the case, contact your local Authorized Maserati Dealer. When the system detects a fault, the “” symbol appears on the instrument panel display, accompanied by a failure message. It can only be operated with the ignition key in the MAR (ON) position.
Improper use of the power windows can nevertheless be dangerous, even if the vehicle is equipped with the finger-trap prevention system. Before and during activation of the power window, always check that the passengers are not exposed to the risk of injury both by the moving window and by personal objects dragged or hit by it. When you get out of the vehicle, always remove the ignition key to prevent the windows from accidentally being activated posing a risk to passengers remaining onboard.
Operation in manual and automatic modes
The front and rear power windows can be operated both automatically (opening and closing) and manually. The operation mode is selected according to the length of the power window’s operation impulse. If the button is kept pressed down or pulled up, the automatic operation is activated, upwards or downwards, respectively. The window stops when it reaches the stroke end or if the button is pushed again.
A short impulse causes a small movement of the window, which stops when the button is released.
Controls
The armrest on the driver’s door is equipped with controls for operating all of the power windows, while the panels on the other doors house the control for the relative window only.
A- opening/closing front left-hand window
B- opening/closing front right-hand window
C- opening/closing rear left-hand window
D- opening/closing rear right-hand window
E- disabling/enabling power window controls on the rear doors. The controls are disabled when the LED on the button is illuminated.
Central opening/closing of the windows
The central opening/closing system for the windows can be activated in the following conditions: –ignition key removed –all doors must be properly closed. To activate the central closing of the windows, hold the button G on the remote control down for more than 2 seconds after the doors have been closed. The power windows are operated until they are completely closed or until the button is released.
WARNING: Before leaving the vehicle, it is advisable to check that the windows and the sunroof are completely closed.
To activate the central opening of the windows hold the button F on the remote control down for more than 2 seconds after the doors have been unlocked. The power windows are operated until they are completely opened or until the button is released.
WARNING: Before activating the alarm system, check that all the windows and the sunroof are closed to prevent undesired triggering of the alarm.
Improper use of the power windows can nevertheless be dangerous, even if the vehicle is equipped with the finger-trap prevention system. Before and during activation of the power window, always check that the passengers are not exposed to the risk of injury both by the moving window and by personal objects dragged or hit by it. When you get out of the vehicle, always remove the ignition key to prevent the windows from accidentally being activated posing a risk to passengers remaining onboard.
Engine compartment lid
To open the engine compartment lid: pull lever A located on the lower lefthand side of the dashboard.
To close the lid: lower it to about 8 in. (20 cm) from the engine compartment and let it drop; it will close automatically.
Disengage the safety device by lifting the lever B shown in the figure. Lift the lid: this operation is facilitated by two gas struts. The lid positions itself at the maximum opening position and does not require support stays.
Always check that the engine compartment lid is properly closed, to prevent it from opening while travelling.
Gearshifting is always active and may be performed even when one or more doors, the engine compartment lid or the luggage compartment lid are open. Therefore, in these conditions, take great care to avoid moving the gearshift lever and so accidentally engage gears.
Luggage compartment
The luggage compartment lid can be opened from the inside or outside of the vehicle. Button A, used to open the lid from inside the passenger compartment, located to the left of the steering wheel; operation is only possible with the ignition key removed or in the STOP and ACC position. To open the luggage compartment lid from the outside, press button B on the ignition key or C on the lid, or insert the key in the lock of the luggage compartment lid and turn it anticlockwise, thus mechanically releasing the lock. This mechanical procedure does not inhibit any subsequent electric opening request, whether coming from button A or B. Depending on the Bose® Infotainment settings, the luggage compartment may be unlocked also using the door unlock control C, see page 124 of the Bose® Infotainment manual. If the lock is released, to open the luggage compartment lid simply press the button under the license plate lights molding.
To prevent the controls being operated accidentally while the vehicle is travelling, the luggage compartment can only be opened when the ignition key is removed on or in the STOP and ACC position. Raising the lid is facilitated by the action of the gas struts.Vehicles are also equipped with a lever inside the luggage compartment, which permits opening from the inside.
The struts are calibrated to help ensure proper operation with the weights specified by the manufacturer. Arbitrary additions of objects (spoilers, parcel racks, etc.) can jeopardize proper operation and safety in the use of the luggage compartment lid.
When using the luggage compartment, never exceed the maximum loads allowed (see section on “Capacities and Technical Specifications”). Also check that the objects contained in the luggage compartment are arranged properly.
The luggage compartment is illuminated by a dome light that comes on automatically when the lid is opened; switching off is timed. If the luggage compartment lid is left open, the light switches off after a few minutes. To turn it on again, close the lid and then re-open it.
WARNING: If the luggage compartment lid is opened mechanically (i.e., by inserting and then turning the key in the lock) the power locking will be disabled. When the lid is reopened electrically, normal operation will be restored.
Emergency opening of the luggage compartment
In the event that somebody is accidentally locked in the luggage compartment, the lid can be opened from the inside by pulling the lever D positioned in the center of the lid. The lever is visible even in poor light conditions.
Fuel tank door
The fuel tank door is found on the rear, left-hand side of the vehicle. To open the door, press button A located on the left of the steering wheel. It can be operated only when the ignition key is removed or turned to STOP.
The cap’s hermetic seal may allow a slight pressure increase in the tank. Any hissing noise while the cap is being released is therefore completely normal.
When refuelling, the cap should remain attached to the door by means of the respective hook B.
The cap is linked to the fuel door with a strap, so that it cannot be misplaced while refuelling. The door must be re-closed manually. Before closing the door, check that the fuel filler cap is fully tightened.
No open flames or lit cigarettes close to the filler: risk of fire! Also avoid putting your face close to the filler neck so as not to inhale noxious fumes.
Fuel tank door emergency opening
If necessary, the door can be opened by pulling the small cable C located on the left-hand side of the luggage compartment.
Keys
The Maserati CODE system
In order to increase protection against attempts at theft, the vehicle is equipped with an electronic engine immobilizer system (Maserati CODE), which is automatically activated when the ignition key is removed. Each ignition key contains an electronic device which transmits a code signal to the Maserati CODE control unit, and engine ignition is enabled only if the key code is recognized by the system. Two keys are supplied with the vehicle.
The key can be used for:
–start-up;
–door central locking; –electrical and manual opening of the luggage compartment; –activating/deactivating the alarm system.
Operation
Each time the ignition key is removed the from the STOP position, the protection system will activate the engine immobilizer.
When the key is turned to MAR (ON), upon engine start-up:
1) If the code is acknowledged, the warning light CODE on the instrument panel will turn off within a second, while the OBDII warning light, once the ECU diagnosis cycle has been completed, will turn off after about 18 seconds. Under these conditions, the protection system recognizes the key code and deactivates the engine immobilizer. Turn the key to start the engine.
2) If the CODE warning light stays on and the OBDII one goes off after 18 seconds and then comes on again immediately, the code is not recognized. If this occurs, turn the key to STOP and then back to MAR (ON). If the immobilizer stays on, try with the other key. If you still cannot start the engine, try the emergency start procedure (see on page190) and contact your local Authorized Maserati Dealer.
While driving, with the ignition key in the MAR (ON) position:
1) If the CODE warning light comes on, it means that the system is running a self-diagnosis cycle. At the first stop, you can test the system: turn the ignition key to STOP to stop the engine and then back to MAR (ON). The warning light CODE will come on and should go out in approximately one second. If the warning light stays on, repeat the procedure described previously leaving the key at STOP for more that 30 seconds. If the fault persists, contact your local Authorized Maserati Dealer.
2)
If
the CODE warning light
flashes, it means that the vehicle is not protected by the immobilizer device. Contact your local Authorized Maserati Dealer immediately to have the codes of all the keys restored in the memory.
WARNING: Strong impact can damage the electronic components in the key.
WARNING: Each key supplied has its own specific code, which must be stored in the memory of the system control unit.
Duplicating the keys
When ordering additional keys, remember that memorizing (up to maximum of 7 keys) must be carried out on all the keys, including those already in your possession. Contact your local Authorized Maserati Dealer directly, bringing with you all the keys in your possession, the Maserati CODE system CODE CARD, the electronic alarm system CODE CARD, a personal ID and the identification and registration documents proving ownership of the vehicle. The codes of any keys that are not available when the new storage procedure is carried out will be deleted from the memory to prevent any lost or stolen keys being used to start the vehicle.
Emergency starting
If the MASERATI CODE fails to deactivate the engine immobilizer, the warning light CODE will light up with a fixed light, the OBDII warning light will go out after four seconds and then will come on immediately and the engine will not start. To start the engine, it is necessary to follow the emergency start procedure.
WARNING: We recommended that you read the entire procedure before carrying it out. If you make a mistake, you should turn the ignition key to STOP and repeat the operations from step 1.
1) Read the 5-digit electronic code on the CODE CARD.
2) Turn the ignition key to MAR (ON): the CODE and OBDII warning lights are on.
3) Press the accelerator pedal fully down and keep it pressed. Approximately 8 seconds later, the OBDII warning light will go off. Release the accelerator and get ready to count the number of times the OBDII warning light flashes.
4) As soon as the displayed number of flashes is equal to the first digit of your CODE CARD, depress the accelerator and keep it pressed down until the OBDII warning light goes off, after being off for approximately 4 seconds; you can now release the accelerator pedal.
5) The OBDII warning light starts flashing again. As soon as the displayed number of flashes is equal to the second digit of your CODE CARD, press down the accelerator pedal and keep it pressed.
6) Proceed in the same manner for the remaining digits in the code on the CODE CARD.
7) When the last digit has been entered, keep the accelerator pedal pressed down. The OBDII warning light comes on for 4 seconds and then goes off; you can now release the accelerator pedal.
8) A quick flashing of the OBDII warning light (about 4 seconds) confirms that the operation has been carried out correctly.
9) Start the engine turning the key from MAR (ON) to AVV (START).
If the OBDII warning light remains on, turn the key to STOP and repeat the procedure from step 1. This procedure can be repeated an unlimited number of times.
WARNING: After an emergency start-up, you should contact your local Authorized Maserati Dealer, otherwise you will have to perform the emergency start procedure every time the engine is started.
Ignition switch
The starter switch can be turned to 4 positions:
STOP - Engine off, engine immobilizer and steering lock activated, connected devices cut-off, except those that are not operated by the key (e.g., door lock, luggage compartment opening control, etc.). The key can be removed.
ACC - Cigarette lighter and power sockets. The key cannot be removed.
MAR (ON) - Driving position (on). All electrical devices can operate.
AVV (START) - Engine start-up.
When getting out of the vehicle, remember to always remove the ignition key, in order to prevent that anybody remaining in the vehicle may involuntarily activate the controls.
WARNING: The ignition key can only be removed from the switch when the gearshift lever is in position P. In addition, it must be removed within 30 seconds after turning the key to STOP. In the event that the key unlocking system fails or if it is not possible to shift the gearshift lever to P, to remove the key you must turn it to STOP, then remove the cap A, using a pen or sufficiently pointed tool, then press the button just uncovered and at the same time extract the key. Once the key has been removed, refit the cap A.
After stopping the vehicle, always shift the gearshift lever to P.
If the ignition switch is tampered with (e.g., theft attempt), have it checked by your Authorized Maserati Dealer to verify that it works properly before you drive.
If the automatic electric parking brake engagement function is deactivated, remember to engage the parking brake manually.
Never leave children unattended in the vehicle.
Electronic alarm system
The electronic alarm system performs the following functions:
–remote centralized door locking/ unlocking
–perimeter surveillance, detecting the opening of doors, front and rear lids
–motion surveillance, detecting intrusion in the passenger compartment
–vehicle movement surveillance.
WARNING: The engine immobilizer operation is designed to automatically activate when the ignition key is removed from the starter switch.
Activation
To turn on the electronic alarm system, press button A on the key:
–the direction indicators will flash once;
–the system beeps;
–the red LEDs on the front door panels flash;
–the vehicle's centralized door locking system is activated and locks the doors.
The alarm system becomes operative after approximately 25 seconds and the alarm is activated if:
–a door is opened
–the luggage compartment lid is opened
–the engine compartment lid is opened
–someone attempts to enter the vehicle from a window
–the power supply is cut off
–the siren is disconnected
–the car moves.
When the alarm is switched on, the user may request the luggage compartment opening; in this case, the motion sensors and inclination sensors are temporarily deactivated. If the luggage compartment is then closed, the sensors will be reactivated.
Should the direction indicators flash 9 times when you activate the alarm system, this means that one of the doors or lids is not closed properly and therefore is not protected by the perimeter surveillance. Check for correct closing of doors, rear/front lid and close the open one, even without deactivating the alarm system: the direction indicators flashing once indicate that now the door, front/rear lids are closed properly and are protected by the perimeter surveillance.
WARNING: If the direction indicators flash 9 times when the alarm system is activated with doors, front and rear lids properly closed, it means that the self-diagnosis function has detected a malfunction in the system and that you should contact your local Authorized Maserati Dealer to have the system checked.
Deactivation
To switch the electronic car alarm off, press button B on the key: –the direction indicators flash twice; –the system gives a double beep; –the red LEDs on the front door panels switch off and turns green; –the centralized door lock system is activated and the doors are unlocked.
The alarm system is off and it is therefore possible to get into the vehicle and to start the engine. Pressing button B twice unlocks the doors and also switches on the low beams for 30 seconds.
WARNING: The alarm system is not deactivated when the key is turned in the locks.
Getting into the vehicle when the alarm system is on
When the remote control battery is flat, to access the vehicle insert the key in the lock of one of the two front doors and turn it clockwise to release it: the alarm will sound but you will have to continue with the normal starting procedure regardless (see page150). The alarm will be deactivated.
Deactivating the motion sensing alarm
The motion sensing system can be deactivated by pressing button C on the roof. When this function is deactivated, the LED on the button will flash for 3 seconds and then turn off.
Deactivating the anti-lift alarm
Pressing button D deactivates the lift protection alarm. When this function is deactivated, the LED on the button will flash for 3 seconds and then turn off.
Alarm memory
If the warning light appears on the display when the vehicle is started, this means that an intrusion has been attempted during your absence.
The alarm system memory is reset when you turn the ignition key.
Ordering extra radio operated controls
To order extra radio operated control keys, contact your local Authorized Maserati Dealer only and remember to take with you:
–all the keys in your possession with related remote control
–the Maserati CODE system's CODE CARD
–your identity card
–the identification and registration documents proving ownership of the vehicle.
WARNING: Radio-operated controls that are not given to the dealer for the new code storing procedure, will be automatically deactivated in order to prevent any lost or stolen radiooperated controls from being used to deactivate the electronic alarm system.
Replacing radio operated control batteries
If, when one of the three buttons is pressed, the corresponding function does not activate, replace the remote control battery after checking the operation of the alarm system functions with the other remote control.
To replace the remote control battery: –extract the key by pressing button E –undo the screw F –remove the battery support G
–extract the battery H from its retaining ring
–fit a new battery of the same type, observing the indicated polarity –fit the battery support G into the remote control and secure it by tightening the screw F.
Front seats
Never adjust the seat while driving. You could lose control of the vehicle. Moving the seat could distract you or make you press a pedal unintentionally. Adjust the driver's seat only when the vehicle is stationary.
The seats can only be adjusted with the ignition key in the MAR (ON) position. It is however possible, when the door is closed, to operate the seat for approx. 15 seconds after turning the ignition key to STOP and then for other 15 seconds after the last operation.
Back/forward adjustment
Push lever A on the outer side of the seat forward or back.
Height adjustment
Grip lever A at the center and push it down or up.
Seat inclination adjustment (tilting)
–Front part of seat: push the front end of lever A up or down.
–Rear part of seat: push the rear end of lever A up or down.
Seatback rake adjustment
Push lever B forwards or backwards to raise or lower the backrest.
Sitting in a reclined position while the vehicle is in motion could be dangerous. The seatback should not be tilted back too far.
The 3-point shoulder/lap belt must remain firm against the occupant's body in order to function properly. Therefore, both the driver’s and passenger’s reclining seatbacks must always be in a fairly upright position while the vehicle is in motion; otherwise the 3-point shoulder/lap belt would not remain firm against the occupant. Serious injury could result!
Adjusting the headrest
Move the lever B up or down to align the upper edge of the headrest with the top of the occupant’s head.
Lumbar support adjustment
Push the horizontal arrows on the lever C to increase or decrease lumbar support and the vertical arrows to raise or lower it.
Comfort Pack (optional)
This includes the installation of the following optional systems inside the seats:
Ventilation system
This can be activated and deactivated by rotating wheel button D. By means of two fans (one in the cushion and one in the seat back), this system provides ventilation for the thigh and back areas.
Still using the wheel button D, the intensity of the ventilation can be set at 3 levels.
Heating system
The heating is switched on by rotating wheel button F. Two heating pads are used to heat the seat. When this function is active for one or more seats, the relative warning light will light up on the display.
Also, using wheel button F the intensity of the heating can be set at 3 levels.
Massage System
This function is activated by pressing the corresponding button G and, by means of a system of inflatable and deflatable bags enclosed in the cushion and seat back, it provides a massage function in the thigh and lumbar region areas. The function can be switched off by pressing button G again.
The massage cycle lasts 5 minutes in total, after which the function cuts out and the previous settings are restored.
Self-adaptive system
The system is activated by pressing button H and it enables the seats to adapt themselves to the occupant's body, using inflatable bags. If the button is pressed a second time, the system is deactivated.
Each system is independent of the others and can be operated separately using specific buttons for each seat.
The Comfort screen page related to the modified feature will be displayed whenever you operate any control.
The seat comfort screen page can be displayed on the instrument panel by pressing the MODE button. This screen page shows the operating status of each individual system.
WARNING: Switch off the various systems when not required.
Winter Pack
With this type of equipment, the heating system is installed in the front seats only.
Storing the seats and external rear-view mirrors positions
The system allows different positions to be stored and recalled for the driver's seat and for the external rearview mirrors (buttons I).
Memorization is only possible with the ignition key in position MAR (ON). Adjust the position of the seat, the headrest, the external rear-view mirrors and the steering wheel, then engage the reverse gear and reposition the external passenger side mirror to ensure the best possible visibility to perform the maneuver, then disengage the reverse gear. Next press one of the three buttons "1", "2" or "3", each one corresponding to a memorizable position, for 3 seconds until you hear a double confirmation tone.
Lumbar support adjustment is not included in the seat position memorization.
The memorization of a new seat position cancels the one previously memorized with that particular button.
To recall one of the stored positions with the door open, press the relative button “1”, “2” or “3” briefly. To recall the a stored position with the door closed, press the corresponding button until hearing a tone that confirms the seat has stopped.
WARNING: To stop the seat, press one of the buttons - “1”, “2” or “3” -, or one of the adjustment controls.
WARNING: Malfunctioning of the seat control unit is indicated by a sequence of 5 tones emitted when the ignition key is turned to position STOP: contact your local Authorized Maserati Dealer to correct the failure.
Headrest
The headrests are adjusted electrically for the height and manually for the tilting position.
Remember that the headrests must be positioned so that their upper edge is aligned with the top of the occupant’s head. In fact, only in this position can they provide the support required in the event of a bumper-to-bumper collision.
To adjust the headrests’ vertical position, move the lever B upwards or downwards.
Armrest
To access the compartment, lift the armrest J pulling on the handle K. To close the compartment, lower the armrest until the lock engages. Inside the armrest there is a temperature controlled beverage holder.
Easy entry/exit system
The easy entry/exit system makes it easier for the driver to get in and out of the vehicle. In fact, before the driver gets out, the seat moves back and the steering wheel rises. The function is activated when the door is opened, only if the key has been extracted or is in position STOP. On re-entry, the driver finds the seat and steering wheel still in these positions. After sitting down and closing the door, upon turning the key to position MAR (ON), both the seat and the steering wheel return to their normal driving positions. This function can be disabled/enabled by pressing button L.
Rear seats
These can seat three passengers.
The two side seats can be both tilted and moved back and forward electrically.
Rear seat adjustments
Lengthways adjustment
This is possible for the side seats only, and it is performed by pushing control A, located on the door panel, next to the seat you wish to adjust either forwards or backwards.
Seat inclination adjustment (tilting)
This is possible for the side seats only, and it is performed by pushing control A located on the door panel, next to the seat you wish to adjust either upwards or downwards.
Armrest
The rear armrest is moveable and can be folded up into the seatback. To lower it, pull the handle, B. To close it, pull it upwards then push it back into its seating. Inside the armrest there is a compartment containing a 12 volt power socket.
To access the compartment, lift the armrest cover using the handle C. The compartment houses a control D to move the front passenger seat forward and back. To close the compartment, lower the cover.
Two cup holders are housed in the compartment D. To pull it out, press on its front.
If the rear-seat comfort pack is installed, you will find the relative controls inside the armrest on the rear seats.
Comfort Pack (optional)
This includes the installation of the following optional systems and controls in the rear seats:
Massage System
This system uses the inflatable bags mechanism and operates in the thigh and lumbar region area. The massage cycle lasts 5 minutes in total, after which the function cuts out and the previous settings are restored. To activate the massage feature, press button 1 (left-hand seat) or 7 (righthand seat). If the button is pressed again, the function is switched off.
Ventilation system
By means of two fans (one in the cushion and one in the seatback), this system provides ventilation for the thigh and back areas. The relative wheel button can also be used to adjust the intensity of the ventilation. To switch on the ventilation, rotate wheel button 3 (left-hand seat) or 6 (right-hand seat) to one of the positions, either “1”, “2” or “3”, depending on the air flow required. To switch off the ventilation, rotate the wheel button to position “0”.
Heating system
Two heating pads are used to heat the seat. To switch on the heating, rotate wheel button 4 (left-hand seat) or 5 (right-hand seat) to one of the positions, either “1”, “2” or “3”, depending on the temperature required. To switch off the heating, rotate the wheel button to position “0”.
Lumbar support adjustment control
The lumbar support adjustment allows the support offered by the seat back to be changed. Press the front of button 2 (left-hand seat) or 8 (right-hand seat) to increase lumbar support. Press the rear of the same buttons to decrease lumbar support.
Control for front passenger seat backward/forward movement
Press the front of button 9 to move the front passenger seat forwards, and the rear of the button to move it backwards.
Comfort Pack Controls
The right-hand controls are used to adjust the right-hand seat, while the right-hand controls adjust the lefthand seat.
1 – 7 Massage activation/deactivation
2 – 8 Lumbar support increase/ decrease.
3 – 6 Ventilation activation and adjustment.
4 – 5 Heating activation and adjustment.
9 Front passenger seat backward/ forward movement.
Winter Pack (optional)
With this type of equipment, the heating system is installed in the rear seats only.
Headrests
The two side headrests can be both tilted and their height adjusted manually. The central, fixed headrest can be power tilted by pressing the specific button to the left of the steering wheel (see page82) and repositioned by lifting it manually.
Remember that the headrests must be positioned so that their upper edge is aligned with the top of the occupant’s head. In fact, only in this position can they provide the support required in the event of a bumper-to-bumper collision.
Rear-view mirrors
External rear-view mirrors
They can be adjusted electrically (with the ignition key in the MAR (ON) position) and they are equipped with anti-fog features.
–Mirror selection (right-hand or lefthand): move the selector A to the right or left, depending upon the mirror you wish to adjust.
–Mirror positioning: control A allows each mirror to be adjusted with four movements (up – down – right – left). Bring the selector back to the center to prevent mirror position being changed accidentally.
–Mirror retraction: By turning the selector switch A to the lower central position, both the mirrors fold inwards to help facilitate parking in narrow spaces. If the selector switch is set back in the upper central position, the mirrors return to the open position.
The mirrors are designed to fold in both directions in the event of a collision.
The external rear-view mirror position, both for the normal driving direction and for reversing, is automatically memorized together with each seat position. To memorize a new position of the external rear-view mirrors, turn the ignition key to the MAR (ON) position and adjust the position of the mirrors; then engage the reverse gear and reposition the external passenger side mirror to ensure the best possible visibility for maneuvering, then disengage the reverse gear. Finally, press one of the buttons “1”, “2” or “3” on the seat, each one corresponding to a memorized position, until a beep confirms the procedure is complete.
The new position of the external rearview mirrors will be automatically memorized together with the seat position.
The side rear view mirrors feature different curvatures; the left-hand mirror is flat, while the right-hand one is convex. Pay particular attention as objects viewed in the righthand mirror are closer than they appear.
WARNING: Never retract or open the mirrors by hand to avoid damaging the powering mechanism.
The mirrors must always be in the open position when the vehicle is moving.
Electrochromic internal rearview mirror
This can can be manually adjusted, and is fitted with an accident-prevention release system in the event of a collision.
The electrochromic rear view mirror automatically operates an anti-dazzle function by gradually shading as the light shining on the mirror increases. This function is automatically deactivated in reverse to ensure maximum visibility of obstacles.
Steering wheel
The steering wheel can be power adjusted, both in terms of height and depth.
It can only be adjusted if the ignition key is in position MAR (ON). For adjustment, move control A in the four directions. The steering wheel position is memorized, together with the position of the external rear view mirrors, when the driver’s seat position is stored.
Do not adjust the steering wheel while the vehicle is moving. Under no circumstances remove the steering wheel; this procedure, if necessary, must be carried out by an Authorized Maserati Dealer.
Easy entry/exit system
The easy entry/exit system makes it easier for the driver to get in and out of the vehicle. Before the driver gets out, the seat moves back and the steering wheel rises. The function is activated when the door is opened, only if the key has been extracted or is in position STOP. On re-entry, the driver finds the seat and steering wheel still in these positions. After sitting down and closing the door, upon turning the key to position MAR (ON), both the seat and the steering wheel return to their normal driving positions. This function can be disabled/enabled by pressing button B.
External lights and direction indicators
The exterior lights and direction indicators can only be operated with the ignition key at MAR (ON), with the exception of the parking lights, which can be turned on at any time. On CANADIAN version vehicles, in accordance with the current regulations, when the ignition key is at MAR (ON), the DRL turn on automatically, even during the day, and cannot be turned off ("Day Time Running Lights" function).
Light switch
Switch A has 5 settings:
0-DRL on (*)
-Position and license plate lights on
-Low beams on
-Parking lights
AUTO - Automatic activation and deactivation of the exterior lights according to the brightness outside.
(*) On the vehicles manufactured for the Japanese market, these lights are not operational; for all the other markets where by law they may not be turned on, they can be deactivated through the Bose® Infotainment system.
Parking lights
The parking lights operate when the ignition key is at STOP or ACC, or with the key removed. They are activated by turning the light switch to position . It is harder to turn the switch to position than to the other positions. This is to avoid activating the parking lights unintentionally and waste power.
When the parking lights are on, the warning light illuminates on the instrument panel.
When the parking lights are on, if you lower the left-hand lever, only the DRLs on the left-hand side are activated, while when if you move the lever up only the DRLs on the righthand side are activated.
Automatic on and off
When the light switch A is turned to AUTO and the ignition key is in the MAR (ON) position, the position lights, side marker, low beam lights and license plate lights turn on and off according to the light outside.
WARNING: The high beams can only be switched on manually by pushing the left-hand lever forward.
If the high beams are activated, they will come on automatically every time the lights are switched on. We recommend therefore that you switch them off every time the twilight sensor deactivates the external lights.
In case of fog during the day, the position lights and low beams will not be turned on automatically. The driver must always be ready to turn the lights on manually, including the front and rear fog lights.
WARNING: After the external lights have switched on automatically, the front and rear fog lights can always be turned on manually. When the external lights are switched off automatically, the front and rear fog lights are also switched off (if active) and the next time the external lights are switched on automatically, only the front fog lights will come on. Therefore, the user will have to switch the rear fog lights on manually if these are required.
The responsibility for switching on the lights, depending on the daylight and the local regulations in force, always lies with the driver. The automatic system for switching on and off the external lights is to be considered as an aid for the driver. If necessary, switch the lights on and off manually.
Twilight sensor
The twilight sensor is composed of two sensors: a global sensor, which measures the brightness upwards, and a directional one, which measures the brightness in the vehicle's travelling direction, so as to recognize tunnels, etc.
If the sensor should fail, the system will turn on the low beams and the side lights, regardless of the brightness of light outside, and the failure message will appear on the instrument panel display.
The failure indication will be displayed so long as the switch A is turned to AUTO.
In this case, we recommend that you switch off the automatic operation for the external lights and switch them on manually if necessary; contact your local Authorized Maserati Dealer as soon as possible.
Direction indicators
The lever has 3 settings:
B - Direction indicators off
C - Lever up: right-hand indicators
D - Lever down: left-hand indicators.
Lane change function
This function allows you to activate either the right-hand or left-hand direction indicators so that they flash three times, without moving the lever to positions C or D, and then move it back to the neutral position, B. To activate this function, you must simply start moving the lever to a different position: if you move it up you activate the right-hand direction indicators, if you move it down you activate the left-hand direction indicators.
This function is useful when overtaking or changing lanes.
High beams
To switch on the high beams with the light switch in position 2, push the left hand lever towards the dashboard. Pull the lever towards the steering wheel again to switch off the high beams and switch on the low beams.
WARNING: For the use of the high beams, follow local legislation.
Flashing the headlights
The headlights can be flashed by pulling the left-hand lever towards the steering wheel. Flashing occurs also with lights off if the ignition key is at MAR (ON).
WARNING: Flashing takes place with the high beams. Comply with local law in force to avoid penalties.
“Follow me home” function
This feature allows you to activate the timer for the position lights and for the low beams, so that they remain on, for a certain period, after turning off the vehicle.
This function is activated by pulling the turn signal lever, used to flash the headlights. The position lights and low beams light up for 30 seconds, the message “follow me” appears on the instrument panel display for 20 seconds, and the lights’ activation time is displayed.
When the function is active, every time the flash control is operated, the time the lights remain on is increased by 30 seconds, with a maximum total time of 210 seconds. The display will show the value of the time set.
If the flash control is operated for over 2 seconds, the function is deactivated, and the indicator on the instrument panel’s display switches off. When the function is active, returning the key to the MAR (ON) position deactivates the system.
Windshield wiper/washer and headlight washers
The windshield wiper and washer work only with the ignition key in the MAR (ON) position.
Windshield wipers
The lever has 5-settings:
A -Windshield wiper stopped.
B - Automatic operation. In this position the rain sensor's sensing range can be adjusted.
C -Slow continuous operation.
D -Fast continuous operation.
E -Fast temporary operation.
Windshield washer
Pulling the lever towards the steering wheel activates the windshield washer and wiper. When the windshield washer is activated, the windshield wiper starts automatically. Releasing the lever turns off the jet of fluid while the blades continue to wipe for a few seconds.
WARNING: Do not start the windshield washer during the cold months until the windshield has warmed up. If it has not warmed up, the liquid could freeze on the glass and block your view.
WARNING: If there is ice or snow on the windshield, do not activate the windshield wiper in order to prevent damaging the mechanism.
Headlight washers
The headlight washers are activated automatically when the windshield washer is started and the external lights are on. The headlight washer and windshield washer share the same fluid reservoir, and a low fluid level is indicated by the same warning light on the instrument panel. The headlight washers are deactivated if the vehicle’s speed exceeds 75 mph (120 km/h).
Windshield wiper/washer and headlight washers
Rain sensor
The function of the rain sensor is to adapt the frequency of the windshield wiper’s strokes (in the intermittent operation mode) to the intensity of the rain.
All the other functions controlled by the right-hand lever (windshield wipers off, headlight and windshield washer in continuous slow and fast operation mode and in temporary fast operation mode) remain the same. The rain sensor is activated automatically by bringing the righthand lever to position B. The sensor's setting range varies progressively, from the windshield wiper's stationary position - when the windshield is dryto the windshield wiper's second speed - in conditions of pouring rain.
To regulate the frequency of intermittent operation, with the lever on the B position, rotate the end section of the lever F. Rotating the end section clockwise, intermittent operation varies from a maximum (fast intermittent wipe) to a minimum (slow intermittent wipe). If the engine is turned off during automatic windshield wiper operation, with the lever in position B, to reactivate the function the next time the engine is started, the lever must be moved to A (stop position) then returned to position B.
Before cleaning the front windshield (for example in service stations) make sure the rain sensor is deactivated or that the key is turned to STOP. The rain sensor must be off also when washing the car by hand or in automatic car washes.
WARNING: In case of ice or snow on the front windshield, do not activate the rain sensor to avoid damaging the wiper motor.
Sensor failure
When the rain sensor is activated, in the event that it is malfunctioning, the windshield wiper is switched on in the intermittent operation mode and the sensing range is set by the user, regardless of whether or not there is rain on the windshield. In this case, we recommend that you turn off the rain sensor and turn on the wiper, if necessary, in continuous mode. Contact your local Authorized Maserati Dealer as soon as possible.
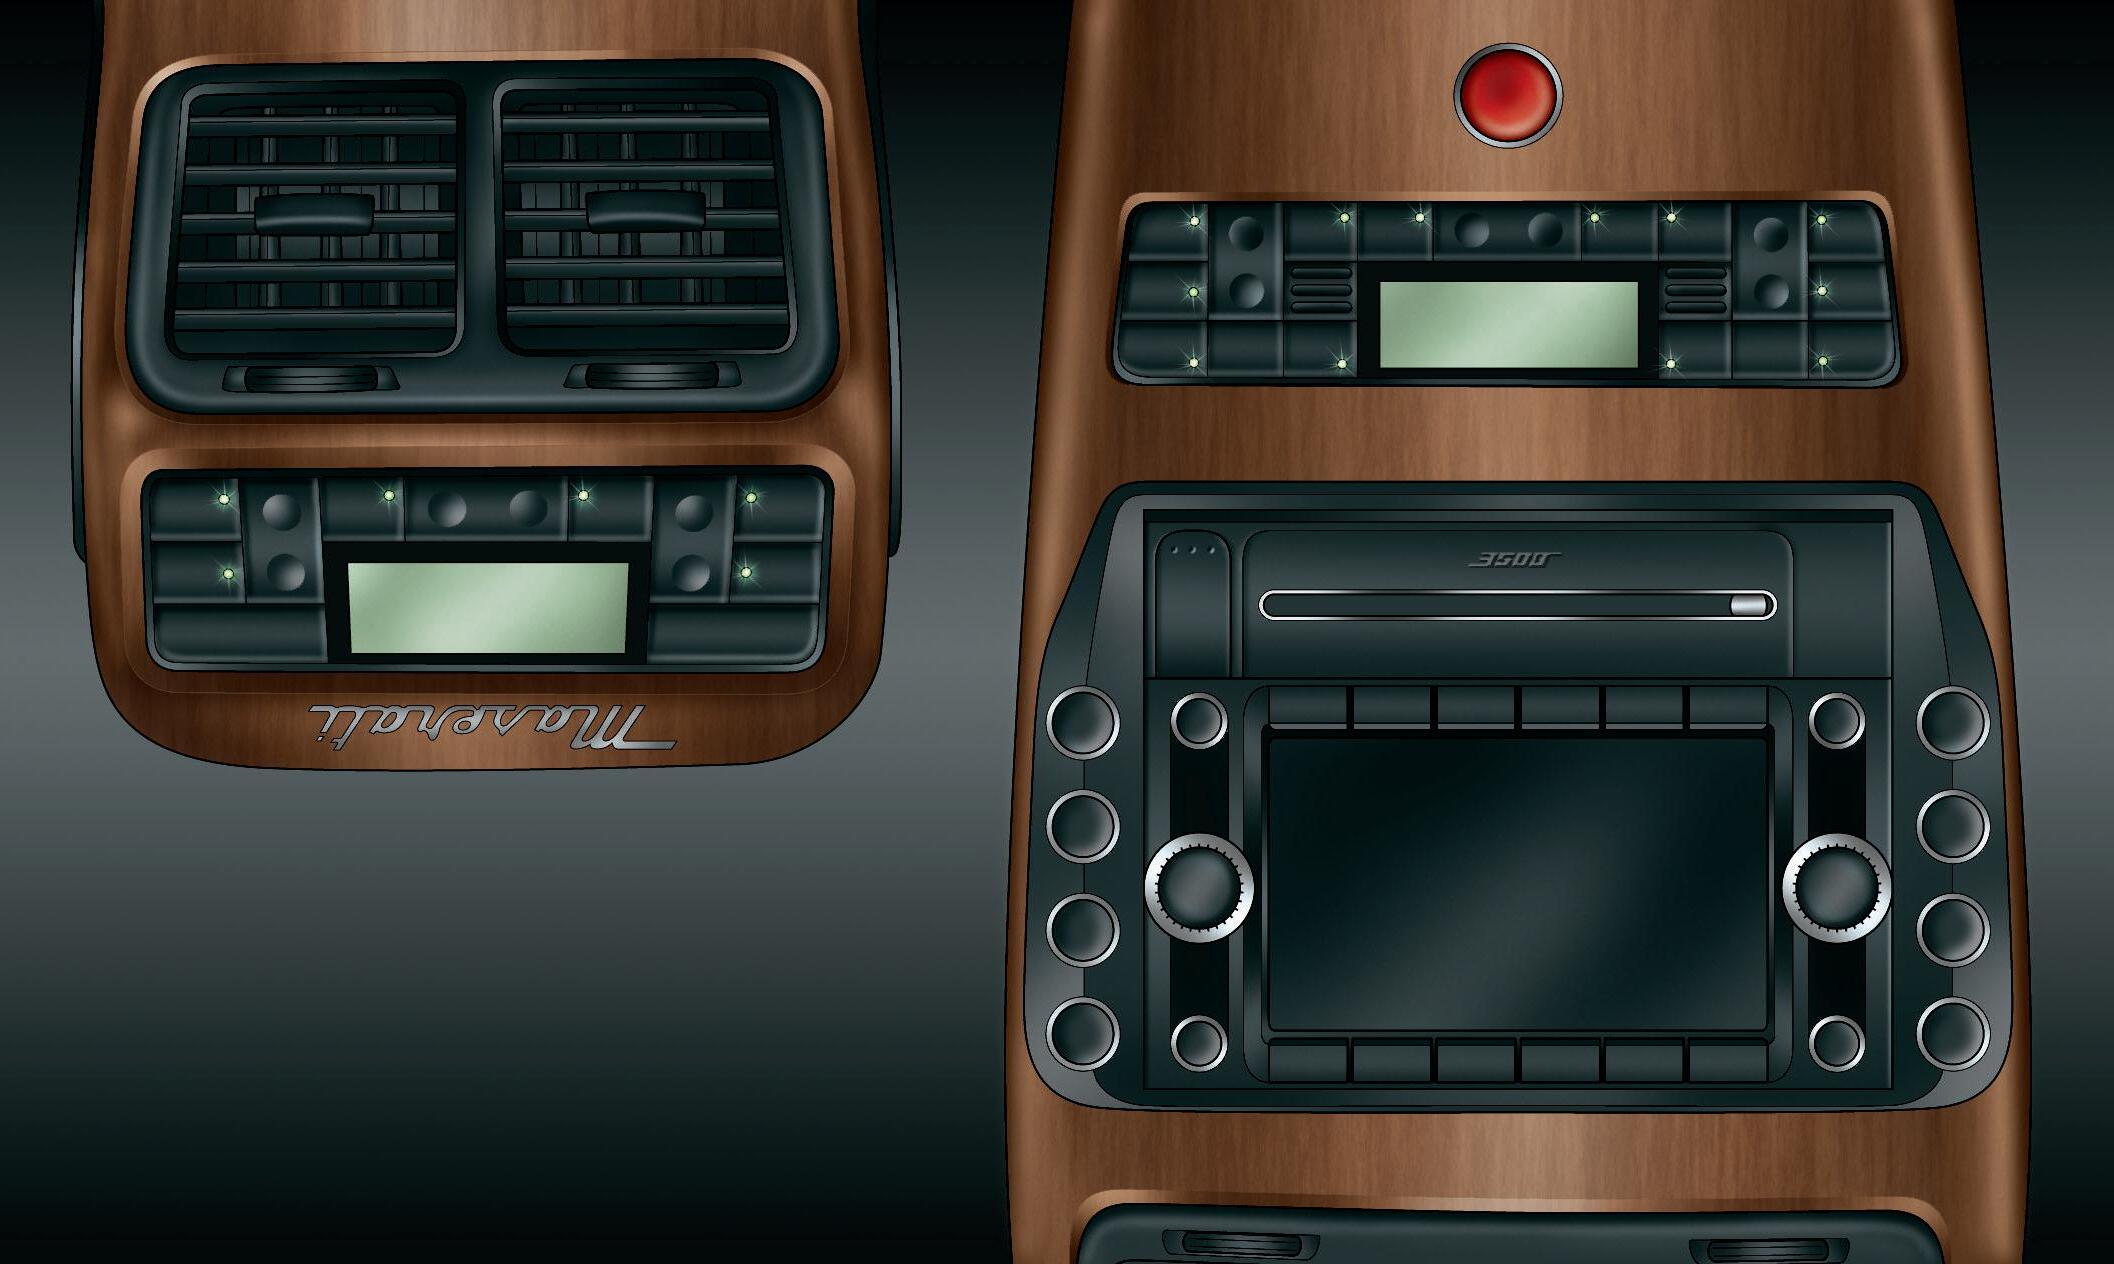
Bose® Infotainment
This vehicle is equipped with Bose® Infotainment system, an advanced user interface which combines innovative and exclusive technical features to provide entertainment, navigation, communication and information functions within a single system. In addition, this vehicle is equipped with Bose® Surround Sound System, acoustically optimized for the Maserati Quattroporte.
For more information on the system functions and their use, please refer to the dedicated manual. These functions include enhanced radio reception with easier station tuning, automatic playback from almost every kind of audio disc, and the exclusive Bose uMusic® system that learns your musical preferences and automatically plays your favorite music. The system also features voice recognition for a number of key functions and can be customized to match your personal preferences.
The navigation system assists the driver with advice and suggestions for the best route to take for reaching the set destination through voice guidance and graphic information. The suggestions provided by the navigation system do not relieve the driver from full responsibility for maneuvers made through traffic while driving, or from compliance with laws and other provisions regarding road traffic. The driver is always responsible for safe driving.
The system controls and main functions are listed below. The vehicle is equipped with an annex to the owner's manual, describing the Bose® Infotainment fully and listing all of the warnings and precautions for use, which are important for safe use of the system. We recommend that you read this annex carefully and thoroughly and that you keep it within reach at all times.
Controls
A- Bose® Infotainment
B- Front air conditioning and heating system controls
C- Rear air conditioning and heating system controls (optional)
Main panel controls
1) Zoom map +.
2) Button pressed briefly: Presets.
Recall the stations stored (1-6). Button pressed at length: stores the current station (1-6).
3) Cancels the current action or goes back to the previous screen.
4) Outer tuning knob. Rotation: selects the categories.
5) Inner tuning knob. Rotation: highlights the items within a category. Confirms the selection of a highlighted item
6) Provides access to the Options screen.
7) USB port.
8) Phone mode activation.
9) Navigation mode activation.
10) Variable function depending on the active mode, as indicated on the display above the button.
11) Variable function depending on the active mode, as indicated on the display above the button.
12) Digital Sources mode activation.
13) Broadcast Sources mode activation.
14) CD eject.
15) Zoom map -.
16) Button pressed briefly: Inner volume knob.
Rotation: adjusts the volume. Activates the system (ON) - with the system ON, it mutes or unmutes it.
Button pressed at length: Deactivates the system (OFF).
17) Outer volume knob.
Rotation: Audio settings: Bose Sound, customized, only front speakers, only rear speakers.
Controls repeated on the steering wheel
18) Increases the sound system volume.
19) Decreases the sound system volume.
20) Button pressed briefly Broadcast Sources Mode: searches for the first tunable station with a higher frequency; CD, Music Library mode: next track selection.
Button pressed at length CD audio mode: track fast forward.
21) Button pressed briefly Broadcast Sources Mode: searches for the first tunable station with a lower frequency; CD, Music Library mode: goes to the previous track if selected within the first 3 seconds of track playing, otherwise the track is played again from the beginning. Button pressed at length CD audio mode: track fast rewind.
22) Mode selection Broadcast, Digital sources.
23) Mute function on/off.
24) Broadcast Sources Mode: Radio frequency shift shifts the radio frequency to the next station in preset steps, starting from the station currently tuned in.
CD, MP3, Music Library mode: selects the next folder.
25) Broadcast Sources Mode: shifts the radio frequency to the previous station in preset steps, starting from the station currently tuned in.
CD, MP3, Music Library mode: selects the previous folder.
26) Confirms the function, item or value selected.
27) Button pressed briefly Voice command function activation/deactivation. Button pressed at length Repeats the last voice guidance message given by the navigator.
28) Button pressed briefly Phone mode activation. Place call. Accept incoming call. End Phone call in progress. Button pressed at length Reject incoming Phone call.
Air conditioning and heating system
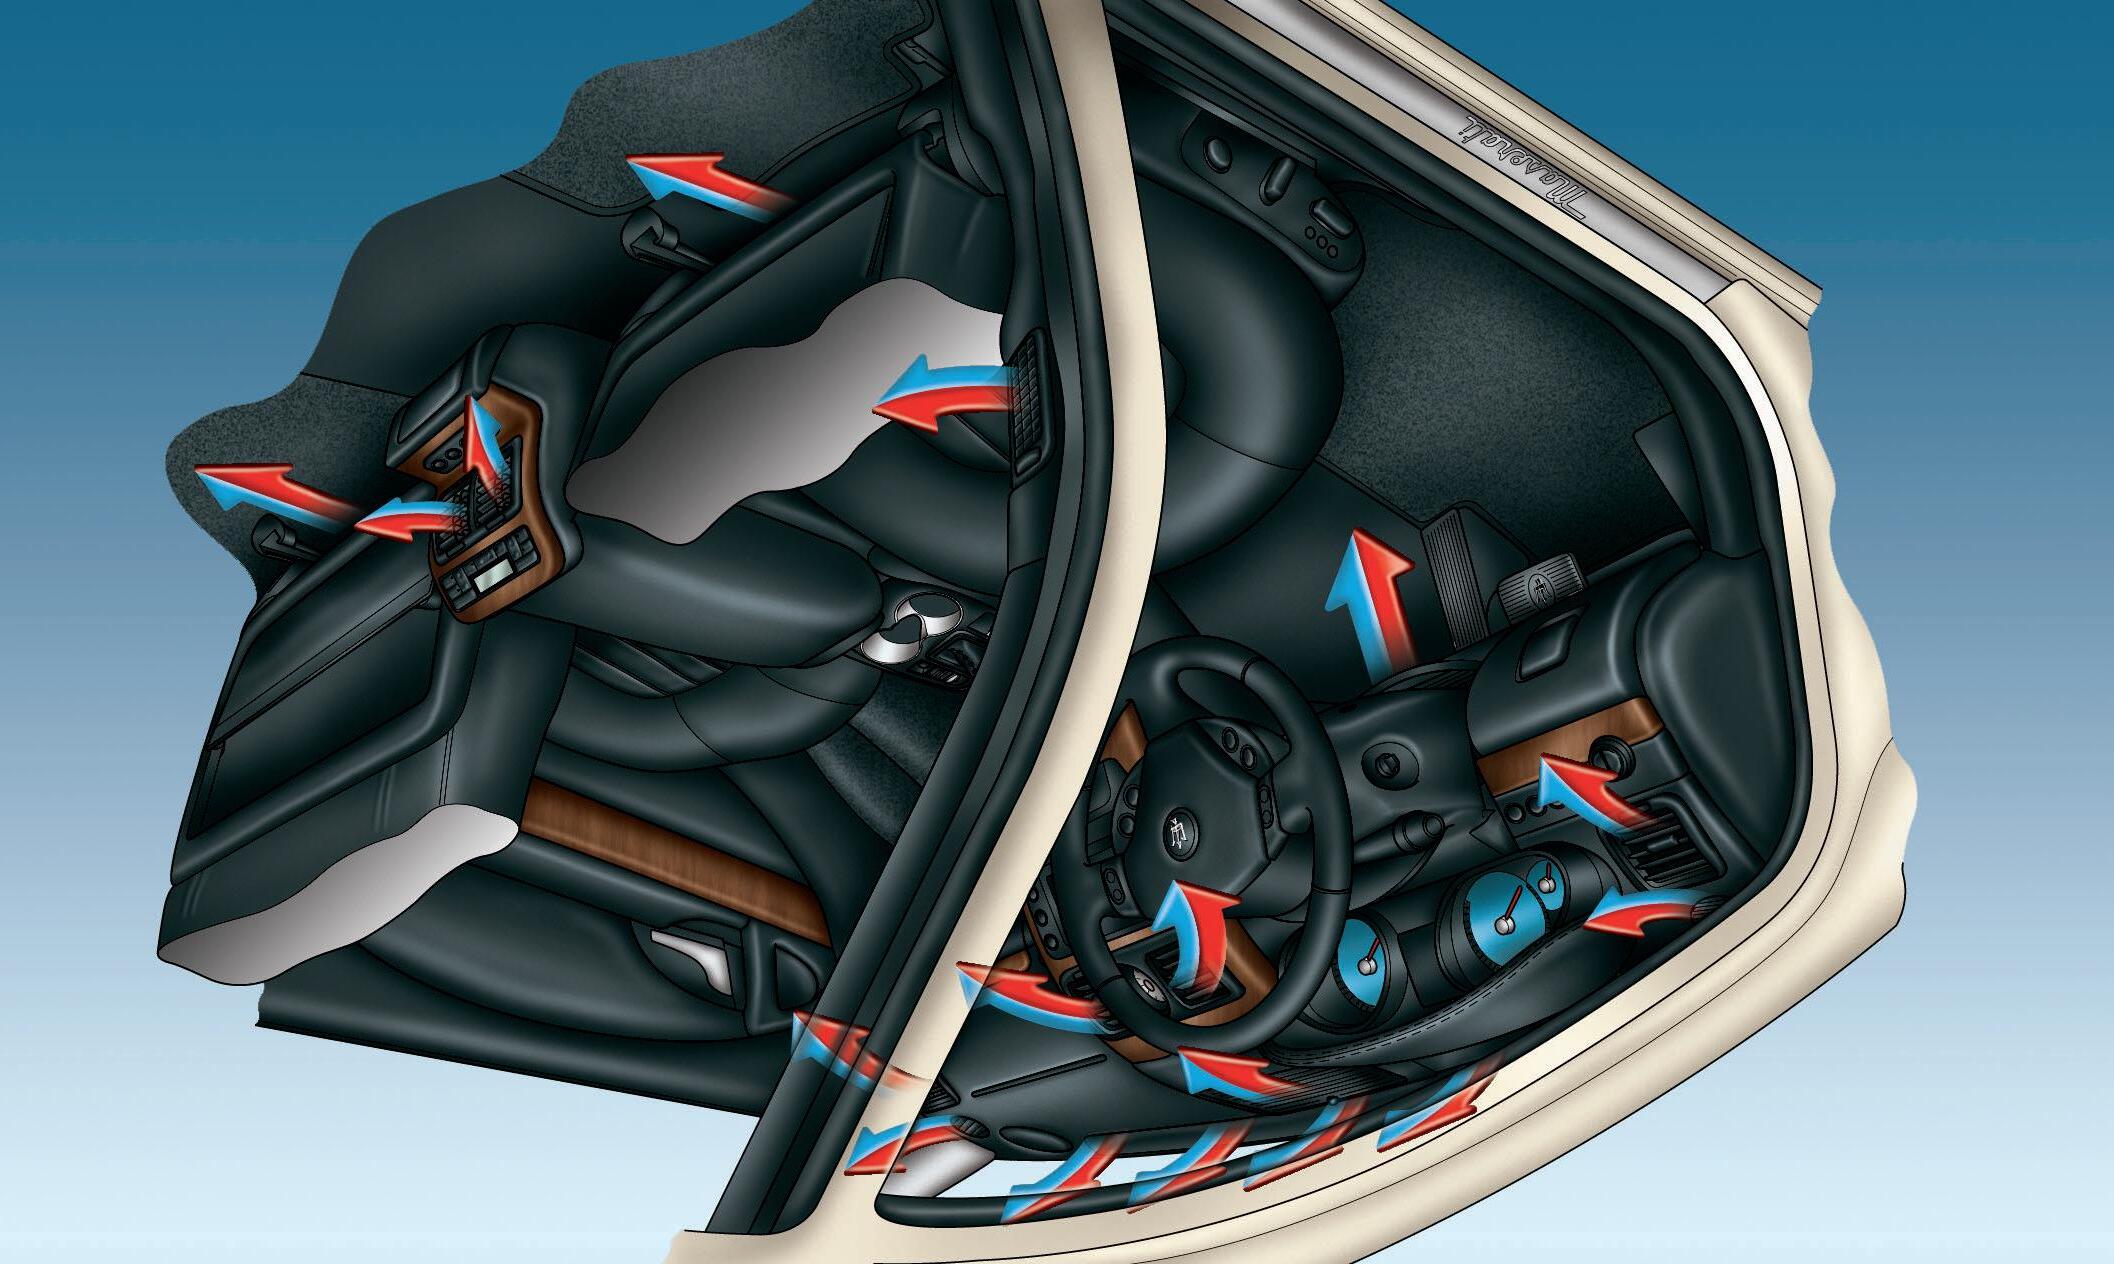
A- Front central and lateral vents
B- Upper dashboard vent
C- Lower dashboard vents
D- Upper lateral dashboard vents
E- Windshield vents
F- Rear central vents
G- Rear lateral vents
H- Vents beneath seats
Adjustable vents with direction option
These can be positioned vertically and horizontally by means of control I. Using control J, the air flow distribution can be adjusted. Vents A, F and G have the same features.
Fixed air distribution vent
These cannot be adjusted in any way and are designed specifically for demisting/defrosting or cooling certain areas.
Vents B, C, D, E and H have the same features.
Front automatic heating/air conditioning controls (A)
1) left-hand temperature setting
2) right-hand temperature setting
3) fan speed adjustment control
4) 7-position air distribution on the left-hand side
5) 7-position air distribution on the right-hand side
6) air conditioner system's compressor activation/deactivation button
7) single/dual zone selection button
8) defrosting/demisting activation/ deactivation button
9) air recirculation activation/ deactivation button
10) automatic/manual system control button
11) heated rear window activation/ deactivation buttons
12) rear instrument panel activation/ deactivation button.
Rear automatic heating/air conditioning controls (B) (optional)
13) automatic/manual system control button
14) left-hand temperature setting
15) automatic/manual system control button
16) right-hand temperature setting
17) single/dual zone selection button
18) fan speed adjustment control
19) air conditioner system compressor activation/deactivation button
20) 3-position air distribution setting, on the left-hand side
21) 3-position air distribution setting, on the right-hand side
General
The vehicle is equipped with an automatic dual-zone air conditioner/ heater, which is designed to adjust the air temperature, distribution and flow in the vehicle's passenger compartment, in two separate zones: left-hand side and right-hand side. In fact, the system can be controlled from the front by means of panel A, incorporated in the central console, and also from the rear, by means of panel B, housed in the end section of the console.
The rear instrument panel can be activated/ deactivated using the REAR button 12 on the front panel.
When the rear instrument panel B is active, the front panel A is disabled. Both instrument panels allow the user to control the following parameters/ functions:
–left-hand/right-hand air temperature
–left-hand/right-hand air distribution
–fan speed (stepless change)
–compressor activation
–recirculation.
All the functions listed above can be modified manually, i.e., the user can select one or more of these functions, as he/she wishes, using the control panel.
The manual selections are always given priority over the automatic ones and are memorized until the user chooses the automatic control again. When a function has been set manually, the other automatic functions will not be affected.
The following parameters/functions can be set/modified manually:
–left-hand/right-hand side air temperature
–fan speed
–air distribution setting on 7 positions (left/right)
–compressor activation
–single/dual-zone distribution priority
–defrosting/demisting function (MAX DEF)
–air recirculation function
–automatic/manual control of the system
–heated rear window
–system deactivation
–activation of rear control panel.
Activation
The system can be activated in a number of ways, however, begin by pressing one of the buttons 10, 13 or 15 AUTO and using the buttons 1, 2, 14 or 16 to set the temperature required. This way, the system will operate in fully automatic mode so that the temperatures set will be reached as quickly as possible.
In this condition, manual interventions will activate the following functions:
–MONO button 7 or 17 adjusts the air temperature and distribution in the two heating/air conditioning areas.
–REAR button 12 activates the rear control panel
–button 6 or 19 switches off the compressor
–button 8 activates/deactivates the defrosting/demisting function on the front and side windows
–button 11 activates/deactivates the heated rear window.
By altering any other parameter manually, such as the air temperature or distribution, these features switch from the fully automatic control mode (FULL AUTO) to the manual mode (AUTO).
On starting the vehicle after stopping, the various parameters are controlled manually or automatically depending on the options selected by the user before turning the engine off. As a consequence, all the manual operations carried out before the vehicle stop are memorized and kept stored until the next start up. This also applies for the OFF function; if it were in the OFF position before stopping, when next started the system should still be in the OFF position.
System deactivation
If the compressor is deactivated on both the front and rear panels, switching the air flow reduction control 3 below the first bar results in the fan switching off.
If the compressor is enabled on the front and rear control panels, the air flow reduction control 18 cannot request flow rates below the first bar (it will not switch off the fan).
When switched OFF, the heated rear window button 11 and recirculation button 9 are controlled normally without activating the heating/ air conditioning system. Exiting the OFF status, the recirculation will forcibly return to the automatic mode.
Recirculation
This is activated when button 9 is pressed and allows only the air already in the passenger compartment to circulate.
The recirculation feature has various operation modes:
–Automatic (AQS) (LED on button switched on)
–Forced closed recirculation (LED on button switched on)
–Forced open recirculation (LED on button switched off).
Automatic
In the automatic operation mode, the recirculation is switched on when:
–the air quality sensor detects the presence in the air of pollutants that may enter the vehicle during traffic jams, when driving in built-up areas or when passing through tunnels. –the compressor is activated, outside temperatures are over 37.4°F (3°C) or the speed is below 3.73 mph (6 km/ h), to prevent air polluted by exhaust gas during stops from entering the passenger compartment. When the vehicle speed exceeds 7.46 mph (12 km/h), the system resets the previous automatic control conditions.
When the compressor is deactivated or outside temperatures are below 37.4°F
(3°C), the automatic recirculation function is switched off automatically. After prolonged operation (over 15 minutes), the system switches off the recirculation function automatically for safety reasons, allowing the exchange of air once again.
Forced closed recirculation
In this type of operation, the amber LED switched on indicates the recirculation flap is closed.
Forced open recirculation
In this type of operation, the LED switched off indicates the outside air flap is open.
AUTO mode
When this button is pressed (one button per zone), the automatic system will take control of the following functions once again:
–air distribution (for the side concerned)
–fan speed
–compressor operation (with ECON LED lit up)
–air recirculation function.
Rear control panel
The rear passengers can also utilize the system using the controls on the rear control panel.
The rear panel is activated by pressing button 12 REAR, on the front control panel.
REAR function
Pressing the button 12 REAR (the relative LED will come on) will result in the following:
–the controls incorporated in the rear control panel will be enabled; –the options set from both control panels will be repeated on the rear display.
This function is active both in the MONO and DUAL zone.
Pressing the button 12 REAR once again (LED on) will disable the controls on the rear panel (LED off).
System initialization
Every time the battery is reconnected, when the vehicle is started, a system initialization procedure is required. This is run by activating the compressor. Both displays automatically show the passenger compartment temperature set at 71.6°F (22°C).
The system is set up as follows:
–AUTO (automatic operation, the words FULL AUTO appear on the display).
–Compressor enabled (the LED on the button lights up).
–Defrosting/demisting (MAX DEF) deactivated (the LED on the button is switched off).
–Heated rear window deactivated (the LED on the button is switched off).
–Recirculation controlled by the automatic system (if active, ‘AQS’ will appear on the display).
–the air ventilation and distribution are set by the system.
–REAR deactivated (the LED on the button is switched off).
Bose® Surround Sound
The digital Hi-Fi system, developed in association with Bose®, includes exclusive accessories such as the innovative speakers with neodymium technology, also making use of other systems such as AudioPilot® and active electronic equalization.
AudioPilot® System
The AudioPilot® technology detects and measures the ambient noise, and consequently adjusts a number of acoustic signal parameters, continuously, to ensure the sound quality inside the passenger compartment is always at optimum levels.
Electronic equalization
The electronic equalization helps ensure absolute sound precision at any volume. The automatic output frequency balancing feature makes manual adjustments using switches or dials unnecessary.
Diversity system
This is composed of two aerials linked together, which are activated reciprocally to obtain the best signal reception.
The sound system in the vehicle consists of:
1) three medium and high range speakers located on the upper part of the dashboard
2) a 5.12 in (13 cm) Neodymium (Nd®) Richbass woofer powered by an amplifier with dual-stage modulation, fitted into the footrest on the passenger’s side
3) a tweeter on each of the rear door panels
4) a neodymium low and medium range speaker on each of the rear door panels
5) one 9.84 in. (25 cm) Power Neodymium (Nd®) woofer mounted on the rear parcel shelf
6) Two 90 mm Nd (Neodymium) Twiddlers for high and medium frequencies, positioned on the sides of the rear luggage shelf
7) digital amplifier with AudioPilot® technology controlled by a microphone positioned to the right of the steering wheel and customized six-channel equalization
8) AudioPilot® sensor
9) audio CD player and single-CD drive for GPS navigation maps, in the center of the dashboard
–aerial incorporated into rear window
–aerial incorporated in the windshield
Starting the engine
Keep the brake pedal pressed when starting the engine.
1) Ensure that the handbrake is engaged and that the doors are closed.
2) Keep the brake pedal pressed when starting the engine.
3) Do not press the accelerator pedal.
Starting-off when the engine is cold
WARNING: If you attempt to start the engine without depressing the brake pedal, a message on the display will warn you to push it.
It is dangerous to run the engine in a closed space. The engine consumes oxygen and discharges carbon dioxide, carbon monoxide and other toxic gases.
WARNING: Before start-up, switch off the electrical devices with a high power consumption (air-conditioning and heating system, heated rear window, headlights, etc.).
WARNING: Do not start the engine if the fuel level in the tank is low.
4) Check that the letter P (PARK) or N (NEUTRAL) is shown on the gear display and on the instrument panel.
5) Turn the ignition key to the AVV (START) position and release it as soon as the engine starts. Do not keep the key turned to the AVV (START) position for a long time. In the event of misfiring, turn the key back to the STOP position and wait until the gearshift display switches off and then repeat the entire procedure.
The engine can only be started when the gearshift lever is in P (PARK) or N (NEUTRAL).
When the engine has started up, release the key, which will automatically return to the MAR (ON) position.
In the event of misfiring, turn the key back to the STOP position and wait until the gearshift display switches off and then repeat the entire procedure.
Start-off slowly, avoiding sudden accelerations and rev the engine at low-medium speeds. Highperformance driving should be avoided until the water temperature reaches 149 °F - 158 °F (65–70 °C).
Emergency starting with an auxiliary battery
If the battery is flat, the engine can be started using another battery having the same or slightly higher capacity than the flat one.
Proceed as follows:
1) Connect the positive terminals (+) of the two batteries with a jumper cable.
2) Connect the negative terminals (-) of the two batteries with a jumper cable.
3) Start the engine.
4) When the engine starts, remove the cables in the reverse order to the above.
If the engine does not start after a number of attempts, do not continue, consult your local Authorized Maserati Dealer.
Do not carry out this procedure if you do not have experience; incorrect procedures can cause high electrical discharges and even cause the battery to explode.
Do not approach the battery with open flames or lit cigarettes and not to cause sparks: risk of explosion and fire.
WARNING: Do not use a batterycharger for emergency starting under any circumstances. You could damage the electronic systems, particularly the control units managing the ignition and fuel supply functions.
Remember that if the engine is not started, the brake servo and power steering systems are not activated and therefore the effort required on the brake pedal and steering wheel is much greater.
Turning off the engine
With the engine idling, rotate the ignition key to the STOP position. A burst on the accelerator pedal before turning off the engine has no purpose and increases fuel consumption.
WARNING: The ignition key can only be removed from the switch when the gearshift lever is in position P. In addition, it must be removed within 30 seconds after turning the key to STOP.
If you do not remove the key within 30 seconds, you will need to turn it back to MAR (ON) and then to STOP to obtain a further 30 seconds within which to remove the key. In the event that the key unlocking system fails or if it is not possible to shift the gearshift lever to P, to remove the key you must turn it to STOP, then remove the cap A, using a pen or sufficiently pointed tool, then press the button just uncovered and at the same time extract the key. Once the key has been removed, refit the cap A.
Electronic automatic gearbox
The electronically-controlled gearbox has six forward gear ratios and one reverse gear. The gears can also be engaged manually once you have shifted the gearshift lever to the sector provided.
The gearbox controls are the following:
A- Gearshift lever
B- Button on the gearshift lever to engage reverse gear R and park P
C- SPORT button
D- ICE (low grip) button
E- Gear display.
The SPORT and ICE modes can be selected both when the gearbox is set to automatic (AUTO) and to sequential manual (MANUAL) operation.
The gearbox operating mode is controlled by the lever A. This lever can be positioned in the following sectors:
P – (PARK)
R – (REVERSE)
N – (NEUTRAL)
D – (DRIVE)
+ / - – (MANUAL)
The position of the gearshift lever A is shown on the gear display E by the illumination of the corresponding letter. This letter is also shown on the instrument panel display.
WARNING: In order to properly use the Automatic Gearbox, it is essential that you read through this whole chapter, so that you can learn what the correct and permitted operations are.
The gearbox is also equipped with Shift-Lock and Key-Lock safety systems.
Shift-Lock
This safety system allows you to shift from P (PARK) to another position only if the brake pedal is depressed. This prevents the vehicle from involuntarily jumping forward or backward.
Key-Lock
This function allows you to remove the key from the ignition switch only when the gearshift lever A is in position P and within a maximum time of 30 seconds; when this time has elapsed, the key can no longer be removed.
Starting the engine
The engine can only be started when the gearshift lever A is in position P or N.
Always start the engine holding the brake pedal depressed.
WARNING: Upon setting off, after starting the engine, do not depress the accelerator pedal before and while shifting the gearshift lever A.
This is particularly important when the engine is cold.
Driving the vehicle
After starting the engine, let the engine idle with the brake pedal depressed (Shift-Lock safety), then shift the gearshift lever A to D, or to the sequential manual operating position + or - . Release the brake pedal and gradually depress the accelerator pedal.
WARNING: The gearshift lever can only be shifted from position P when the ignition key is in the MAR (ON) position and the button B and the brake pedal are depressed (Shift-Lock safety).
For safety reasons, the gearshift lever A can be shifted from D to R and P only when the button B is pressed. It is also advisable to depress the brake pedal during this maneuver.
WARNING: Do not run the engine at top RPM until it has reached its operating temperature.
WARNING: In case of performance starts, check that the electric parking brake is deactivated.
the engine running, as this may lead to malfunctions.
WARNING: For more comfortable starting (with the gearshift lever in D, R or Manual and the electric parking brake - EPB - engaged), push the brake pedal, manually deactivate the EPB system by pulling the lever F upward, and push the accelerator pedal.
Stopping the vehicle
Regardless of the position of the gearshift lever A, simply depress the brake pedal to stop the vehicle.
Always depress the brake pedal when the gearshift lever is moved to the D, R or MANUAL positions with the engine idling. If the brake pedal is not depressed the vehicle may move forward.
When the gearshift lever is in position D, R or MANUAL, the engine idling and the vehicle on an even ground, if the brake pedal is not depressed, the vehicle tends to move.
seconds from turning the key to STOP. The letter P (Key-Lock safety) is displayed on the instrumental panel for the full 30 seconds.
If you do not remove the key within 30 seconds, you will need to turn it back to MAR (ON) and then to STOP to obtain a further 30 seconds within which to remove the key.
WARNING: In the event that the key unlocking system fails or if it is not possible to shift the gearshift lever to P, to remove the key you must turn it to STOP, then remove the cap G, using a pen or sufficiently pointed tool, then press the button just uncovered and at the same time extract the key. Once the key has been removed, refit the cap G.
Do
Not Keep The
vehicle stationary for a long time with the brake pedal depressed, the gearshift lever in D and
The ignition key can be removed from the switch only when the gearshift lever A is in position P and within 30
If you turn off the engine with the gearshift lever A in a position different from P, an acoustic signal will sound for a few seconds and a message will be displayed indicating to shift the lever to P.
When the driver’s door is opened with the gearshift lever A in a position different from P, an acoustic signal will sound for a few seconds and a message warning the driver that the gearshift lever is not in P will be displayed.
Gearshifting is always active and may be performed even when one or more doors, the engine compartment lid or the luggage compartment lid are open. Therefore, in these conditions, take great care to avoid moving the gearshift lever and so accidentally engage gears.
Selecting automatic or sequential manual operating mode
The gearbox can be used both in fully automatic (position D) and in sequential manual (positions + or -) mode.
To select the desired mode, shift the gearshift lever A to:
D – automatic gearshifting (AUTO) MANUAL (+ / -) – sequential manual gearshifting. The lever can always be shifted from one position to the other, even when the vehicle is moving. You can actually continually shift between D and MANUAL.
If automatic gearshift mode is selected, the word AUTO and the letter D will be shown on the instrument panel display, while for sequential manual gearshifting, the word MANUAL and the gear engaged will be shown.
Automatic operation (AUTO)
To set automatic operation, shift the gearshift lever A to one of the following positions:
P – Park
R – Reverse gear
N – Neutral
D – Drive, automatic forward gear (6 ratios)
The position of the gearshift lever is shown on the gear display E by the illumination of the corresponding letter. This letter is also displayed on the instrument panel.
The gearshift lever A can freely be shifted from D to N. The button B must also be pressed to engage and disengage R.
Position P is engaged by pressing the button B and then moving the gearshift lever; it is disengaged by pressing the button and the brake pedal at the same time. It is advisable to also hold the brake pedal depressed when moving the gearshift lever to the other positions.
P – Park
When parking the vehicle, shift the lever to P. A gearbox device will lock the driving wheels.
WARNING: Shift the lever to position P only when the vehicle is stationary. Therefore, it is advisable to perform this maneuver with the brake pedal depressed.
WARNING: To prevent accidental engagement, the gearshift lever can only be shifted from P to any other position when the button B and the brake pedal are depressed.
WARNING: Before getting out of the vehicle, check that the automatic parking brake is engaged. Shift the gearshift lever to P even when you need to get out of the vehicle for only a few seconds leaving the engine running.
If you turn off the engine with the gearshift lever A in a position different from P, an acoustic signal will sound for a few seconds and a message will be displayed indicating to shift the lever to P.
When the driver’s door is opened with the gearshift lever A in a position different from P, an acoustic signal will sound for a few seconds and a message warning the driver that the gearshift lever is not in P will be displayed.
WARNING: In the event of a battery failure, manually release the driving wheel locking device before you drive.
In the event of a battery failure, shift the gearshift lever from P to another position before moving the vehicle. To do this, follow the emergency procedure described below:
–Remove the pocket-change tray H.
–Using the screwdriver provided in the toolkit, push on the gearshift lever locking mechanism through the hole.
–At the same time, slightly move the gearshift lever towards N in order to release the lever locking mechanism.
–Take the screwdriver out of the hole, taking care not to move the gearshift lever.
–Move the gearshift lever fully back to N.
–Cap the hole using the tray H to prevent foreign bodies from falling into the gearbox and damaging it.
The gearshift lever is now released.
While moving the gearshift lever, remember to press the button B on the lever.
WARNING: Work extremely carefully so as not to damage the trim panels.
If the automatic parking brake engagement system is active, the EPB is automatically applied when the vehicle is stopped, (see page179).
WARNING: In the event of a battery failure, manually disengage the parking brake (EPB) before you drive (see page179).
R – Reverse gear
With the vehicle stationary, the engine idling and the button B pressed, shift the gearshift lever A to position R. It is advisable to also depress the brake pedal when shifting to this position. When the lever is in position R, the system emits an acoustic signal for a few seconds.
You can also shift the gearshift lever to R when the vehicle is not completely stationary, however, this does not mean that reverse gear is actually engaged, since there is a limit speed above which the gear is not engaged. When the speed drops to below this limit, reverse gear is engaged.
WARNING: To prevent accidental engagement, the gearshift lever can only be moved from R to any other position when the button B is pressed. It is advisable to also depress the brake pedal when shifting to this position.
N – Neutral
With the vehicle stationary and the brake pedal depressed, move the gearshift lever A to N.
This function should be used when you need to tow or push the vehicle.
D – Automatic forward gear
Select this position when you wish to use of all the automatic gearshift functions.
With the vehicle stationary and the brake pedal depressed, move the gearshift lever A to D; if the gearshift lever is position in P or R, also press the button B.
When the function is set, the letter D illuminates on the gear display and on the instrument panel.
When this function is active, the ECU controls automatic engagement of the six gears. The gears will be engaged in relation to the traveling speed, engine RPM, accelerator position, speed with which the pedal is depressed as well as the traveling conditions (e.g., uphill, downhill, on curves).
The system has been programmed to classify all driving styles, in relation to the above mentioned parameters, and to associate them with the various vehicle settings, which go from extremely comfortable and economic driving to full sports-style driving. The setting is selected automatically.
Sequential manual operation (MANUAL)
This allows you to manually engage gears while driving. When the automatic gearshift mode is selected (position D), shift the gearshift lever A to + or -. When this mode is selected, the symbol + or – illuminates on the gear display E, based on the position of the gearshift lever, and the gear engaged is shown on the instrument panel display.
When sequential manual operation is selected, upshifting or downshifting must be performed manually.
To engage the gears, shift the gearshift lever A to one of the following two positions:
+ UP to engage a higher gear overrevving or underrevving, the system will not accept the command.
- DOWN to engage a lower gear.
WARNING: However, some conditions will remain automatically controlled, for example, when the engine is overrevving or underrevving, the system automatically engages a higher or lower gear.
WARNING: The electronic control unit is programmed to handle one gearshift at a time, therefore, fast and repeated requests will not necessarily result in a gearshift. The higher or lower gear is engaged only if the previous gearshift procedure has been completed.
When the system refuses to engage a gear, an acoustic signal is sounded for a few seconds.
Sequential manual gearshift mode can only be selected from position D, whatever the driving mode (SPORT, NORMAL) active upon requesting a gearshift.
The gear selected by the automatic gearbox will remain engaged when the lever A is moved. Shifting the lever back to D, automatic operation will instantly be resumed, and a gear will be engaged based on the driving style and mode selected.
Other system functions
The settings automatically selected by the system operate in three modes:
–NORMAL
–SPORT –ICE (low grip).
Activate the desired mode by pressing the relative button. The active mode is shown on the instrument panel display.
For each mode there are various vehicle settings, that are automatically set by the system in relation to the traveling speed, engine RPM, accelerator position, speed with which the pedal is depressed as well as the traveling conditions (e.g., uphill, downhill, on curves). NORMAL
WARNING: If you request a gearshift in conditions where the engine is
In the event of a failure of the sequential manual gearshift system, the gearbox ECU will select automatic operation.
NORMAL mode is the default setting when the engine is started. This mode is intended specifically for comfortable and fuel-economy driving (low longitudinal and lateral acceleration); the gears are shifted with minimum vibration in lowest noise (gearshifting at low engine RPM).
Sport
SPORT mode is activated by pressing the button C; the word SPORT illuminate on the instrument panel display.
To return from SPORT mode to NORMAL mode, press the button again.
As "SPORT" mode has a lower priority than “low-grip” mode, if this is already active when activating “SPORT” mode, the system will ignore the command.
ICE (Low grip)
This mode can be used on particularly slippery road surfaces (e.g., rain, snow, ice). To activate/deactivate this mode, press button D. The word ICE will illuminate on the instrument panel display.
In “Low-grip" mode the system uses 2nd instead of 1st gear. This means that when you start from a stationary position with the engine running and you have selected automatic operation (gearshift lever in D), 2nd gear will be engaged; if you have selected sequential manual operation (gearshift lever in MANUAL) and you shift the gearshift lever A from N to R or, when the vehicle stops, 2nd gear will automatically be engaged.
When sequential manual mode is selected with 2nd gear engaged, a downshift request will be ignored. While driving, the system automatically switches to the upper gear if the engine reaches the preestablished speed rate (3,000 RPM). “Low-grip" mode has priority over SPORT mode and assists the MSP system.
A downshift request from 6th to 5th gear will only be accepted if the engine speed rate in 5th gear is lower than 3,000 RPM. As "low-grip" mode can be activated at any time and the system limits the engine's speed to 3,000 RPM in all gears except for the 6th, unrequested gearshifts could take place.
In any case, it is advisable to deactivate "SPORT" mode before selecting "lowgrip" mode.
When sequential manual operation is active, regardless of the mode set (NORMAL, SPORT, ICE), the gearbox automatically upshifts or downshifts when reaching the minimum and maximum engine RPM, respectively. This is to prevent engine overrevving or underrevving.
Strategies during downhill driving
When the accelerator pedal is released, the gearbox system detects that the vehicle is moving downhill and deactivates upshifting. When the accelerator pedal is depressed, upshifting is reactivated but will be delayed by a few seconds. When the brake pedal is depressed, the gearbox system downshifts to provide enhanced engine braking power.
In other words, when driving downhill, the gearbox system operates so as to avoid upshifting and shifting gears when the accelerator pedal is released, and delays gear engagement by a few second when the accelerator pedal is depressed. In addition, when the brakes are applied, it engages the lowest gear in order to provide enhanced engine braking power. This strategy is aimed at making downhill driving safer.
Strategies in curves
The system detects when the vehicle goes into a curve through the lateral acceleration and the steering angle. Detecting this condition, it controls gearshifting using a specific mode. This mode is exited when the vehicle comes out of the curve, at a distance that varies depending on the vehicle speed.
Fast-off strategy
When the accelerator pedal is fully released, the system deactivates upshifting.
When the accelerator pedal is next depressed, upshifting is reactivated only after a few seconds. Upshifting is also deactivated when the accelerator pedal is partially released; the system waits the time necessary to evaluate if the release action is completed.
Hot-mode strategy
In the event that the engine oil or coolant temperature is too high or both, the gearbox system reduces the maximum engine speed to 4000 RPM. Therefore, upshifting will occur at this limit.
This strategy does not manage downhill driving, so as to always have the efficiency of engine braking together with the standard braking system.
MSP system operations
In order to prevent unstable driving conditions, the MSP system may request the gearbox system to deactivate gearshifting. The system handles this request depending on the gear engaged and on the RPM, and decides whether to accept it or not.
Cruise Control
With cruise control the gearbox system selects such settings as to provide enhanced comfort and fuel-economy.
Malfunction indication
The malfunctions indicated may be due to two causes:
–Gearbox failure
–Gearbox oil temperature too high In both cases, the warning light illuminates.
Gearbox failure
A gearbox failure is indicated on the display by the message “Check transmission go to dealer”. While driving, the ECU that controls the device sets an emergency program.
WARNING: In these conditions, we recommended that you stop the vehicle and turn off the engine for at least one minute. When restarting the engine, the autodiagnostic system may cancel the malfunction, which will in any case be recorded by the ECU.
In failure conditions, the gearshift lever A can still be shifted to positions R, N and D.
When shifting to D, only a few gears will be available for shifting, depending on the malfunction found.
WARNING: If a gearbox failure is signaled, take your vehicle to the nearest Authorized Maserati Dealer as soon as possible to have the problem corrected.
If the failure is signaled when the engine is started, it means that the gearbox ECU detected a fault when the vehicle was last used. Also in this case, take your vehicle to the nearest Authorized Maserati Dealer to have the gearbox checked.
When the gearbox is malfunctioning, drive very carefully considering that vehicle performance is reduced. In addition, the reverse gear safety lock may not be active: absolutely do not shift the lever to R when the vehicle is moving.
Gearbox oil temperature too high
This message is displayed when the gearbox oil has reached the maximum temperature. In this case, the gearbox ECU sets an emergency program.
WARNING: We recommend that you always stop the vehicle, shift the lever to position P or N and keep the engine idle until the temperature warning light goes off and the message disappears from the display. Resume driving without demanding high engine performance.
If the warning light illuminates again and the message is displayed again, stop the vehicle again and run the engine at idle speed until the light goes off and the message disappears. If the interval between the two warnings is less than 15 minutes, it is advisable to stop the vehicle, turn off the engine and wait for the engine/ gearbox assembly to fully cool down.
Push start
The engine cannot be push-started. If the battery is flat, start the engine using an appropriate emergency battery following the instructions given in Section 6 “In an emergency”.
Towing the vehicle
If you need to tow the vehicle, observe the following recommendations: –if possible, have the vehicle transported on a vehicle specific for roadside assistance and recovery
If this is not possible:
–Tow the vehicle by raising the driving wheels (rear)
If also this solution is not practicable: –- tow the vehicle for a distance of less than 60 mi (100 km) at a speed below 35 mph (60 km/h).
Tow the vehicle using the towing hook found in the toolkit. Screw the towing hook down tightly in its seat, on the lower, right-hand side of the front bumper. In order to tow the vehicle, turn the key to MAR and engage neutral by shifting the gearshift lever A to N. If the electronic parking brake (EPB) is applied, you must release it, see on page179.
Do not extract the key, as the steering wheel will lock automatically and you will be unable to steer the wheels.
WARNING: If you have to tow the vehicle with 2 wheels raised, ensure that the ignition key is in the STOP position. Otherwise, with MSP activated, the relative ECU stores a malfunction and consequently the warning light on both the instrument panel and the display illuminates. To reset the system you will have to contact your Authorized Maserati Dealer.
When towing the vehicle, make sure that you observe the road traffic regulations concerning both the towing device and driving conduct.
When towing the vehicle with the engine off, remember that, without the assistance of the brake servo, a stronger effort is required on the brake pedal for braking and on the steering wheel for steering.
Screw down the towing hook into its seat (approx. 11 turns). Accurately clean the threaded seat before tightening the hook.
Gearshift levers on the steering wheel (optional)
In sequential manual operating conditions, upshifting and downshifting can be controlled not only with the gearshift lever A but also with the two levers positioned behind the steering wheel.
L- Lower gear engagement lever - DOWN;
M- Upper gear engagement lever + UP. Also in automatic operating mode, when the gearshift lever A is in position D (DRIVE), you can shift to a different gear by moving one of the levers. This action will temporarily switch the system to sequential manual operation.
If you then keep to a constant driving style (low longitudinal and lateral acceleration), the gearbox automatically switches back to automatic operation.