64 minute read
Active and passive safety


Seat belts
The vehicle is equipped with seat belts with automatic retractor designed for maximum freedom of movement. The seat belts are equipped with electronically-controlled load limiting devices and pretensioners. In addition, the attachment points of all the seat belts are directly attached to the seat, in order to help ensure optimal protection, whatever the seat position.
Maserati urges you to use the seat belts correctly fastened and adjusted at all times!
Correct use of the seat belts can help reduce the risk of serious injury in the event of an accident.
The passenger and rear side seats are equipped with KISI System, which improves safety when children are traveling in special child seats. The system is activated by pulling out the belt to its full length: once the child seat is securely fastened, the belt can no longer be pulled out and hence the belt/child seat system is exceptionally secure.
When the belt is released and fully retracted, the system deactivates and resumes its normal operation.
Do not pass seat belts over sharp edges. They could tear. Do not pin anything to the seat belts. This could reduce their initial strength and cause them to tear in the event of a crash.
Always deactivate this feature prior to using the seat belt for normal use. Having the retractor locked can be dangerous when the seat belt is used for directly restraining a passenger.
Fastening the seat belts
Extract the lower section of the seat belt from the outer side of the seat and secure it by holding the fastening tang A, and pulling out the belt until the tang inserts into the buckle lock B. The belt is correctly engaged when the lock clicks into position. To release the belts, press button C. If the driver’s seat belt is not fastened or improperly fastened, the warning light on the instrument panel illuminates.
A buzzer is also activated for approx. 8 seconds when the warning light is on. The retractor locking device is designed to activate whenever the belt is pulled out too rapidly or in case of sudden braking or collision. If the belt locks due to too rapid extraction, allow it to retract a short distance to disengage the locking device.
The retractor is designed to allow the belt to automatically fit to the passenger’s body, allowing free movement.
When the vehicle is parked on a steep slope, the retractor may lock: this is normal.
Seat belts
WARNING: Feed the belt back into the retractor by hand to avoid twisting and snagging. A C
B
Adjusting the front seat belts
height (front seats only)
The seat belts height must be adjusted only with the vehicle stationary. Always adjust the height of the front seat belts so that they suit the driver's and passenger's height. This precaution can help to substantially reduce the risk of injury in a collision. The correct adjustment is achieved when the belt passes about mid-way between the end of the shoulder and the neck.
The upper attachment point of the seat belts is equipped with an oscillating ring capable of moving into 4 different positions, allowing the belts position to be adjusted.
Do not bring cutting edges in contact with a seat belt. This could reduce their initial strength and cause them to tear in the event of a crash. If a seat belt has been brought in contact with a cutting edge, or has been used to pin something to it, have it immediately replaced at your Authorized Maserati Dealer.
To move the attachment fitting, press control D.
After the adjustment, always check that the slider to which the oscillating ring is fixed, is locked into one of the positions provided. With the handgrip released, push again downward to allow the anchoring device to click into place, in the event that it has not been released in one of the positions provided.
Using the rear seat belts
The belts for the rear seats must be worn as shown in the figure.
Remember that, in the event of a violent impact, the passengers on the rear seats that are not wearing the seat belts are not only subject to personal injury but they also represent a danger for passengers sitting in the front seats.
The seat belts must be worn keeping your chest in the upright position and lying against the backrest. When the rear seats are not occupied, place the seat belt buckles in their respective seatings.
Load limiting devices
To help increase passive safety levels, the seat belt retractors are equipped with a load limiting device designed to control the belt reeling out, so that the force exerted on the shoulders while the seat belt is in restraining mode can be suitably adjusted.
Pretensioners
To further enhance the seat belt efficiency, the vehicle seat belts (except for the rear central one) are equipped with ETD (Emergency Tensioning Device) pretensioners. These devices "detect", by means of a sensor, that a violent crash is occurring and retract the belts by a few centimeters. Thisn helps ensure that the belt perfectly adheres to the occupants’ bodies before the restraining action takes place. The smoke is not toxic and does not indicate the presence of a fire. The pretensioners activate in the following cases:
–Head-on and rear collisions of a sufficient severity
–In certain roll-overs
The pretensioner only activates when the seat belt is fastened.
After the pretensioner activation, the seat belt can be unfastened as usual, by pressing the button on the buckle. The pretensioner does not require any maintenance or lubrication.
WARNING: Tampering with the device will compromise its efficient operation. If, as a result of exceptional natural circumstances (e.g., floods, heavy seas, etc.), the device has been in contact with water and sludge, it is mandatory to replace it. To help ensure the best protection from the pretensioners, wear the belt in such a way that it fits snugly against your chest and pelvis.
The pretensioners can be used only once and activate only when the seat belts are fastened. After activation, contact an Authorized Maserati Dealer to have the pretensioners replaced and for properly discarding the old components. The units have a 14 year service life from the date of manufacture; they must be replaced when their service life is near to expiration.
WARNING: Work on the vehicle which involves blows, vibrations or localized heating in the area of the pretensioners may damage or activate them: vibrations due to uneven road surfaces or unintentional underbody collisions, for instance, should not affect the units. Contact your local Authorized Maserati Dealer for any intervention that may be required.
It is strictly forbidden to remove or tamper with the pretensioner components. Any intervention must be carried out only by qualified and authorized personnel. Always contact your local Authorized Maserati Dealer.
Seat belts
General warnings for using the seat belts
The driver and any passengers are obliged by law to respect and obey the provisions of local legislation regarding the compulsory use of seat belts.
To help provide maximum protection, you are advised to keep the seatback in the most upright position possible and the seat belt close to your chest and pelvis. If the seat belt is loose, in the event of an accident you could move too far forward and could be injured. Travelling with the seatback too far reclined could also be dangerous: even if the seat belts are fastened, they may not work correctly. In fact, the belt itself may not be close enough to your body and, if it is in front of you, it could cause neck wounds or other injuries in an accident. Additionally, in an accident, the lower section of the belt could press against the upper part of your stomach rather than the pelvic area, causing serious internal injuries.
Do not use child seats or child booster cushions/backrests in the front passenger seat. Occupants in the front passenger seat must never sit on the edge of the seat, leaning toward the instrument panel or otherwise sit out of position. The occupants' back must be as upright as comfort allows, and must rest against the seatback with the seat belt properly fastened. Feet must be on the floor (i.e. not on the dashboard, seat or out of the window).
When travelling with one or more child seats fitted on the rear seat of the vehicle, the tables (if equipped) must be in a closed position.
When the vehicle is moving and the table(s) is open, passengers travelling in the rear seats must fasten their seat belts. Travelling without the seat belt fastened increases the risk of injury in the event of a collision.
Always fasten the seat belts. Travelling without the seat belts fastened significantly increases the risk of serious injury in the event of a collision, even with the airbags. In the event of a collision, the seat belts help reduce the possibility of the vehicle's occupants being thrown against the structures of the passenger compartment or out of the vehicle. The airbags are designed to work together with the seat belts, not to substitute them. The front airbags only deploy in the event of certain head-on collisions of medium or high intensity. They will not be activated if the vehicle rolls over, or in the event of rear bumps or minor frontal collisions, or non-frontal collisions. not be distributed evenly along the belt and would consequently cause injuries. The upper part of the belt must pass over the shoulder and diagonally across the chest. The lower section must adhere to your pelvis, not the stomach, to avoid that you slide forward in the event of a collision. Do not use devices (clips, fastenings etc.) that prevent the seat belts from laying close to the passenger bodies.
Do not fasten your seat belt using the buckle lock for the other seat: in the event of an accident, the lower section of the belt could press against the upper part of your stomach rather than the pelvic area, causing serious internal injuries.
It is extremely dangerous to travel with the belt positioned underneath your arm. In the event of an accident, you would be thrown forward and would likely suffer head and neck injuries. Additionally, if the belt presses against your ribs, it could cause serious internal injuries.
Do not carry children on a passenger’s lap using only one seat belt for protecting both of them.
If the seat belt has suffered a heavy mechanical stress, for example during a collision, it must be completely replaced together with its anchorages, the screws fastening the said anchorages and the pretensioner. In fact, even if there are no visible defects, the resistance level offered by the seat belt could be reduced.
Pregnant women must observe local legislation regarding the use of seat belts. Make sure, in any case, that the lower section of the belt is positioned well down on the hips, below the abdominal region of the body.
How to keep seat belts efficient
1) Always use the seat belts keeping the belt perfectly flat, not twisted; make sure the belt can slide freely, without jamming.
2) The seat belts must be replaced following every pretensioner activation and whenever the belt itself shows visible damages or abrasions.
3) Wash the seat belts by hand using water and neutral soap, rinse them and let them dry in the shade. Do not use strong detergents, bleaches or colorants and any other chemical substance that could weaken the belt fibers.
4) Make sure the retractors do not get wet: as they will not operate properly.
The belt must not be twisted; make sure that it is snugly fitted to the driver's and passenger's bodies. In fact, in an accident, the restraining force would
Seat belts
Proper transport of children
For the best protection in the event of a collision, all the vehicle's occupants must travel seated and protected by all the suitable restraining systems. The seat belts are designed to be used by persons whose physical characteristics (age, height, weight) are provided for by established legislation in each country. Anyone who does not comply with these provisions may not travel in the front passenger seat. This also applies to children. Their heads are proportionally heavier and larger than those of adults, while their bones and muscles are relatively undeveloped. To help protect them in case of a collision, they must use special restraint or safety systems, even in the rear seat.
Incorrect fastening of a child restraint system increases the risk of injury to the child in the event of a collision.
The seat belts on the vehicle have been designed and tested to protect people weighing at least 79 lbs (36 Kg) and taller than 59 in (1.50m).
To help properly protect a child outside these limits, specific restraint systems with dedicated belts or accessories capable of adapting the child’s position to the vehicle’s seat belts must be fitted.
If a child seat is installed on the front passenger's seat, the seat must be positioned completely backwards and upwards.
We recommend that child seats be installed in the rear seating positions ONLY.
Even with advanced airbags, children should always be seated in the rear seats. The rear seat is the optimal location for children.
The use of specific restraint systems for newborns and children is mandatory, as provided by the law in all the 50 States of the United States, the District of Columbia, the USA territory and the Canadian provinces. Newborns and children must travel seated in suitable restraint systems, using adequate safety abdominal or diagonal belts or, if present, an upper anchoring point and a system with 2 lower anchoring points, in order to be compliant with the U.S. Federal Motor Vehicle Safety Standards 213 and 225 and with the Canadian Motor Vehicle Safety Standards 213 and 210.2.
No child under 12 should travel in the front passenger seat.
No child seat can be installed in the rear, central seat.
When traveling with one or more child seats fitted on the rear seat of the vehicle, the tables must be closed.
Children must never travel seated on a passenger's lap. In a collision, a child becomes so heavy that it is impossible to hold onto him or her. For example, in the event of a collision at only 25 mph (40 km/h), a child weighing 12 lbs (5.5 kg) exerts a force equal to 240 lbs (110 kg) on the arms of the person carrying him/her. Children must always be protected by a suitable restraining system when travelling.
WARNING: The vehicle is equipped with airbag technology that no longer uses a Passenger Airbag Off function to indicate that the front passenger seat is occupied.
Children should be properly restrained in suitable child seats, which must be properly installed in the vehicle (following the child seat manufacturer's instructions), and be placed in the rear passenger seating area.
Children (or adults) who are resting on the airbag or are too close to it when it is activated, may be seriously injured. The airbags and pretensioners are designed to offer suitable protection for adults and teenagers, but not for children and babies. Neither the seat belts or the airbags are designed for them. Children and babies must travel in suitable restraining systems.
Babies must be supported completely, including their head and neck. This is necessary since the babies neck is weak while their head is proportionally bigger and heavier in relation to their body. In a collision, if a baby is travelling in a rearwardfacing seat, the forces of an impact are
Proper transport of children distributed throughout the strongest parts of the body, i.e., the back and shoulders. Babies must always be protected by a suitable restraining system when travelling.
Babies travelling in a rearward-facing seat may be seriously injured in the event of airbag activation. This could happen because the seatback of the child's seat may be positioned extremely close to the airbag at the moment it is inflated. Do not place an infant or a child in the front passenger seat at any time.
The structure of a child's body is completely different from that of an adult or a teenager (whom the seat belts are designed for). Children's hips are so small that the seat belt will not stay in the correct position on them. The belt may rise up on the child's stomach and, in the event of a collision, can cause serious internal injuries. Children must always be protected by suitable restraining systems.
We recommend that child seats be installed in the rear seating positions ONLY.
All minors whose physical characteristics (age, height, weight) fall within the value ranges/limits provided by established legislation in each country must also be protected by special restraint or safety systems (e.g., certified child seats, booster seats). Make sure to always use approved universal child restraining systems. Follow the instructions that the manufacturer of the device is required to supply together with the child restraint systems.
To help ensure the best restraining action of the child seats, we recommend that you choose the model that best suits the shape of your seats. If possible, try to install the seat on the vehicle before purchasing it. Do not install child seats that, when placed on the seat, have an unstable or unnatural position due to the shape of your vehicle seat.
In an emergency situation, if you have to carry a baby in a specific child seat facing rearward on the front passenger seat: –adjust the front pasenger seat to the most rearward position; –install the child seat following the instructions provided by the child seat's Manufacturer; –position all the movable parts of the child seats (e.g., handle, reclining seatback, sunshade etc.) carefully following the instructions provided by the Manufacturer and found on the instructions manual of the same child seat.
The seat belts on the front passenger seat and on the rear side seats are fitted with the KISI system, which improves safety when children are travelling in special child seats. The system is activated by pulling out the belt to its full length: once the child seat is securely fastened, the belt can no longer be pulled out and hence the belt/child seat system is exceptionally secure. When the belt is released and fully retracted, the system deactivates and resumes its normal operation.
To help ensure the best restraining action of the child seat, we recommend that you choose the seat that best suits the shape of your vehicle's seat and that you try to install the child seat before purchasing it.
In the event of an accident, an improperly fastened child restraining system can increase the risk of injury.
Rearward-mounting child seats must not be used on front passenger seats equipped with airbags, as these could cause serious injuries during inflation, even in minor collisions.
We recommend that you always carry children seated in their specific child seats, which must be fitted on the rear seat, as this is the safest place in the event of a collision.
No modifications can be made to the seat belts and the child restraining systems. Established legislation in some countries already provides that children under 12 years of age may not travel in the front passenger seat.
Check on the label found on the child restraint system and on the manual provided by the child seat manufacturer that the system complies with the above mentioned standards, as certified by the manufacturer declaration.
Whenever using a restraint system for newborns or children, we recommend that you carefully read and follow the instructions provided by the child seat manufacturer on installation and use.
Please read and observe the instructions on the warning labels found inside the vehicle and on the restraint devices for newborns and children.
To fasten the child seat to the vehicle seat, follow the assembly instructions provided with the restraint system itself. Then fully pull out the seat belt to then let it rewind. During rewinding, you will hear a click sound: this means that the special retractor has activated. The seat belt is now locked. Then push the child seat against the seat to rewind any excess length of the seat belt. To deactivate the retractor, unbuckle the seat belt and let it rewind completely. The seat belt can now be used normally.
Never unbuckle the seat belt that retains the child seat when the vehicle is moving. When the child seat is not used, remove it from the vehicle or fasten it using the seat belt, in order to prevent it from being projected out of the vehicle in the event of an accident. Never leave children unattended in the vehicle, even if they are secured and seated in their child seat. Unattended children in a child seat may use some of the vehicle equipment and cause accidents and/or serious personal injuries.
Children whose weight/height are below the minimum limits established by the manufacturer of the child restraint systems must use the standard seat belts. Adjust the seat belt in a diagonal position, across your chest and on your shoulder, and not on your neck or face. Starting from a weight of 41 lbs (approximately 18.60 Kg), it may be necessary to add a rise cushion to obtain a correct position for fitting the seat belt, until the children reach a sufficient height to have an abdominal/diagonal seat belt suitably fitted without needing a rise.
Below is a summary of the safety regulations applying to the transport of children:
We recommend that you always carry children in the specific restraining systems installed in the rear outer seats, as this is usually the best place in the event of a collision. Always and strictly follow the instructions that the manufacturer provides with the seat. Keep the instructions in the vehicle together with the documents and this manual. Do not use a seat which does not have any instructions for use.
WARNING: We recommend that you choose the seat that best suits the shape of your vehicle's seat and that you try to install the seat before purchasing it.
Always pull on the seat belt to check that it is locked in place. All restraint system must be used by a single passenger only: never carry two children in the same seat. Always check that the seat belts are not resting against the child's neck.
Always drive slowly and carefully when carrying a child. Hard accelerations due to sport-style driving can be dangerous for children, even if no crash occurs. Even with advanced airbags, the rear seat is the safest location for children. Whenever possible, always place children in the rear seats.
Do not allow the child to assume incorrect positions or undo the seat belt /child seat safety harness during travel.
Do not carry children in your arms, even new born children. Nobody, however strong, can hold on to a child in the event of a collision. After an accident, always replace the child seat with a new one. The vehicle is designed for mounting child seats with top anchoring. To fit the child seat, run the belt A through the support pins of the headrest and anchor it on one side to the backrest of the child seat and on the other side to the bracket B on the car body.
This anchoring point can be easily identified thanks to the logo found on the Isofix bracket covering cap shown below:
These metal brackets are easily identifiable through the label bearing the logo shown below.
Then anchor the base of the child seat to the brackets C.
Latch system
The rear side seats of the vehicle are equipped with anchoring points for Latch system child seats. This is a new system complying with applicable standards for carrying children. This system offers a special anchoring system for child seats, which uses two metal brackets C positioned between the seat cushion and backrest.
The seats designed for Latch system child seats installation can however be fitted with standard child seats; you can install a standard and an Latch system child seat at the same time (one in each outer rear seat). No more than two standard child seats or two Latch system type child seats can be installed on the rear seats. Only standard type child seats can be mounted on the front passenger seat.
Fit the child seat only when the vehicle is stationary. The child seat is correctly anchored to the provided brackets when a click indicates it is locked in place. Follow the mounting, removal and positioning instructions provided by the child seat manufacturer.
Fitting the Latch system child seat in rearward-facing position
To fit the Latch system child seat in a rearward-facing position, be particularly careful that the brackets D are properly inserted in their seatings
F.
The baby is then secured by the child seat's harness G.
Fitting the child seat in frontward-facing position
For installation, proceed as follows:
– make sure that the release lever E is in the standby position (retracted);
– align the anchoring points F with the brackets D, then push the seat until you hear it click into place, which indicates it is secured
– check for correct locking by trying to move the child seat with strength; the safety mechanisms in fact, help prevent the child seat from being improperly fitted if only one of the attachment fittings is locked.
–pass the strap H underneath the rear headrest and anchor it onto the child seat backrest and onto the bracket on the car body.
This way, the child seat is retained not only by the brackets D but also by the vehicle seat belt and by the upper strap H.
In any case, see the instruction booklet provided with the child seat for fitting the vehicle belts into the seat correctly.
Remember, the best child safety seat is the one that fits your child properly, is easy to use, and fits in your vehicle correctly. The best way to ensure a proper fit in your vehicle is to try installing the child seat before purchasing. You can be certain you’ve installed your child safety or booster seat correctly by having it checked at a child safety seat inspection station or by a certified child passenger safety technician. To find one near you, visit http://www.nhtsa.dot.gov/CPS/ CPSFitting or www.seatcheck.org. You can also call 1-888-DASH-2-DOT or 1-866-SEATCHECK.
Transport of persons with disability
If it is necessary to modify the advanced airbag system of your vehicle to accommodate a person with disabilities, contact an Authorized Maserati Dealer.
The advanced airbag system of your vehicle is not designed to protect adults with disabilities that require deactivation of the passenger or driver airbag.
If you or or another occupant is an adult with a medical condition that requires airbag deactivation, please contact an Authorized Maserati Dealer.
As long as the airbag is activated, persons with disabilities are advised not to travel in the front seat in order to avoid the risk of serious injuries or death, even in minor crashes.
Front and side airbags
The vehicle is equipped with 6 airbags (2 front and 4 lateral ones) and with electronically- controlled pretentioners for all of the seats belts except for the rear central one. The system components are the following:
1) Electronic control unit
2) Passenger's front airbag
3) Front passenger seat belt pretensioner
4) Passenger side bag
5) Satellite collision sensor on passenger side
6) Passenger’s window bag
7) Driver’s window bag
8) Driver side bag
9) Satellite collision sensor on driver side
10) Front, driver seat belt's pretensioner
11) Airbag system failure warning light
12) Driver's frontal airbag
13) Clock Spring
14) Diagnostics socket
15) Rear left-hand pretensioner
16) Rear right-hand pretensioner
17) Front left-hand Crash Zone Sensor
18) Front right-hand Crash Zone Sensor.
Front airbags
The airbag is not a substitute for the seat belts. Correct use of the seat belts, in combination with the airbag, will offer protection for the driver and passenger in the front seat in the event of a head-on collision
Airbag system components
The airbag system is composed of two cushions that are designed to inflate almost instantaneously. One (12) is on the driver side, in the center of the steering wheel, and the other (2) is on the passenger side, inside the dashboard.
Deployment
The front airbags of your vehicle have been designed to inflate in 2 stages. This allows the airbag to have different rates of inflation based on the crash severity, as assessed by the airbag control unit.
The driver’s airbag is designed to be deployed in certain head-on collisions according to the following strategy.
•For low severity crashes, the airbag control unit will not deploy the airbag.
•For crashes of higher severity, the control unit will deploy the driver airbag in low energy mode.
•For crashes of even higher severity, the control unit will deploy the driver airbag in high energy mode.
The front passenger’s airbag is designed to be deployed in certain head-on collisions according to the following strategy.
•For low severity crashes, the airbag control unit will not deploy the airbags.
•For crashes of higher severity, the control unit will deploy the airbag in low energy mode.
•For crashes of even higher severity, the control unit will deploy the airbag in high energy mode.
Never place an object over or near the driver and passenger airbags. In the event that the passenger airbag is deployed, it will project any object over it, or near it, in the passenger compartment at very high speed. The object will be transformed into a projectile propelled in the passenger compartment. This could cause serious injuries.
Do not tamper or damage the airbag modules. If, for any reason, an airbag cover gets damaged, have the airbag module immediately checked by an Authorized Maserati Dealer.
Activation of a damaged module could cause serious or fatal injuries. Please note that your vehicle is not capable of automatically detecting damages to the airbag cover.
Operation and replacement
The airbags are controlled by an ECU that is designed to activate them in the case of a head-on collision of sufficient force.
In the event of a collision with an impact force that causes deceleration exceeding the value set for the internal sensor, the ECU will transmit a signal to deploy the airbags. The airbags will begin to inflate, breaking the cover along the breakage line and will inflate completely in a few milliseconds. Once inflated, they will serve as a protection between the driver and/or passenger and the structures that could cause injury. The airbags deflate immediately afterwards.
The driver and passenger are both advised not to travel handling objects (e.g., beverage cans or bottles, pipes, etc,) that could cause injury in the event of airbag activation.
WARNING: When the system starts operating, gases are released in the form of fumes, together with the gas used for inflating the airbags. These gases are not harmful.
Drive with your hands always on the rim of the steering wheel so that, in the case of activation, the airbag can inflate without obstruction. Placing hands or arms inside the rim increases the risk of arm/hand injuries in the event of a crash.
Always keep the seat backrest in the upright position and sit with your back properly resting against it. Do not modify the system components or wiring under any circumstances.
With the ignition key inserted and in position II, although the engine is off, the airbags can still be activated when the vehicle is stationary if it is hit by a moving vehicle.
Thus, even with the vehicle stationary, do not put children in the front seat. In addition, remember that if the ignition key is in position 0, none of the safety devices (airbags or pretensioner) are activated in the event of a collision. Failure of the airbags to inflate in these circumstances is not indicative of system malfunction.
Front and side airbags
WARNING: Do not cut or tamper with the connectors of the airbag harness or on the airbag modules. Do not cover the steering wheel and the top part on the instrument panel on the passenger’s side with any tape or label, or treat it in any way. Never remove the steering wheel. If necessary, this procedure should only be performed by an Authorized Maserati Dealer. All the airbag system components must be replaced after an accident that has caused airbag deployment. Following an accident not involving airbag activation, you must contact an Authorized Maserati Dealer to have the system checked and replace any system components that may be damaged or malfunctioning.
Damaged or defective components of the airbag system cannot be repaired but must be replaced.
WARNING: Improper intervention involving the system components can cause failures or undesired activation of the airbags with damage resulting. The airbag system components have been specially designed for this specific vehicle model. Do not attempt to use them on other vehicles, as this could cause serious injuries to passengers in the event of an accident.
To scrap the vehicle, please contact an Authorized Maserati Dealer to have the airbag system disposed of properly.
If the vehicle has been stolen or there has been an attempted theft, have the airbag system checked by an Authorized Maserati Dealer.
The airbag modules must be replaced at the intervals indicated in the “Warranty Booklet and Maintenance Schedule”, even if the vehicle was not involved in collisions.
The label A on the right-hand side of the dashboard, bears the airbag system expiration date. Please contact an Authorized Maserati Dealer for replacement of the system when this date approaches.
The labels B, C and D indicate that the airbag system is installed.
Note: The label B on the dashboard can be removed.
Front and rear side airbags
The lateral airbags are designed to help enhance the protection offered to passengers travelling in the front and rear seats in case of moderate to severe lateral collision. They consist of two types of near instantaneous inflation bags:
–Side Bags housed in the front seats backrests; this solution allows the airbag to be always in the approximate position with respect to the occupant, regardless of the seat position.
–Window bags housed behind the roof lateral panels and covered by special trim panels that do not interfere with the bags unfolding downwards during inflation. This solution, designed to help protect the head region, offers passengers sitting in the front and in the rear appropiate protection in the case of a side impact, thanks to the large area covered by the bags. In the event of a side impact, an electronic control unit processes the signals coming from a deceleration sensor and deploys the side airbags if necessary.
The bags inflate near instantaneously, acting as a protection between the occupants body and the side of the vehicle. The bags deflate immediately afterwards.
WARNING: The electronic control unit provides for the activation of the pretensioners, front airbags or side airbags (front and rear) based on different criteria, according to the type of impact.
The fact that one or more systems do not activate is not indicative of a system malfunction.
In the case of low impact lateral collisions (for which the retaining action of the seat belts affords adequate protection), the airbags are not designed to inflate. It follows that the front airbags (on driver and passenger side) do not replace or substitute the seat belts but supplement them, and hence the seat belts must always be worn as provided by established legislation in most countries.
The side airbags are not disabled when the front passenger airbag is deactivated. Thus even children being transported in the front passenger seat are protected from lateral collisions by the side airbags. The front and/or lateral airbags may also inflate if the vehicle suffers a violent impact beneath the car body, for example when the underbody collides with steps or speed bumps, potholes, etc.
WARNING: Airbag inflation releases a small amount of powder. This powder is not harmful and does not indicate the presence of fire; furthermore the surface of the deployed bag and the interior of the vehicle may be covered with a powdery residue: this powder may irritate skin and eyes. If contact occurs, wash with a pH neutral soap and water.
Front and side airbags
If the warning light comes on when the vehicle is running (indicating a fault), contact your local Authorized Maserati Dealer as soon as possible to have the system checked.
WARNING: The airbag system has a service life of 14 years. Contact your local Authorized Maserati Dealer when this period is near to expiration.
In the event of a collision with consequent airbag inflation, contact your local Authorized Maserati Dealer for replacement of the entire safety system, electronic control unit, seat belts, pretensioners, and to have the vehicle’s electrical system checked.
All testing, repairs and replacements of the airbag system must be done by an Authorized Maserati Dealer.
WARNING: In the case of scrapping of the vehicle, contact your local Authorized Maserati Dealer to have the system deactivated.
WARNING: If the vehicle is sold, the new owner must be informed of the aforesaid instructions for use and warnings, and he/she must also be provided with the "Owner's Manual".
The electronic control unit activates the pretensioners and front/lateral airbags based on different criteria, according to the type of collision. The fact that one or more systems do not activate is not indicative of a system malfunction.
General warnings
When the ignition key is turned to the MAR (ON) position, the warning light comes on, but it switches off after approx. 5 seconds. If the warning light fails to come on at this time, or stays on, or lights up when driving, contact your local Authorized Maserati Dealer immediately.
Drive with both hands on the steering wheel rim, so that if the airbag inflates it can do so freely, without encountering obstacles which can cause serious injuries. Do not drive with your body curved forwards but keep the seatback upright, with your back fully against it.
Do not apply stickers or other objects to the steering wheel or the passenger’s airbag compartment.
Do not travel with objects in your lap, in front of your chest or especially with a pipe, pencil or other objects held in your mouth. In the event of a collision, the deployment of the airbag could result in serious injury.
Do not cover the front seatbacks with clothing or covers. Note that with the ignition key inserted and turned to the MAR (ON) position, even with the engine switched off, the airbags can inflate even if the vehicle is stationary, if it is struck by another vehicle. Therefore, even with the vehicle stationary, children must be secured by the specific child restraint systems installed on the passenger seat. On the other hand, the airbags will not inflate in the event of collisions with the vehicle stationary and the key removed from the ignition lock; failure of the airbags to inflate in these circumstances is not indicative of a system malfunction.
If the vehicle has been the object of theft or attempted theft, if it has been vandalized or involved in flooding, contact your local Authorized Maserati Dealer to have the airbag system checked.
If interventions are carried out on the electrical system incorrectly, the airbag could be activated, thereby causing injuries to anyone in the vicinity.
The airbags do not replace the seat belts but act as a supplementary restraint system. Moreover, in the event of head-on collisions at low speed, side impacts, rear impacts or roll-overs, the passengers are protected by the seat belts only, that must always be fastened.
Do not wash the seats with water or pressurized steam.
Do not hang rigid objects onto the clothing hooks or onto the handholds.
Front and side airbags
MSP System
The vehicle is equipped with the MSP (Maserati Stability Program) yaw prevention monitoring system, encompassing all of the vehicle's control systems: ABS, EBD, ASR and MSR. The system is fitted with a unit that is designed to predict the vehicle's behavior accurately. The system is designed to detect whether the driver is about to lose control of the vehicle. In this case, it can activate the brake calipers individually and the engine control, in order to create a torque sufficient to resist the vehicle's yawing movement.
Activation
The MSP system is activated automatically every time the engine is started, and it can be disengaged by pressing button A for approx. 2 seconds. Press button A again to reactivate the system. The dark yellow warning light on the instrument panel flashes during all the activation phases.
Fault indicators
In the event of a fault, the system is automatically disabled and cannot be reactivated. This condition is signalled, while driving, by the amber warning light that comes on both on the instrument panel and on the multifunction display. On the latter, the warning light is accompanied by the message “MSP failure go to dealer”. When the engine is started, the system malfunction is indicated by the illumination of the warning light .
WARNING: In the event of a fault with the MSP disabled, the vehicle will react as if it were not equipped with this system: have the system checked by your local Authorized Maserati Dealer as soon as possible.
WARNING: Make sure that the ignition key is turned to STOP if you have to tow the vehicle with 2 wheels raised off the ground. Otherwise, with the MSP switched on, the respective control unit will store a malfunction, resulting in the illumination of the warning lights on the instrument panel and on the display: this requires the intervention of your local Authorized Maserati Dealer to restore the system.
WARNING: In low- and medium-grip conditions (e.g., rain, snow, ice, sand, etc.) it is advisable not to activate SPORT mode, even with the MSP enabled.
WARNING: Driving on parabolic curves will deactivate the system.
ASR system (electronic anti-skid device)
The ASR system is designed to help prevent skidding of the driving wheels during acceleration by means of the engine control unit (spark advance delay, engine throttle opening reduction and fuel injection cut-out) and of the rear brakes.
The ASR system enhances the vehicle stability and helps improve active safety while driving, especially under the following conditions:
–internal wheel skidding on curves because of the dynamic load variations or excessive acceleration
–excessive power transmitted to the wheels, also in relation to the road conditions
–acceleration on slippery, snowy or icy roadways
–loss of road grip on wet roads (aquaplaning).
The ASR system works together with the electronic suspension control system: under normal conditions (SPORT mode off), stability in low and medium grip conditions has priority, while with SPORT mode active, the system favors traction, thereby optimizing vehicle's performance on dry asphalt.
Activation
The ASR system is automatically activated every time the engine is started and can be deactivated by pressing button A for about 2 seconds. Press button A again to reactivate the system.
The dark yellow warning light on the instrument panel flashes during all the activation phases.
Fault indicators
In the event of a fault, the system is automatically disabled and cannot be reactivated. This condition is signalled, while driving, by the amber warning light, that comes on the multifunction display, accompanied by the message "ASR failure go to dealer".
MSR function (engine braking torque adjustment)
The MSR system is also designed to control the engine braking torque when the accelerator pedal is released under low grip conditions (e.g., snow, ice, etc.): in these conditions, in fact, the engine's high braking torque may cause instability of the vehicle. The system, using the same sensors as the ABS, detects the skidding arising on one or both of the driving wheels when the accelerator is released and opens the motor driven throttle for the engine supply system, thereby reducing the braking torque and restoring the driving wheels maximum grip conditions.
WARNING: The maximum deceleration that can be obtained with the engine braking always depends on the tire grip on the roadway. Snow or ice obviously reduce grip levels.
ABS and EBD systems
The vehicle is equipped with ABS (Antilock Brake System) and EBD (Electronic Brake force Distribution) systems which, by means of the ABS system sensors and the ECU, are designed to improve the braking system’s performance.
In the event of an emergency stop or braking on slippery surfaces (e.g., snowy or icy roadways), the ABS, together with the standard braking system, is designed to allow the driver to apply maximum braking force without causing the wheels to lock and consequently losing control of the vehicle.
The system is based on an electronic control unit that processes the signals coming from 4 sensors fitted on the 4 wheels.
When a wheel tends to lock, the sensor warns the unit which, in turn, requests an electro-hydraulic unit to intervene by modulating the pressure exerted on the brake; the driver will perceive a “pulsation” on the brake pedal which is completely normal.
In the event of a failure, the system will be deactivated, but this will not affect the efficiency of the standard braking system.
The failure will be indicated through the illumination of the red warning light with the letters ABS on the instrument panel. In this case, we recommend you contact your local Authorized Maserati Dealer which, thanks to the selfdiagnostics system the vehicle is equipped with, should be able to quickly identify the problem.
The vehicles must be equipped only with wheels, tires and brake pads of the type and make approved by Maserati S.p.A. for this model.
Despite the fact that this device makes a considerable contribution to safety, it is still essential to drive carefully, especially when the road surface is wet, covered with snow or ice.
The vehicle is equipped with an Electronic Brake force Distributor (EBD). The illumination of the warning light "BRAKE" with the engine running indicates a malfunction in the EBD system; in this case, sharp braking may cause an early locking of the rear wheels, and the vehicle may skid. Drive with the greatest care and have the system immediately checked by the nearest Authorized Maserati Dealer.
The warning light usually comes on when the engine is running to indicate a fault in the ABS system only. In this case, the braking system is designed to still be efficient, but it will not make use of the anti-locking device. Under these conditions, the EBD system efficiency can also be reduced. Drive with the utmost care to avoid abrupt braking and consult your local Authorized Maserati Dealer immediately.
If the low brake fluid warning light “BRAKE” comes on, stop the vehicle and check the brake fluid level immediately. If the fluid level is below the minimum notch, top up with the recommended fluid and contact your local Authorized Maserati Dealer immediately to have the system checked. Brake fluid leaks impair the operation of the entire braking system.
System performance in terms of active safety is not a reason for the driver to take unnecessary risks. The driving style must always be suited to weather conditions, range of visibility and road traffic conditions and of course must comply with local traffic laws.
The maximum obtainable deceleration is always dependent on the grip between tire and road. With snowy or icy roadways, grip levels are obviously reduced and the braking distance is very high, even with the ABS system.
Tire pressure monitoring system
The vehicle may be equipped with an optional system that monitors the tire pressure by means of special sensors that are secured inside the wheel rims, in position with the inflation valve. These sensors transmit a signal that is detected by the antennas fastened on the car body, behind the fenders, and connected to the ECU.
WARNING: The system can momentarily experience radio-electric interference emitted by devices using similar frequencies.
The ECU processes this information and, via the CAN line, transmits a series of tire pressure data and system errors, if any, to the on-board instrument panel.
The signal transmitted by the ECU activates some icons on the display.
The system is equipped with a specific wiring that connects the antennas, the control unit and the calibration button to the vehicle's electrical system. The system warns the driver that there is a drop in tire pressure. This warning does not excuse the driver from periodically checking the tires and from complying with the prescribed tire pressure levels.
WARNING: The system stores the tire pressures as a reference rate, therefore tires must be inflated to the prescribed pressure.
Each tire, including the spare one (if provided), should be checked monthly when cold and inflated to the inflation pressure recommended by the vehicle manufacturer, as shown on the vehicle placard or tire inflation pressure label. (If your vehicle has tires of a different size than the size indicated on the vehicle placard or tire inflation pressure label, you should determine the proper tire inflation pressure for those tires.)
As an added safety feature, your vehicle has been equipped with a tire pressure monitoring system (TPMS) that illuminates a low tire pressure warning light when one or more of your tires is/are significantly underinflated.
Accordingly, when the low tire pressure warning light illuminates, you should stop and check your tires as soon as possible, and inflate them to the proper pressure.
Driving on a significantly underinflated tire causes the tire to overheat and can lead to tire failure. Underinflation also reduces fuel efficiency and tire tread life, and may affect vehicle handling and stopping ability.
Please note that the TPMS is not a substitute for proper tire maintenance, and it is the driver's responsibility to maintain a correct tire pressure, even if under-inflation has not reached the level to trigger illumination of the TPMS low tire pressure warning light.
Your vehicle has also been equipped with a TPMS malfunction indicator to signal when the system is not operating properly. The TPMS malfunction indicator works in combination with the low tire pressure warning light. When the system detects a malfunction, the warning light will flash for approximately one minute and then remain permanently illuminated.
This sequence will continue upon subsequent vehicle start-ups as long as the malfunction exists.
When the malfunction indicator is illuminated, the system may not be able to detect or signal low tire pressure as intended.
TPMS malfunctions may occur for a variety of reasons, including the installation of replacement or alternate tires or wheels on the vehicle that prevent the TPMS from functioning properly. Always check the TPMS malfunction warning light after replacing one or more tires or wheels on your vehicle, to ensure that the replacement or alternate tires and wheels allow the TPMS to continue to function properly.
System calibration
After replacing or inflating one or more tires, the system must be calibrated once again. To calibrate the system, keep button A, located on the inside roof, pressed down for a time ranging between 4 and 10 seconds. The system takes a maximum of 20 minutes to complete the calibration procedure with the vehicle in motion.
A green symbol will appear on the display together with the message "Calibration activated".
If the user recalls the information page showing the pressure levels of each tire, dashes “–.–” will be viewed in the place of the values.
Viewing messages on the display
By pressing the specific "Mode" button B, (see page77), the user can access the information page showing the pressure values for each tire.
When indication by event occurs, the malfunction is viewed in the place of the information on tire pressure levels. The malfunction is displayed for a time equal to its entire display cycle. When the display cycle ends, the tire pressure screen page becomes available again and the multi-function symbol indicating the malfunction is displayed in the specific area until the malfunction is rectified.
Normal conditions
By pressing the specific button for quick information display ("Mode" button pressed briefly), the user can access the information page (screen page 1), which displays the pressure levels for each tire.
Low pressure
When the instrument panel receives a message from the tire pressure ECU indicating that one or more tires have pressure levels below the control threshold, screen page 2 is displayed for 10 seconds, after which the system will display the screen page previously active.
When the key is subsequently turned back to ON or when the MODE button is pressed, if the malfunction persists the display will show screen page 2 once again.
The system may not know which wheel is originating the malfunction indication and therefore is not capable of indicating the wheel involved. In this case, screen page 3 will be displayed for 10 seconds. The display sequence follows the usual logic of the malfunction previously described.
Tire punctures
When the instrument panel receives a signal from the tire pressure ECU indicating that the pressure level of one or more tires is below the alarm threshold, the warning light will permanently illuminate on the instrument panel and screen pages 4 will alternate on the display for 20 seconds. Every time the key is subsequently turned back to ON, if the malfunction persists the display will show screen pages 4 for 20 seconds. These screen pages will be displayed until the situation is corrected and the system is calibrated again as required by the system.
The system may not know what wheel is originating the malfunction and therefore is not capable of indicating the wheel involved. As a consequence, in addition to the warning light permanently illuminated on the instrument panel, the display will show screen page 5. The display strategy of this screen page follows the same logic applied for screen page 4, previously described.
“Run Flat” tire puncture
If the vehicle is equipped with Run Flat tires, in the event of a tire puncture, the relative warning light comes on and the pages 6 are alternately displayed for 10 seconds. At the end of the display cycle, the system will show the previously active page with the symbol positioned in area G of the display (see page76). The warning light on the instrument panel remains on.
The system calculates the residual tire life in miles and repeats the display cycle every 19 mi (30 km) of driving up to a maximum of 75 mi (120 km).
During the "tire punctured" condition, if more than 75 mi (120 km) are travelled or if the vehicle speed exceeds 50 mph (80 km/h), the pages 7 or 8, respectively, are displayed. At the end of the tire life, the display logic follows the procedure for normal tires.
If another tire is punctured, the system calculates (without displaying it) the updated value of the km that can still be driven, depending on the distance covered from the previous puncture, and displays the pages 9 alternately.
If the driver presses the MODE button with the "Escape" function during the "tire punctured" condition, but not in maximum speed conditions and with the tires still in a condition to continue driving, the summary symbol will be displayed in the dedicated warning light area until the correct condition is restored and after subsequent calibration requested by the system.
It may occur that the system does not know which wheel is signaling the fault and it is hence unable to display it: page 10 will be displayed for 10 seconds.
The system calculates the residual tire life and repeats the display cycle every 19 mi (30 km) of driving up to a maximum of 75 mi (120 km) and also controls the conditions of exceeding the maximum km travelled or exceeding the speed limit.
System not calibrated
If the system has not been calibrated or following a tire replacement, the warning light will flash on the instrument panel for 90 seconds, and the display will show screen page 11. Subsequently, the screen page previously active is displayed once again and the warning light illuminates on the instrument panel permanently.
The system can be calibrated by means of the specific button (see page47). The information page that shows the pressure value for each tire cannot be recalled by the user.
Tire pressure monitoring system failure
Screen page 12 may appear in the following cases:
–malfunction in the ECU system/ wiring
–no signal reception by one or more sensors due to malfunction, breakage or dead battery;
–ECU malfunction.
The display sequence follows the usual logic of malfunctions. Therefore, after 10 seconds, the display will show the screen page that was active before the malfunction occurred.
In addition to screen page 12 being displayed, the warning light , which is permanently illuminated on the instrument panel, will flash for 90 seconds, after which it will remain permanently on until the situation is corrected. The information page that shows the pressure value for each tire cannot be recalled by the user.
Note: The TPMS malfunction indicator works in combination with the low tire pressure warning light. When the system detects a malfunction, the warning light will flash for approximately 90 seconds and then remain permanently illuminated. Once the system detects a failure, you must go to the nearest Authorized Dealer to correct the problem and deactivate the malfunction warning light.
System temporarily not active
When one of the following conditions occurs:
•outside transmitter (frequency interference);
•excessively high temperature;
•during the first calibration procedure; screen page 13 will be displayed. In addition, the warning light , which is permanently illuminated on the instrument panel, will flash for 90 seconds, after which it will remain permanently on until the situation is corrected.
The information page that shows the pressure value for each tire cannot be recalled by the user.
System not active
After Key-on, in the case that the system has been deactivated by means of the diagnosis tester, screen page 14 will be displayed for several seconds. In addition, the warning light , which is permanently illuminated on the instrument panel, will flash for 90 seconds, after which it will remain permanently on until the situation is corrected.
The information page that shows the pressure value for each tire cannot be recalled by the user.
Parking sensors
To assist the driver during parking manoeuvres, the vehicle may come equipped with four sensors housed in the rear bumper and four sensors in the front bumper (optionals in the latter case).
During parking manoeuvres, the parking sensors provide the driver with information on the distance between obstacles found behind and in front of the vehicle. The information about the obstacle distance is given to the driver by means of a acoustic and visual signals. The acoustic signals generated by the system add to the driver’s field of vision, allowing him to avoid hitting any obstacles during manoeuvres.
However, the driver remains responsible during parking manoeuvres and in other potentially dangerous situations. The system has actually been designed only as a supplementary aid during parking manoeuvres, since it allows the driver to detect obstacles outside his field of vision.
If the vehicle is also equipped with front sensors, these may be activated by pressing button A; When the front sensors are active, the button illuminates with an amber colour. To deactivate the front sensors, press button A once again. When reverse gear is disengaged, all the sensors remain active. The rear sensors remain active for about 10 seconds or until a speed of approx. 6 mph (10 Km/h) is exceeded. The front sensors remain active until a speed of about 6 mph (10 Km/h) is exceeded.
When the rear or front sensors are activated, an acoustic signal (beep) warns the driver that the system is active.
When the sensors are activated, the system begins to beep as soon as an obstacle is detected, and the tone frequency increases as the vehicle approaches the obstacle.
The acoustic signals are emitted by two buzzers, one under the dashboard (if the vehicle is equipped with front sensors) and one in proximity of the luggage shelf (if the vehicle is equipped with rear sensors). When the obstacle is located at a distance of less than 14 in (35 cm) from the bumper, the beep is continuous. The warning beep stops immediately if the distance between the vehicle and the obstacle increases.
The tone cycle is constant if the distance measured by the central sensors remains unaltered, while if this occurs with the lateral sensors, the signal stops after approximately 7 seconds, to prevent for example continuous beeps in the event of manoeuvres alongside walls.
The front and rear parking sensors are automatically activated when the key is turned to MAR, when reversing.
Parking sensors
The distance from the obstacles can also be graphically shown on the instrument panel display by means of an image that shows the vehicle surrounded by explanatory symbols of the distance (maximum/average/ minimum) and the position (front/rear/ central/side) of the obstacle detected. The colour represents the distance, while the field represents the position. The green colour represents the maximum distance detected, the yellow colour the medium distance and the red colour the minimum one.
If the vehicle is equipped only with rear sensors, the front sensors are not shown in the image.
If the vehicle is equipped with front and rear sensors, the rear sensors are not shown in the image if only the front sensors are active.
Stop & Go function
The vehicle is equipped with a Stop & Go function that can be activated through the Bose® Infotainment system. The Stop & Go function can be enabled/ disabled by accessing the "Vehicle Options" menu, selecting the "Front parking sensor" option, then the Stop & Go parking option and setting it to "ON". With the Stop & Go function active, the front sensors will automatically be activated in all conditions where the vehicle speed goes below 8 Km/h (5 mph).
WARNING: The Stop & Go function is only available if the vehicle is equipped with front parking sensors.
For the system to operate correctly the sensors positioned on the bumper must be kept clean (remove any mud, dirt, snow or ice).
Cleaning the sensors
When cleaning the sensors, take special care not to scratch or damage them; therefore, do not use dry, rough or hard cloths.
The sensors must be washed with clean water, possibly with car shampoo added. In car-washes which use steam jet or high pressure cleaning machines, keep the nozzle at least 10 cm away from the sensors.
Should you need to repaint the bumper or in case of paint touch-ups in the sensor area, please contact exclusively the Maserati Service Network. Incorrect paint application could affect the parking sensor operation.
Sensor range
The sensors allow the system to monitor the front and rear of the vehicle; they are positioned so as to monitor the central and lateral zones at the front and at the rear of the vehicle.
In the event of an obstacle located in a central area, this will be detected at distances of less than 0.9 m at the front and 1.50 m at the rear, depending on the type of obstacle and its dimensions.
If the obstacle is located in a lateral position, it will be detected at distances of less than 0.6 m (2 feet).
Failure indicators
The system ECU checks all the components every time reverse gear is engaged.
In the event that the parking sensors fail, the relative warning light illuminates on the display, accompanied by the message "Parking Sensor Failure".
In the event of a failure signal, stop the vehicle and turn the ignition key to Stop. Then try cleaning the sensors or moving the vehicle away from any possible ultrasound sources (e.g. pneumatic truck brakes or pneumatic hammers) and rotate the ignition key to the MAR position. This way, if the cause of the operating fault has been removed, the system will start functioning again automatically and the failure buzzer will stop. If however, the failure beep continues, contact the Maserati Service Network to have the system checked.
During parking manoeuvres, always be extremely careful with obstacles that might be located above or below the sensors. In fact, in certain circumstances, objects located near the rear of the vehicle are not detected by the system and therefore could damage the vehicle or be damaged themselves.
The signals transmitted by the sensors can also be altered by damage to the sensors or by dirt, snow or ice on the latter or even by ultrasound systems (e.g. pneumatic truck brakes or pneumatic hammers) in the vicinity.
The driver is fully responsible for parking and other potentially dangerous manoeuvres. During these manoeuvres, always make sure there are no people (especially children) or animals in the manoeuvring area. The parking sensors must be considered an aid for the driver who, in any case, must never take less care during potentially dangerous manoeuvres, even at low speeds.
Fuel cut-out inertia switch
The vehicle is equipped with a safety switch which is designed to intervene in the event of a collision, cutting off the fuel supply and consequently causing the engine to stop. It also prevents fuel leakage if the fuel lines are damaged during the accident. Activation of the safety switch is signaled by the illumination of the warning light on the display The switch is positioned underneath the front left-hand seat.
After impact, if you smell fuel or note any leakage from the fuel supply system, do not reactivate the switch to help prevent any risk of fire.
The activation of the inertia switch results in all the doors and the luggage compartment unlocking and the internal dome lamp and the four direction indicators switching on.
Resetting the switch
Turn the ignition key to the STOP position.
Check that there is no leakage from the fuel system.
If no leaks are found, reset the inertia switch which stops the fuel pump operation, by pressing button A on the switch.
Turn the ignition key to the MAR (ON) position, wait a few seconds and then move it to the ACC. position. Check that the warning light on the display is off.
Check once again that there are no fuel leaks.

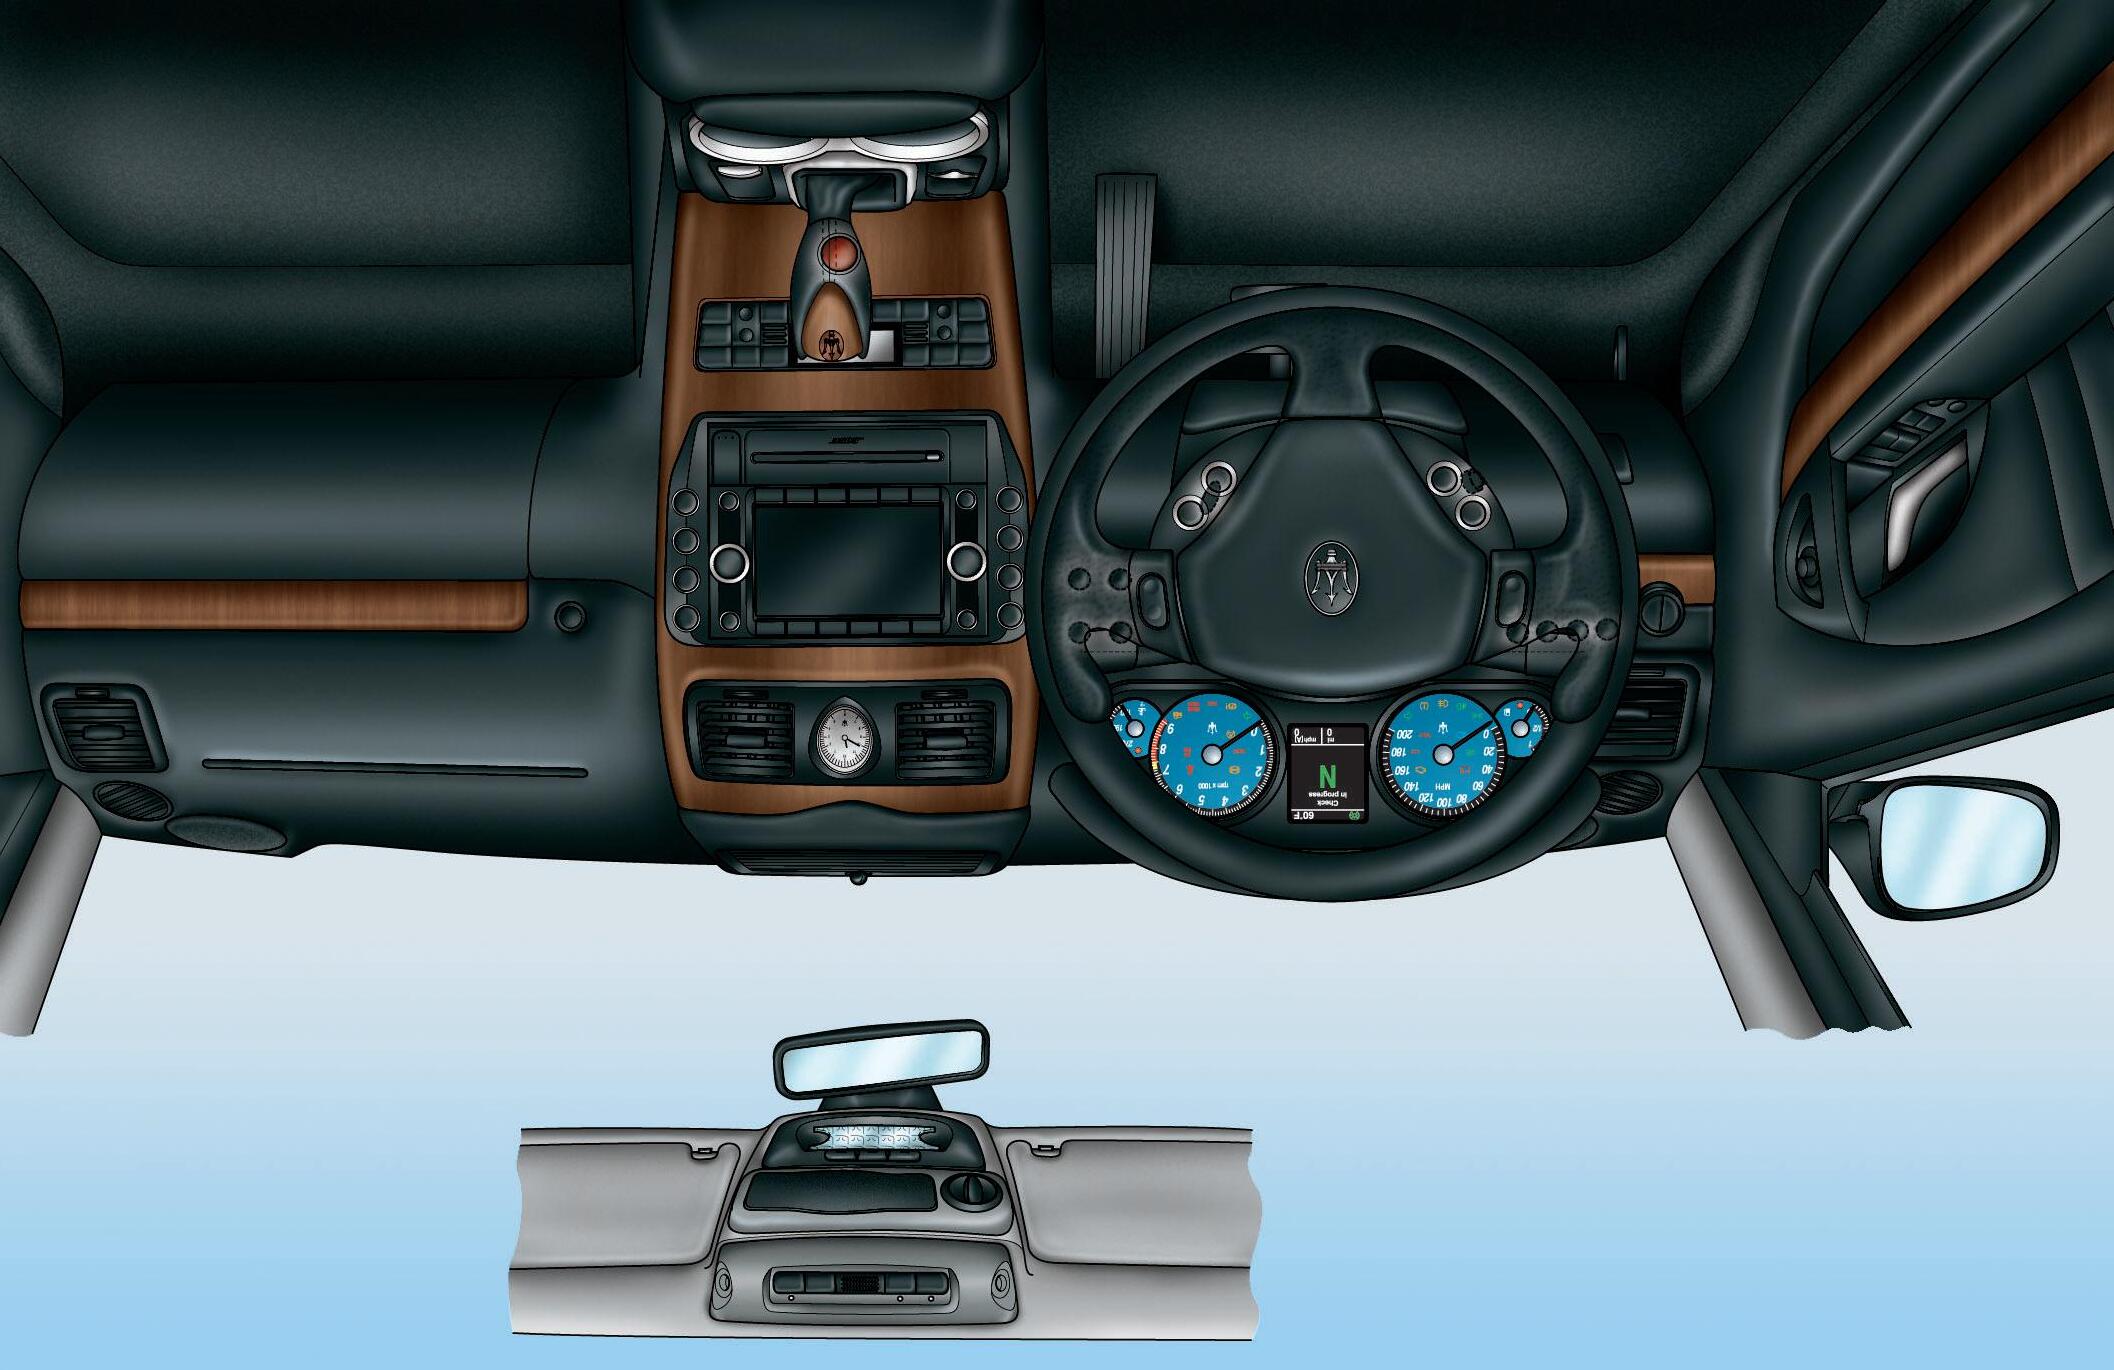
1) Air conditioning and heating system vents
2) Side windows vents
3) Speaker
4) Cruise Control, Direction indicators control lever
5) Instrument panel
6) Driver’s airbag and horn
7) Windshield/headlight wiper/washer control lever
8) Controls to the right of the steering wheel
9) Side buttons, to the left of the Bose® Infotainment Display
10) Central air-conditioning and heating system vents
11) Upper air conditioning and heating system vents
12) Sun radiation sensor
13) Clock
14) Side buttons, to the right of the Bose® Infotainment Display
15) Glove compartment opening button
16) Glove compartment
17) Passenger’s airbag
18) Bose® Infotainment
19) Air conditioning and heating system controls
20) Hazard button
21) Automatic gearshift lever
22) Ashtray with cigarette lighter
23) Electric handbrake engagement/ disengagement lever
24) Gear display
25) Ignition/steering lock switch
26) Bose® Infotainment Controls repeated on the steering wheel
27) Steering wheel height and depth adjustment control
28) Engine compartment lid opening lever
29) Controls to the left of the steering wheel
30) Controls on driver's door
31) External rear-view mirror controls
32) Internal door opening handle
33) Roof controls
34) Front dome lamp
Ref. 8 Controls on the right of the steering wheel
A- Instrument panel brightness increase
B- Instrument panel brightness decrease
C- Trip MODE button and odometer reset.
Ref. 9 and 14 Side buttons on the Bose® Infotainment display
A- SPORT mode button
B- LOW-GRIP (ICE) mode button
C- PARK OFF function button (see page179)
D- MSP system deactivation button
E- Door lock/unlock button
F- Sunshade raising/lowering button.
Ref. 26 Bose® Infotainment Controls repeated on the steering wheel
A- Increases the sound volume.
B- Decreases the sound volume.
C-Button pressed briefly
Voice command function activation/deactivation.
Button pressed at length
Repeats the last voice guidance message given by the navigator.
D-Button pressed briefly Phone mode activation. Places a call.
Accepts incoming call. Ends call in progress.
Button pressed at length
Rejects incoming call.
E-Button pressed briefly
Broadcast Sources Mode: searches for the first tunable station with a higher frequency;
CD, Music Library mode: next track selection.
Button pressed at length
CD audio mode: track fast forward.
F-Button pressed briefly
Broadcast Sources Mode: searches for the first tunable station with a lower frequency;
CD, Music Library mode: goes to the previous track if selected within the first 3 seconds of track playing, otherwise the track is played again from the beginning.
Button pressed at length
CD audio mode: track fast rewind.
G- Mode selection Broadcast, Digital sources.
H- Mute function on/off.
I- Broadcast Sources Mode: Radio frequency shift shifts the radio frequency to the next station in preset steps, starting from the station currently tuned in.
CD, MP3, Music Library mode: selects the next folder.
J- Broadcast Sources Mode: shifts the radio frequency to the previous station in preset steps, starting from the station currently tuned in.
CD, MP3, Music Library mode: selects the previous folder.
K- Confirms the function, item or value selected.
Ref. 27 Steering wheel height and depth adjustment control
Ref. 29 Controls on the left of the steering wheel
A- Light switch
B- Fuel tank door opening button
C- Luggage compartment lid opening button
D- Rear central headrest tilting button
E- Front parking sensors activation.
Ref. 30 Controls on driver's door
A- Rear power windows lock/unlock button
B- EASY ENTRY activation/ deactivation
C- Rear left-hand power window control
D- Rear right-hand power window control
E- Front left-hand power window control
F- Front right-hand power window control
G- External rear-view mirror adjustment control.
Rear console controls
A- Door lock/unlock buttons
B- Sunshade raising/lowering buttons
Dashboard
Rear vents
A- Central vents on console
B- Side vents on pillars
Ref. 33 Roof controls
A- Alarm system anti-lift function deactivation
B- Alarm system motion sensor deactivation
C- Tire pressure calibration
D- Hands-free microphone, voice commands and AudioPilot® sensor
E- Sunroof opening/closing.
Ref. 34 Controls on front dome lamp fixture
F- LH side light switch
G- Central light switch
H- RH side light switch.
Instrument panel
Indicators and warning lights
Rear fog lights
When the rear fog lights are turned on.
Fog lights
When the fog lights are turned on.
Position lights/low beams
This switches on when the position lights, low beams or parking lights are turned on.
High beams
When the high beams are turned on or flashing.
Parking lights
With the key removed, this indicates the parking lights are turned on.
Alternator condition
If there is a fault in the recharging system. When the battery is insufficiently charged or overcharged (flashing).
Engine diagnosis system failure (OBDII)
(*)
Under normal conditions, this warning light should switch on when the ignition key is turned to the MAR (ON) position, and should turn off 18 seconds after engine starts. This will show that the warning light is working properly.
If the warning light remains on or switches on while driving, it indicates that there is a failure in the fuel supply/ ignition and emission control systems. The failure could cause high exhaust emissions, loss of performance, poor vehicle handling and high consumption levels. In these conditions you can drive slowly without demanding engine performance or high speeds. Prolonged use of the vehicle when the warning light is on can cause damages. For this reason, you should contact your local Authorized Maserati Dealer as soon as possible. The warning light will go out if the problem disappears. The error will be stored by the system in any case.
WARNING: When the ignition key is turned to the MAR (ON) position, if the warning light does not turn on or if it turns on while driving, contact your local Authorized Maserati Dealer as soon as possible.
Automatic Gearbox condition (*)
Depending on the message displayed it signals:
–gearbox condition
If the failure permits, slowly drive to the nearest Authorized Maserati Dealer.
–gearbox oil temperature too high
In this case, slow down until the temperature goes down to the normal values for use (the warning light goes off), see page160.
(*) Viewed on the display as well
Low oil pressure (*)
Under normal conditions, the warning light should come on when the ignition key is turned to the MAR (ON) position and go off as soon as the engine is started. If the warning light remains on or turns on while driving, this indicates low engine oil pressure. In this case, turn the engine off immediately and carry out the necessary checks. If the problem persists, contact your local Authorized Maserati Dealer. If it flashes, it indicates a failure of the engine oil pressure sensor.
Tire pressure (*)
This warning light is connected to the tire pressure monitoring system.
In normal conditions, the warning light should illuminate when the ignition key is turned to MAR (ON) and should go off as soon as the engine is started. If the warning light remains on or illuminates while driving, it indicates a too low inflation pressure of one or more tires.
Low brake fluid warning light (*)
It illuminates when the brake fluid level goes below the minimum level. If accompanied by a specific message, it indicates an EBD system failure. In this case, do not apply the brakes suddenly, since this may cause an early locking of the rear wheels. Drive with the greatest care and have the system immediately checked by the nearest Authorized Maserati Dealer.
If the warning light comes on while driving, check the brake fluid level immediately. If the fluid level is below the minimum level there could be a leakage in the circuit: in this case, contact your local Authorized Maserati Dealer before continuing your trip.
Defective ABS system (*)
It illuminates when the ABS system is not functioning. The standard braking system remains operational, but it is advisable to contact your Authorized Maserati Dealer as soon as possible.
Seat belts (*)
It illuminates when the driver seat belt is not fastened or improperly fastened. A buzzer is also activated for approx. 8 seconds when the warning light is on.
Airbag/pre-tensioner failure (*)
This turns on to indicate that the pre-tensioner and/or airbag system is/are not working properly.
Turning the key to MAR (ON), the light comes on but it should go out after a few seconds with the engine running.
If the warning light stays on or if it does not come on, or if it comes on while driving, stop immediately and consult your local Authorized Maserati Dealer.
(*) Viewed on the display as well
Maserati CODE (*)
The warning light illuminates when the vehicle protection system is faulty
Brake pads worn (*)
This illuminates when the brake pads have reached their wear limit. Contact your local Authorized Maserati Dealer.
Handbrake engaged
The warning light comes on when the handbrake is operated.
Parking brake failure (*)
Depending on the message displayed, it signals the following EPB system failures: –Parking brake failure. slowly drive to the nearest Authorized Maserati Dealer and remember that the electric parking brake is not functioning.
If the brake failure is accompanied by the message "EPB fault only manual EPB release possible: see handbook", the manual emergency deactivation procedure must be performed to release the parking brake (see page179).
–Excessive temperature. if the vehicle has been stationary (key to STOP) for about 15 minutes without using the parking brake, and the warning light illuminates again after restarting the engine, slowly drive to the nearest Authorized Maserati Dealer.
–Parking brake system overhaul
The EPB system must be serviced and maintained only by an Authorized Maserati Dealer if any system malfunctions need to be corrected.
MSP system failure (*)
It indicates a malfunction or the deactivation of the MSP system. When flashing, it indicates that the MSP system has activated.
Right-hand direction indicators
This comes on when the righthand direction indicators or the hazard lights are turned on.
Left-hand direction indicators
This comes on when the lefthand direction indicators or the hazard lights are turned on.
(*) Viewed on the display as well
Warning lights on the display
Inertia switch, fuel cutout enabled
This turns on when a collision triggers the inertia switch, thus cutting off the fuel supply. After impact, if you smell fuel or note leakages from the fuel system, do not reactivate the switch in order to help prevent the risk of fire.
Windshield washer fluid
This signals a low level of washer fluid in the windshield washer tank.
Cruise Control
This indicates that the Cruise Control is active.
Lights failure
It illuminates in the case of a system failure or if the position lights, direction indicator, rear fog and license plate lights are blown.
Stop lights failure
This turns on in the case of a system failure or burning-out of the stop lights bulb.
Twilight sensor failure
This turns on in the case of a failure of the twilight sensor.
High catalyst temperature
This warning light illuminates if the engine runs irregularly with consequent high temperature in the exhaust system.
IF THE WARNING LIGHT IS ACCOMPANIED BY THE MESSAGE “HIGH CATALYTIC CONV. TEMPERATURE SLOW DOWN”: the temperature in the catalysts is excessively high. The driver must slow down immediately until the warning light turns off.
could be damaged. Slowly drive to the nearest Dealer.
If the light turns on permanently 3 times the engine will stop.
It will be possible to restart the vehicle only with a key-off - key-on cycle. Then slowly drive to the nearest Authorized Maserati Dealer.
Maserati declines all responsibility for whatever damage deriving from non compliance with the above mentioned warnings.
Power steering failure
This indicates a fault in the power steering system. Slowly drive to the nearest Authorized Maserati Dealer paying attention to stiffening of the steering.
IF THE
Message
“EXCESSIVE CATALYTIC CONV. TEMPERATURE DO NOT PROCEED” APPEARS AFTER DECELERATING: the temperature in the catalysts has reached a dangerous level and the catalytic converters
Low engine oil level
Indicates that the engine oil level is low; to check it see page246
High coolant temperature
Acting in combination with the "Coolant thermometer", it illuminates with the warning light on the instrument panel and indicates a too high coolant temperature. In this condition, stop the vehicle and have the cooling system checked by your Authorized Maserati Dealer.
Adaptive Light Control system failure
It indicates a failure of the automatic headlight aiming system.
ASR system failure
It indicates that the ASR system is faulty. In the event of a failure, contact your local Authorized Maserati Dealer.
Rain sensor failure
This indicates that the rain sensor is faulty. Contact your local Authorized Maserati Dealer.
Parking sensors failure
This indicates a failure in the parking sensors system.
Shock absorber failure
When driving, it indicates a malfunction in the suspension system.
Finger-trap prevention system failure
This indicates a failure in the windows’ finger-trap prevention system.
Before and during activation of the power window, always check that the passengers are not exposed to the risk of injury both by the moving window and by personal objects dragged or hit by it.
Vehicle protection systems
It illuminates when the system detects one of the following malfunctions:
–Alarm system not available.
–Electronic key not detected.
–Have the vehicle protection system checked.
–Vehicle break-in detected.
–Electronic key not recognized.
Doors and lids open
This indicates that the doors or lids are open or improperly closed: the part not closed is highlighted in red.
WARNING: Before driving off, close any open or not properly closed doors and lids.
Ice hazard
This switches on when the outside temperature is approximately 37° F (3° C) or lower, in order to indicate the risk of icy roadways. Under such conditions, drive carefully and slow down as the grip of the tires will be reduced.
Do not activate the "SPORT" mode in this situation.
Scheduled maintenance
Depending on the accompanying message, this indicates that service schedule deadlines are either approaching or due on that day. Upon reaching a deadline, contact your local Authorized Maserati Dealer.
Auto gearbox setting
This indicates that the auto gearbox feature is active.
“SPORT” setting
When the button that sets the vehicle to the "SPORT" mode is pressed.
WARNING: The "SPORT" mode changes the vehicle driving features.
WARNING: SPORT mode should not be activated if the road surface is in rough or slippery.
WARNING: In low- and medium-grip conditions (e.g., rain, snow, ice, sand, etc.) it is advisable not to activate SPORT mode, even with the MSP enabled.
"Low grip" function
This indicates that the low grip function is active
EPB automatic operation disabled
It indicates that the EPB automatic activation/deactivation function is disabled.
Instruments and gauges
Fuel level gauge
The illumination of the warning light inside the gauge indicates that there are approx. 4.7 U.S. gal (18 litres) of fuel in the tank.
Speedometer
It indicates the vehicle speed. The gauge starts providing data when 2.5 mph (4 km/h) are exceeded.
Tachometer
It indicates the engine's r.p.m. Correct driving allows the driver to achieve proper engine performance, without the need of over-revving.
Coolant temperature gauge
It indicates the temperature of the coolant. If the needle indicates high temperatures and at the same time the warning light illuminates, stop the vehicle immediately and have the cooling system checked by your local Authorized Maserati Dealer.
Display
Incorporated in the instrument panel, it performs the following functions: –it provides general information while driving; –it signals any failures and warnings; The user can interact with the system by setting the parameters for the information that can be recalled. The screen page displayed following the initial check cycle, in normal working conditions, (standard screen page) contains the following information:
A- Date
B- Time
C- Gear engaged
D- Driving mode
E- Total odometer,
F- Trip odometer A, B or vehicle speed repetition.
G- Other symbols that may be displayed in icon form
H- Outside temperature
From the Options menu in the Bose® Infotainment system, the user can also choose to have the Audio and Navigator information repeated on the dashboard. For the relevant procedures and instructions, see the "Bose® Infotainment" manual.
Instruments and gauges
Controls MODE
The screen page activation and setting is controlled by pressing the MODE (J), “+” (K) and “-” (L) buttons.
Pressing the MODE button briefly will switch to the following screen pages in sequence:
–Trip A
–Trip B
–Tire pressure
–Left-hand front seat comfort (*)
–Right-hand front seat comfort (*)
–Option Selection
–RPM indicator
–Standard.
(*) if the vehicle is equipped with “Comfort Pack” or “Winter Pack”.
Each of these has a 10-second timing, after which the non-flashing information previously viewed is restored.
Pressing the MODE button for more than 2 seconds the user will select the Trip Odometer information currently displayed, or the Trip Odometer A if the speedometer repetition is active. This piece of information will flash for 10 seconds, after which the nonflashing information previously viewed is restored.
“+ “ and “-”
By means of the “+ “(K) and “-” (L) buttons, the user can adjust the instrument panel brightness. When the "Option Selection" screen page is viewed, these buttons can be used to select, choosing between Trip Odometer A and Trip Odometer B, the information to be repeated on the display. In fact, by selecting , trip A or trip B, with the MODE (J) button and then pressing buttons “+ “ and “-”, the user will display the trip information selected (flashing) alternately.
Trip Odometer reset
In all these cases, and before the 10 seconds are up, pressing the MODE (J) button briefly (less than 2 seconds) will result in the trip information relating to the flashing Odometer (A or B) being reset.
Setting the date
The date can be set through the Bose® Infotainment system, from the "System Options" menu (see the Bose® Infotainment system manual).
TRIP screen page
The Trip screen page is recalled by pressing the MODE (J) button. Each TRIP screen page (A or B) is timed, i.e., it is displayed for a maximum of 10 seconds, after which the screen previously active is restored. When the TRIP A or TRIP B feature is active, the following information is viewed on the display:
–travelled distance (km - miles)
–average fuel consumption (km/L –mpg)
–average travelling speed (km/hmph)
–trip time (hh:mm)
–fuel range (km - miles)
The unit of measurement can be set via the "System Options" menu of the Bose® Infotainment system.
Tire pressure screen page
If the vehicle is equipped with the tire pressure monitoring system (optional), pressing the MODE (J) button the user will display information about the "Tire Pressure".
This screen page is displayed for 10 seconds and, in normal conditions, it will appear as shown in figure 1
–furthermore, the system acknowledges the following conditions:
–system temporarily not active (e.g., external radio interference)
–system not calibrated (e.g., a tire was replaced)
–system failure
–system not active (if it is disabled by the diagnostics system)
–low pressure or puncture in front LH, front RH tires or rear LH and rear RH tires
–low pressure or puncture in unidentified tire.
The system can be calibrated by pressing button M, on the front dome light fixture. The initialization of the procedure is indicated on the display by the message “Calibration activated”.
For more information, please see the “Tire pressure monitoring system” chapter on page47.
Instruments and gauges
Comfort screen page
If the vehicle is equipped with either the “Winter Pack” or the “Comfort Pack” on the front seats, repeatedly press the MODE button to display the screen pages showing the system operating mode for each individual seat.
If the vehicle is equipped with “Winter Pack”, the following seat information is shown:
N- Seat indication
O- Heating level
If the vehicle is equipped with “Comfort Pack”, the following seat information is shown:
N- Seat indication
O- Heating level
P- Ventilation level
Q- Massage system activation/ deactivation
R- Self-adaptive system activation/ deactivation
In both cases, the screen pages shown in Figures 2 and 3 are displayed for 10 seconds.
Option Selection Screen Page
Briefly press the MODE button to display the screen page and select the desired value among the following ones:
–TRIP A distance
–TRIP B distance
–Current speed repetition
–Passenger compartment temperature on the driver’s side. which will be displayed in area F, within the standard screen page (see page76).
The screen page, shown in Fig. 4, remains displayed for 10 seconds. The options listed can be selected by pressing the “+” and “-“ buttons and are confirmed by briefly pressing the MODE button or simply not performing any operation for 10 seconds.
RPM indicator screen page
The "RPM Indicator" screen page allows the user to display, within the standard screen, also a virtual RPM gauge.
The screen page can be recalled by pressing the MODE button repeatedly. The options available, which can be selected by pressing the buttons + and -, are the following:
–ON (display enabled);
–OFF (display disabled).
This function is activated if the user presses the MODE button to confirm this option.
If the Audio or Navigation data repetition option is active on the Bose® Infotainment, when the user sets the virtual RPM indicator this shall not be activated until the repetition function is disabled (see page 123 of the Bose® Infotainment).
Bose® Infotainment
By accessing the "System Options" and "Vehicle Options" modes, the user can set the vehicle functions.
The parameters that can be set are the following:
System Options
-Brightness Display
-Deactivate Display
-Set Time and Date
-Time format
-Date format
-Language
-Temperature Display
-Distance Display
-Tire Pressure Display
-Delayed Accessory
-Reset System Options
Vehicle Options
-Buzzer volume
-Audio Repetition
-Phone Repetition
-Navigation Repetition
-Speed Door Lock
-Unlock Only Driver Door
-Dusk Light Sensitivity
-Front parking sensor
-Easy entry / exit
-Luggage compartment lid opening
-Day running lights
Controls Horn
Pressing the horn symbol A, the horn is activated.
Hazard warning lights
Press button B to turn on the hazard warning lights. Their operation is independent of the ignition key position. Press the button again to turn them off.
When these lights are on, the direction indicators, the related warning lights on the instrument panel and the button are flashing.
WARNING: When the hazard warning lights are activated, the direction control is disabled.
Controls on the left of the steering wheel
Front fog lights
Press button C to turn on the front fog lights. They only work with the position lights or low beams on. The LED on the button illuminates when the lights are on.
Rear fog lights
Press button D to turn on the rear fog lights. They only work with the front fog lights or low beams on. The LED on the pushbutton illuminates when the lights are on.
Do not use the rear fog lights in normal visibility conditions to avoid dazzling vehicles behind.
Opening the luggage compartment
Press button E to open the luggage compartment lid.
This can be operated only with the ignition key removed or turned to STOP and ACC. Vehicles are also equipped with a lever inside the luggage compartment, which permits opening from the inside.
Opening the fuel tank door
Press button F to open the fuel tank door on the rear left-hand side of the vehicle. This button can be operated only when the ignition key is removed or in the STOP position.
Rear central headrest tilting
Press button G to tilt the rear central headrest. The headrest can be then repositioned manually.
Before tilting the headrest, always check that the passengers are not exposed to the risk of injury both by the moving headrest and by personal objects hit by it.
Deactivating the front parking sensors
The front parking sensors can be deactivated by pressing button H. When these sensors are turned off, the LED on the button illuminates. To reactivate the sensors, press button H again.
Controls on the right of the steering wheel
Instrument panel display controls (see page77).
Mode
Pressing button L will select the screen pages to be viewed on the instrument panel display.
Setting
The Instruments And Gauges Brightness
With the external lights turned on, press button J or K to increase or decrease the brightness for the instruments and gauges.
Side buttons on the Bose® Infotainment
Lock set release and locking
Buttons M and N, on the front and rear dashboards, control the locking and unlocking of the lock sets respectively.
Sunshade movement
Press button O to raise the sunshade and button P to lower it. The buttons are found both on the front and on the rear dashboard.
WARNING: If the sunshade guide needs to be cleaned with solvents, it must then be greased in the area where the sunshade slides using Teflon based grease.
WARNING: If, within a time period of 25 seconds, the sunshade is raised and lowered at least 4 times, the relative control will disable them for 30 seconds. Before disabling the sunshade, the system will complete the movement in progress. The last movement accepted will be opposite to the starting movement.
WARNING: Before activating the sunshade, make sure that there are no objects that may interfere with its travel.
SPORT setting
Press button Q to select SPORT mode, which activates the "Automatic Gearbox" and sets the suspension and traction control for sports-style driving.
Please notice that selecting the SPORT mode will decrease driving comfort. Especially in city traffic and on uneven road surfaces.
Low grip
This mode can be used on particularly slippery road surfaces (e.g., rain, snow, ice) to help provide increased road grip. To activate/deactivate this mode, press button R.
When the function is active, the word ICE lights up on the display (see chapter “Other system functions” on page 157).
Park Off
This function allows the user to deactivate automatic engagement of the electric parking brake (EPB) (see page179). Press the button S to deactivate/reactivate the function.
MSP System
The MSP system is designed to activate automatically every time the engine is started.
It is possible to deactivate or reactivate the system while driving by pressing button T. To avoid deactivating the system inadvertently, the button must be pressed for about 2 seconds to turn the MSP system off. When the system is deactivated, the amber warning light on the instrument panel illuminates (see chapter “MSP System” on page43).
Roof controls
Deactivating the alarm system motion sensors
Pressing button U will deactivate the alarm motion sensing system. When this function is deactivated, the LED on the button will flash for 3 seconds and then will turn off.
Deactivating the anti-lift alarm system
Pressing button V will deactivate the anti-lift alarm system. When this function is deactivated, the LED on the button will flash for 3 seconds and then turn off.
Tire calibration button
To calibrate the system, with the ignition key in position MAR (ON), press button W for a time ranging from 4 to 10 seconds. The system will take a maximum of 20 minutes to complete the calibration procedure with the vehicle in motion. The detected situation will then be shown on the display. For further information, see the “Tire pressure monitoring system” on page47.