11 minute read
SERVICING


Should your engine require parts or service, please contact your local DAEDONG dealer. Your dealer will need the following information in order to assist you.
1. Engine make, model number and serial number.
2. Names and code numbers of parts to be ordered.
3. Make and model number of the machine in which the engine is installed.
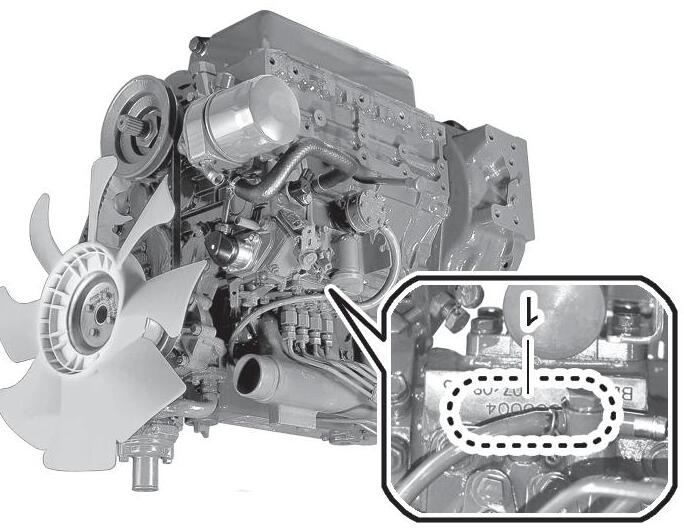
Your dealer is interested in your new tractor and has the desire to help you get the most value from it. After reading this manual thoroughly, you will find that you can do some of the regular maintenance yourself. The engine serial number is stamped on the mounting surface of the injection pump.
Operating The Engine
PRE-START ENGINE CHECKS
Starting And Stopping The Engine
Always check the engine and make sure it is ready for safe operation before starting – See page 4-2 for details.
Important
Before installing the engine, be sure that the equipment is on firm, level ground. Do not run the engine on gradients.
Never use starting fluid or gasoline in the air intake. Engine damage will result, and an explosion may occur.
1. Set the fuel cock to the “ON” or “OPEN” position. (Only for this engine with engine filters)
2. Set the speed control lever at about half throttle.
3. Insert the key into the starter switch, and turn it to "ON" position. Keep the position until the preheat indicator goes off.
① Verify that the oil pressure and charge lights are on.
② The engine may be started with out preheat in normal temperature (above 15oC), but with preheat for 15 or 10 seconds in cold temperature (-23 o C)(Provided it may be varied according to the installed condition of the engine.).
4. Turn the key to the “START” position to engage the starter motor. Release the key immediately as the engine starts.
5. Verify that the oil pressure and charge lights are now off. If either light is on, stop the engine immediately and see page 3-4 for troubleshooting instructions.
6. Run at a moderate speed until the engine reaches a normal operating temperature before doing work.
7. The oil pressure light should remain off during operation. If the light comes on, stop the engine immediately to avoid the possibility of severe engine damage, and check the following:
Correct oil level.
Starting Caution
Verify that the engine contains clean oil of the proper viscosity. Check for faulty wiring.
To avoid personal injury : Keep children or non-essential bystanders away from the engine while it is running.
Stopping
Check During Operation
Important
Do not turn the starter switch to “START” while the engine is running.
If the engine does not start in 10 seconds, wait 30 seconds and repeat the starting sequence. Never run the starter motor continuously for more than 20 seconds.
Always warm up the engine before working. Using a cold engine will shorten its life. If the temperature may be lower below -15 oC (5 oF ), separate the battery from the machine, and keep it indoors. Then use it when starting the engine.
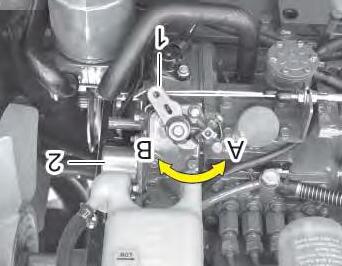
(1) SPEED CONTROLLEVER (2) ENGINE STOPSOLENOIDE (A)"IDLING" (B)"OPERATION"
1. Disengage any load from the engine. Return the speed control lever to the “IDLE” position.
2. Turn the starter switch to “OFF” and remove the key. Return the engine stop solenoide to the “START” position for the next start.
While operating the engine, keep checking whether all parts of the engine are operating smoothly and properly.
Cooling System
If steam or coolant is escaping from the overflow tube; stop the engine, allow it to cool, and check the following and correct as needed.
1. Check for cooling system leaks.
2. Check for obstructions that block cooling air.
3. Clean any dirt or debris from the radiator core (fins & tubes).
4. Check and adjust the fan belt tension.
5. Ensure that the system is filled to the correct coolant level with the proper mix of anti-freeze and water.
6. Check the radiator cap for proper type and condition.
Caution
To avoid personal injury : DO NOT remove the radiator cap or the coolant reserve tank cap while the engine is hot. Pressurized steam or coolant will escape and cause serious injury to you and any bystanders. Open the cap at least 10 minutes after the engine is stopped.
Oil Pressure Lamp
The oil pressure lamp comes on when the oil pressure drops below a safe level. If the lamp comes on during operation. If the lamp is on while the engine is operated at or above 1,000 rpm, immediately stop the engine and check the following items.
1. Check the engine oil level (page 5-4)
STOP THE ENGINE IMMEDIATELY:
1. If the engine speed suddenly changes.
2. If there is an unusual noise.
3. If the engine exhausts suddenly darkens.
4. If the oil pressure or temperature light come on.
Fuel
The fuel tank should never be allowed to become completely empty. An empty tank will allow air into the fuel system; and the engine will not operate without bleeding the fuel system.
Exhaust Smoke
The engine exhaust should be colorless during normal operation within the rated output of the engine. Continuous dark emissions or smoke may indicate improper usage or an engine malfunction.
Reversed Engine Rotation And Remedies
While not common, it is possible for a diesel engine to run backwards. The engine will lose lubrication and be severely damaged if allowed to run in this condition. Shut the engine down immediately.
Remedies
1. Stop the engine immediately using the engine stop lever.
2. Check the air cleaner and rubber parts of the air intake system for damage. Replace as needed.
How To Tell When The Engine Runs Backwards
1. Oil pressure will drop suddenly. The oil pressure light will come on.
2. The sound of the engine will change. Exhaust gases will come out of the air intake.
3. A loud knocking sound will be heard.
Daily Checks
BREAK-IN
Regular maintenance is an important factor in preventing downtime and accidents. Always make the following checks before operating the engine.
During the engine break-in period, the following actions are critical to engine performance and life.
1. Change engine oil and oil filter after first 50 hours of operation (See pages 6-3 to 6-4).
All service and maintenance should be done on a firm, level surface.
Item Page
2. In cold weather, always allow the engine to warm up before using.
Service Intervals
Note
The items marked ⊙ must be done after the first 50 hours of operation. The fuel injection pump, nozzle, alternator, starter, compressor, gear pump and hydraulic valve should be checked and repaired only by KIOTI Dealer/Distributor. If they are serviced by an unqualified person, the vehicle's safety cannot be guaranteed any longer since changes made may not conform to KIOTI requirements.
Use Diesel Fuel No.2.
Caution
To avoid serious injury: Do not mix gasoline or alcohol with diesel fuel. This mixture may damage the engine and can cause an explosion. Stop the engine while refueling to avoid fire or explosion. Avoid open flames and sparks while refueling.
Fuel Level Check And Refueling
1. Always refuel before the fuel level reaches “EMPTY”.
2. Use diesel fuel only. Other fuels and fuel mixtures will degrade performance and may damage the engine. Use the correct grade of diesel fuel for the ambient temperature.
Important
Always use clean fuel. Use a strainer if necessary. Do not let the fuel tank run empty. Clean up fuel spills promptly and properly to eliminate a fire hazard.
Checking The Fuel Lines
Caution
To avoid serious injury: always stop the engine and allow it to cool before servicing the fuel system. Repair fuel leaks promptly to avoid fire or explosion.
Replacing The Fuel Filter
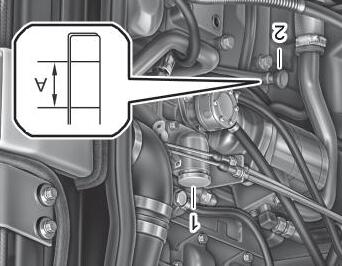
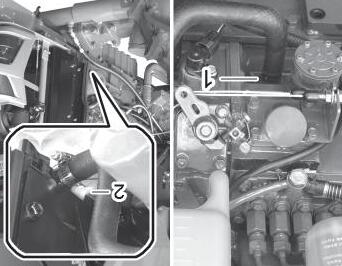
Check the fuel lines after every 100 hours of operation.
1. Check and tighten all hose clamps.
2. Check and replace rubber fuel lines and clamps as needed. Replace hoses and clamps every 2 years regardless of engine usage.
3. Bleed air from the fuel system after service.
Important
Plug ends of open fuel lines during service to prevent dirt and other contaminants from entering and damaging the fuel system.
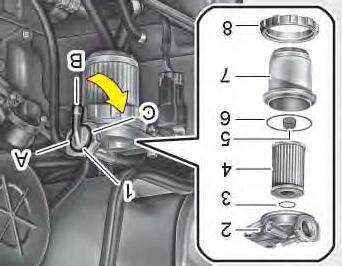
(1) Fuel cock
(2) Fuel filter container
(3) O-ring
(4) Filter element
(5) Spring
(6) O-ring
T91OA26A
(7) Filter container
(8) Screw ring
(A) Close
(B) Open
(C) Bleeder
1. Replace the fuel filter cartridge every 400 hours.
2. Apply a thin layer of fuel oil on the gasket. Install and hand-tighten.
Important
Replacing the fuel filter periodically will significantly reduce injection pump and fuel injector wear.
Engine Oil
For your own safety and maximum service life of the machine, make a thorough daily inspection before starting the engine.
Caution
To avoid personal injury: Be sure to check and service the tractor on a flat place with the engine stopped and the parking brake “ON”.
Checking Engine Oil Level
Caution
To avoid personal injury: Be sure to stop the engine before checking the oil level.
1. Park the machine on a flat sur face.
2. Check the engine oil before starting the engine or wait 5 minutes or more after the engine has stopped.
Walk Around Inspection
Look around and under the tractor for such items as loose bolts, trash build-up, oil or coolant leaks, or broken or worn parts.
(1) Oil Inlet (2) Oil gauge (A) Oil level is acceptable within this range.
Important
When using oil of a different brand or viscosity from the previous one, remove all of the old oil. Never mix two different types of oil. Do not start the engine if the amount of oil is insufficient.
3. To check the oil level, draw out the dipstick, wipe it clean, replace it, and draw it out again.
Check to see that the oil level is between the two notches. If the level is too low, add new oil to the prescribed level at the oil inlet.
4. Engine oil quantity
Changing Engine Oil
1. Change the oil after the first 50 hours of operation.
2. Remove the drain plug from the oil pan and allow all of the oil to drain. Draining the oil will be easier when the engine is slightly warm.
3. Ensure that the oil level on the dipstick is at the upper mark.
4. Change the oil after every 150 hours of operation thereafter.
5. Use SAE 15W40 oil or equivalent.
6. Always drain the oil completely when changing. Never mix different oils or engine damage may result.
Replacing The Oil Filter Note
Swipe off any engine oil stained on the machine.
1. Replace oil filter with at least every other
5. The level of engine oil is lowered when replacing cartridges. So, check whether any oil leakage is in sealed places when operating the engine for a while, and then check the oil level. If necessary, replenish oil.
4. Screw the new filter on. Handtighten only. If the gasket contacts with the sealed place, fasten it with hands. If you fasten it with wrenches, the fastening force may be greater than necessary.
RADIATOR (OPTIONAL)
Radiators must be handled and installed properly to avoid coolant leaks. It should be a daily routine to check the engine coolant level. Check it before each use while the engine is cold.
Warning
To avoid personal injury: Do not remove the radiator cap or coolant reserve tank cap while the engine is hot. Escaping steam or coolant will cause serious injury to you or any bystanders. Always check the engine coolant level when the engine is cold.
Caution
To avoid personal injury: always stop the engine and allow it to cool before changing the coolant or performing any other cooling system service.
CHECKING LEVEL,ADDING AND CHANGING COOLANT
1. Without a reserve tank, remove the radiator cap while the engine is cold. The coolant level should be just below the filler neck.
2. If equipped with reserve (expansion) tank, the coolant level should be between “FULL” and “LOW”.
3. If necessary, add the proper mix of pure water and anti-freeze. Cooling system drain cocks are located at the bottom of the radiator and on the side of the engine. They must be closed securely during operation. (If there is any leakage, refer to pages 5-9.)
IMPORTANT
Do not use dirty water or seawater for coolant. Check radiator cap condition and tighten securely after service.
Do not overfill the reserve tank, if equipped. When coolant is added, start the engine and check again before it gets hot. It may require additional coolant.
Changing Coolant
1. To discharge coolants, always open plugs for discharge that are located on the side of the crank case and lower part of radiator, and open the radiator cap, too. You cannot discharge coolant fully when the cap is closed. (To discharge coolant from reservoir tank, separate the overflow pipe from the radiator cap.)
※ The coolant mentioned above is applied only for the engine.
3. A radiator cap that is loose or has a damaged seal will result in coolant loss and may cause overheating.
4. Coolant(Radiator cleaner and antifreeze).
Season Coolant
SummerPure water and radiator cleaner
Winter (When temperature drops below 0 (32° F)or all season
Pure water and anti-freeze (Refer to P5-10)
IF COOLANT OVERFLOW PERSISTS:
1. Clean dirt and debris from the radiator guard, if equipped, and the radiator core (fins and tubes) to ensure that cooling air flow is not obstructed.
2. Check and adjust the fan belt (see page 5-14).
3. If a cooling system blockage is suspected, drain and flush the cooling system with a suitable radiator cleaner. Refill with fresh coolant. If a blockage persists, contact your dealer or professional radiator service.
Checking Radiator Hoses
1. Inspect radiator hoses every 6 months or 200 operating hours; whichever comes first. Check for leaks and repair or re place promptly. Tighten hose clamps regularly.
Hoses that are cracked, swol len or brittle must be re placed as failure is eminent. Hose fail ure will result in engine over heating and possible injury.
2. Replace cooling system hoses every 2 years. New hose clamps should always be used when replacing hoses.
Cleaning The Radiator Core
Flush the radiator core with fresh water to remove external dirt and debris. Cleaning should only be done when the system is cold.
Cleaning The Radiator If Engine Overheating Occurs
If the coolant is overheated to around or above boiling point, follow instructions below. If a warning buzzer or lamp is turned on, follow instructions below.
1. Safely stop the machine. Remove any load from the engine and reduce the engine speed to idle.
2. Allow the engine to idle for 5 minutes before shutting it down.
3. After shutdown, allow the engine to cool before troubleshooting and repair. Stay away from an overheated engine until it cools as steam or hot coolant may escape violently without warning.
4. After shutdown, allow the engine to cool before troubleshooting and repair. Stay away from an overheated engine until it cools as steam or hot coolant may escape violently without warning.
5. After the engine cools, consult the
“Troubleshooting” section of this manual to determine the cause. Make repairs and adjustments as required.
Clean the cooling system every 500 hours or as needed. Cleaning may be required more often in severe service conditions. Always clean the system when replacing the engine coolant.
IMPORTANT
Use water only to clean the radiator core. Never use tools or any other hard object that will damage fins and tubes. Leaks or degraded performance will likely occur.
ANTI-FREEZE
Freezing temperatures can quickly and severely damage the engine if the cooling system is unprotected. Use antifreeze when temperatures fall below 32oF (0oC).
1. Only use permanent anti-freeze in this engine.
2. Completely drain and flush the cooling system with clean water before adding anti-freeze.
3. Mix the proper amounts of anti-freeze and pure water in accordance with SAE J1034 and SAE J814C based on the expected ambient temperature.
4. Mix the anti-freeze and water before pouring it in the cooling system.
Note Important
The coolant mixture should not exceed 50% anti-freeze by volume.
This data is the industry standard for a typical ethylene glycol based antifreeze. These volumes of anti-freeze, when mixed with pure water, will reduce the freezing point of the coolant mixture as shown.
*At 760 mmHg pressure (atmospheric), a higher boiling point is obtained by using a radiator pressure cap which permits the development of pressure within the cooling system.
When adding coolant during daily service, use only water or anti-freeze mixed with water to ensure that the mix ratio stays at or below 50% anti-freeze. Keep unused anti-freeze in a clean, tightly sealed container. Do not use radiator cleaning agents when anti-freeze has been added to the cooling water. (Anti-freeze contains an anti-corrosive agent, which will react with the radiator cleaning agent forming sludge which will affect the engine parts.)