1 minute read
REPAIR IÑSTRUCTIONS, PART 2


13. Fem@e lhe leo @aliñO rings ffom rh¿ luel p6sage. using rhe chip Éeuum, rem@ any remáining débis fom lhe injector bore.
15.
lnslall lhé ¡nletor bore ealino lool (J 42885-25) ro prc1e6r rhe tuel pássge área and prd€nl déb sfom enle ng, Use lhe unh ¡njeclor hold ddn boll io seu6 lh€
Usins lh€ inislor bo@ clea¡ing kil clean lhe @pper sle* seal of thó ¿-ylinder héád.
Note
Thé i¡j€c¡or bo€ seali¡g tool ñust b6 us6d lo pBsnl did lrcm €nlenna fte tuelpasege.
16. Using lhe bfush, clean the cyllnder héád iñiécld boÉ wáll6 lor lhe @pper deM.
Note
The inje.lor bore seallng toor musr b¿ used to prwenl d€bris from e¡leÍnq lhe iuel passáoe.
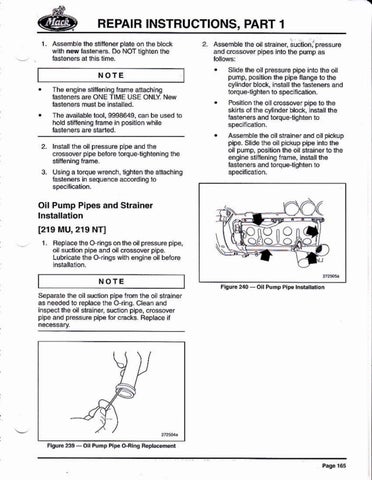
REPAIR INSTRUCTIONS, PART 2
17. Using lhe brush, 6lean opening ¡n lhe cylindé.
Copper Sleeve lnstallation
1 . Ensuó lhé pisron is at the lMst positlon iñ the cyllnder ll not, us6 lh€ ryryheel luming lool lo place l¡e piston al its l@ost oGilion.
NOfE
Thé injéclor boré saling lml musl bá uséd lo prdent debfis lfom enrering the luel p6sge.
when replac¡ng lhe copper sleeves, ¡l ¡s impódanl lo check lhal lhá .lewe bo€ in ihe cylind€r hsad is lrs€ from any carbon d€posils or olher Esidue 0.e,, pie@s ol O ¡ing, eic,) beloe nstalling a ¡éwcoppér dé*. Réclean ii
10 U6ing lhe chipEcuuñ, remove álldebris from lhs @pp€r sle@ bore.
Sefvice Hini
19 Bemow ¡he inleelor bore searins lool rom the cylinder head, Using lhe chip vacuum, róñow árry rémáiniñg deb s.
NOfE
This is 1o sNuB lhál lh€ @pper slese installation t@t does ¡ot damaqe the piston dué