
17 minute read
Brake System


Danger
NOT use replacement parts anywhere the brake system unless conforms exactly original specifications. A nonconforming part your vehicles brake system could cause a malfunction, leading loss control the vehicle resulting severe personal injury death.
Danger
NOT release the parking brake attempt move the vehicle until brake air pressure both circuits least 100 psi (690 kPa). Failure follow this procedure may lead uncontrolled vehicle movement and cause severe personal injury death.
Danger
Automatic slack adjusters MUST NOT manually adjusted fort correct excessive push rod this condition indicates that a problem exists with the automatic adjuster , installation the automatic slack adjuster problems related components the foundation These conditions will not corrected manually adjusting the automatic slack
Manual adjustment automatic slack adjusters a dangerous practice that could result serious This practice gives the vehicle operator a false sense security about the fectiveness the and the brakes will likely soon out adjustment
Note: The brake system a critical vehicle safety For your safety and for those around you, follow the recommended preventive maintenance any problems occur , have them investigated immediately authorized service facility .
The following Dual Circuit Brake System Function T est should performed each C and D inspection interval, after any air system service procedures that involve disconnecting and reconnecting air lines where incorrect reconnection, such the treadle valve, a possibility .
1 Block the wheels prevent the vehicle from 2 Start the engine and build air system pressure governor cutout.
7 Have assistant check for proper results observing the movement the slack adjusters indicated below:
TRUCK:
• The brakes the rear drive axle(s) should always apply indicated movement the slack adjuster .
• The low - air warning buzzer and warning lamp should activate for least two the
TRACT OR:
• The brakes either the steering axle the rear drive axle(s) should always apply indicated movement the slack adjuster .
• The low - air warning buzzer and warning lamp should activate for least two the
8 Repeat the above procedures for the remaining air reservoirs (do not include air reservoirs for air starter equipped).
Air T anks
Danger
Drain the air system tanks the recommended condensation moisture can enter the brake system air causing corrosion The safety the brake system could leading accident causing severe personal injury
W Arning
When draining the air NOT look into the area the draining air Dirt sludge particles may the air stream that could cause eye injury very important that the air system kept sludge oil found the drainage excessive amount fluid drained out the tanks see your authorized MACK T ruck dealer .
Air tanks should drained daily . Make sure the drain cocks close properly after draining. Empty moisture from air tanks pulling the drain valve lanyard pull cord. The tanks should checked for condensation fluid, even automatic drain valve installed.
Air Dryers
fective mid - September 2008, all MACK chassis are equipped with air dryers which utilize oil coalescing desiccant cartridge which removes atomized oil and other particulate matter from the air system. The oil coalescing desiccant cartridge must changed yearly . Refer the specific air dryer service literature for detailed information.
Wheel Safety Information
Danger
NOT attempt repair wheels tires unless you are trained and equipped so. Wheel and tire assemblies cannot worked without proper tools and equipment. Failure follow this may lead serious personal injury death.
Danger
Failure properly torque - tighten the wheel nuts can result the breakage wheel studs and the subsequent loss wheels. Loss vehicle control and serious personal injury death can occur .
Danger
NOT use oil grease studs The tightening torque fected and can lead incorrect clamping loads between the rim and This could lead a loss the Loss vehicle control and serious personal injury death can occur
Danger
NOT install retreaded repaired tires the steering They could fail unexpectedly and cause the loss vehicle leading serious personal injury
Danger
NOT use mismatched wheel they not exactly match the original design they may cause failure separation leading blowout and accident and personal injury death.
Danger
NOT install tires with a load rating that less than stated the Certification Label the door The tire could unintentionally leading causing serious personal injury
Danger
NOT use mismatched tires the same Always use the same type (radial bias ply) Mixing tires the same axle will fect the roadholding and can lead and serious personal injury
Wheels
Danger
Before checking the wheels, set the parking brakes, place the transmission neutral and chock the Failure can result unexpected vehicle movement and can cause serious personal injury
Danger
Wheels must serviced only a qualified
NOT this work Inflated tires wheels contain compressed air and suddenly with explosive resulting serious personal injury
Check wheels for signs rust streaks around the wheel This indicates looseness (steel Inspect all types rims for Cracks can appear many places but typically radiate out from where a load Inspect closely around handholes and inside
Wheel Nut T ightening
Danger
Failure properly torque - tighten the wheel nuts can result the breakage wheel studs and the subsequent loss This can lead loss vehicle control and serious personal injury
After the initial tightening, retightening must made within the first 800 (500 miles). After the first retightening, only normal inspection nut tightness needed. Check front and rear wheel nut tightness with a torque wrench. All disc wheels for MACK vehicles have a tightening torque 610 (450ft). T ighten the nuts the correct sequence. Inspect bolts and nuts for signs wear cracks. Make sure that the bolts are not bent. This tightening check particularly important when rims brake drums are newly painted. Paint can flake f from these surfaces, causing the nuts lose their grip and the wheel loosen. W7001392
T ire Inflation and W ear W ARNING
NOT operate the vehicle with under - inflated Always keep your tires inflated the manufacturers Increased flexing the tire sidewall produces The heat can build the point blowing the tire out causing
W Arning
Check tire pressure when the tire cool. Never bleed the air from hot tires. Increased tire pressure measured a hot tire normal. Low pressures may cause side wall flexing, resulting increased heat, leading tire failure and vehicle accident.
Remove stones lodged ribs between double - mounted wheels. Check the tire pressure and leak - test the valve stems.

W7001270 important have the wheels correctly Check for uneven tire wear frequently Uneven tire wear a sign wheels out
Measure the tread depth. The depth should not less than 4.8 (6/32 - in) front tires and not less than 1.6 (2/32 - in) drive tires. Most premium steer tires start with 14.2 (18/32 - in) tread depth when new . Usually remove steer tires 4.8 (6/32in). Drive tires should removed not less than 1.58 (2/32in).
T ire Hints
Hints How A void
W ear
Unnecessary T ire
• Maintain correct tire pressure
• Check the tire pressure when the tires are cold
• Check that valve caps are not missing
• Keep the wheels balanced
• T ire wear increases with speed
• Overloading not only decreases tire life but also creates a hazard
• Incorrect front end alignment causes increased wear
•
Unnecessary tire rotation may cause excessive wear
Note: A cold weather initial driving period will increase the life new retreaded Dual mounted wheels should always the same type and diameter (maximal diameter dif ference allowed 6 [1/4 in]).
MACK committed repair procedure 642 (RP American T ire Association T and The Maintenance Council
Representatives from MACK Inc. actively participated, along with twenty - two companies, developing recommended practice 642 entitled T otal V ehicle Alignment: Recommendations for Maximizing T ire and Alignment related Component Recommended Practice 642 (RP 642) published the Maintenance Council, American T rucking Associations,
Companies that participated the development 642 are listed the . T
ypical W ear Patterns
Incorrect Air Pressure
Air pressure too high gives rapid wear the middle.
Air pressure too low gives rapid shoulder wear .
Incorrect camber gives abnormal wear one half the


Incorrect T and Axle Alignment
Incorrect toe -
Incorrect toe - out Out - - line axle
Steering arm defect
T1006459
Dual Wheel Mounting
Excessive road camber , dif ferent types dif ferent circumference f - center loading give faster wear one tire.
Air pressure too low , mismatched rims for the tire type and dimension, excess flexing tire dif ferent types tires inner and outer tires gives contact wear

Incorrect Caster and Imbalance
Caster angle Imbalance
Also rapidly wears the mechanical parts steering kingpin and wheel


Cuts the T ire T read
Cuts
Flaking cuts
Rubber flaking
Cuts are due poor roads, air pressure too high incorrect tire type.
T1006720
Cuts the T ire T read
Cuts
Flaking cuts

Rubber flaking
Cuts are due poor air pressure too high incorrect tire
T1006720
Spot W ear
Sudden braking, locking brakes out - - round brake drums give spot wear . T1006721
Feathered Edges
Normal occurrence non - driving wheels good roads and high mileage.
T1006722
Cupping
Cupping a normal occurrence that depends the tread pattern; the higher the the greater the wear

T1006723

Front Wheel Hubs DANGER
Failure keep wheel bearings properly adjusted and lubricated may result accelerated tire wear , poor handling and, extreme cases, wheel separation from the hub from the spindle resulting loss vehicle control and serious personal injury death.
The front wheel hubs can filled with one several types oil. Motor oil should SAE 15W40. The oil can either petroleum based synthetic (synthetic should not used for the MACK axle). Axle oil, API - SAE 75W90, can also used. There are set change intervals for hub lubrication. The only requirement that the hub opened, the lubricant must changed.
W7001271

Unitized Front Hubs
The non - tapered axle hubs are sealed with lubricant inside the hub and not require
Chassis Maintenance Springs

Note: This work best performed a MACK T ruck dealer other service outlet having the proper equipment.
The spring package fastened the axle beam with U - important that the U - bolt nuts are properly The nuts may loosen with Severe roads and service will loosen them faster . Loose U - bolts can cause springs axle hard steering and abnormal tire wear . Inspect the chassis for broken loose broken axle U - any these are contact your local MACK dealer .
Spring Bushings
When lubricating the lift the axle f the floor , suspend the frame with axle stands and lower the The spring bushings are now the position where grease can added the contact the spring bushings are greased without taking the load high wear and lower lifetime will occur because grease not able reach the contact the vehicle being driven severe climates with a lot slushy , highly dusty f - road increase the frequency spring bushing W7000449
Grease Fittings
Rubber Bushings
Rubber bushings are used for extended service life. your vehicle equipped with rubber bushings NOT lubricate them. Replace the leaf spring damaged has premature excessive wear .
Cab Maintenance
Cab Air Filter

T o provide comfortable and clean fresh air the cab, the heating and air conditioning system designed with a replaceable filter .
Under normal operating conditions the filter should replaced every 6 months ensure the ficiency the heating and air conditioning system. Failure replace the filter may cause damage heater/AC components.
Dusty conditions may require more frequent replacement.
Doors
The door lock mechanism should greased annually using white Lubricate the door lock cylinder with liquid graphite annually , more often climates with a lot snow and salt the Coat the door stop arm with white grease annually wet and salted roads, road spray can enter the door lock key cylinder Lubricate the cylinder with liquid graphite annually more often necessary The door hinge pins are treated manufacturing and then lubrication necessary T o keep the door rubber moldings and seals around the windows good working order and prevent them from freezing shut during the cold occasionally spray a silicone W8003203

Hood
The hood latch mechanism should greased with white grease yearly the mechanism hard work binds, the latch should cleaned before

Rust Protection
The rust protection applied when the cab was produced adequate for normal use and service. extension the cab rust protection desired the vehicle used a severe application, recommended that cavity wax - applied every 3rd year .
Paint and Brightwork Care Cab
Caution
When using a pressure washer clean the vehicle, not direct the spray electrical components the engine compartment such the alternator , starter and compressors. W ater spray from pressure washers can damage electrical components.
W ash all exterior painted surfaces frequently remove especially important wash f salt - laden snow and ice during the cold A mild deter gent approved for automotive cleaning can used but avoid strong deter
Note: NOT aim the water jet directly door and window seals door locks. locks are filled with water , use compressed air clean the water out and then apply liquid graphite. especially careful leaving water locks around seals during freezing weather .
Apply a coat wax regularly This will help the paint and other surfaces keep their luster the surface gets dull, use a restoring cleaner specially designed for Clean f all tar spots and tree sap before
Chassis
Keep the chassis free from buildup dirt. Make sure the chassis cleaned before the maintenance inspections help spotting leaks, etc. salt can part the road sludge during the cold season, remove buildup snow and ice does not promote corrosion. the end the cold season, thoroughly flush away all collected dirt from the chassis.
signs delamination the frame rail are apparent, complete the following steps:
1 Clean chassis with high pressure water spray Use mild deter gent available; remove loose dirt and
2 Continue high pressure wash fected delamination areas paint from the frame rails. Apply high pressure spray until paint holds frame substrates.
After completing these steps, avoid further delamination, have the framerail serviced soon possible.
Stainless Steel
Stainless steel will rust exposed salt for too W ash frequently , especially during the cold remove salt - laden snow and rust wash the surface and use a rubbing compound remove the Apply a coat wax a finish (do not wax parts that get such exhaust
Note: Never use steel wool clean stainless steel. Pieces the steel wool break f and can create rust stains the
Chrome
Chrome surfaces will rust they are not cleaned and This especially important during the cold season when roads are salted coastal areas where the salt level the air Clean chrome surfaces with clean water . the surface has heavy dirt tar use a tar remover . T o remove rust use a non - abrasive chrome cleaner and apply a coat wax a finish (do not wax parts that get such exhaust
Note: Never use steel wool clean chrome. Pieces the steel wool break f and can create rust stains the Aluminum
Unprotected aluminum surfaces will form oxide layer not This especially important during the cold season when roads are salted coastal areas where the salt level the air high. Clean with steam high pressure water . Use a mild deter gent the dirt heavy . Rinse well. Clean aluminum surfaces with warm water . the surface has heavy dirt tar spots, use a tar remover . T o prevent spotting, wipe aluminum surfaces dry after washing.
Upholstery
Clean vinyl and cloth upholstery with light brushing vacuuming. heavily soiled and spots caused oil, ice cream shoe polish, grease, etc., use a clothing fabric stain remover .
Plastic
The plastic the upholstery can cleaned with a soft cloth and mild soap solution.
Alcntera Suede-Like Material
Suede - like upholster can cleaned with a soft cloth and mild soap
Leather Care
MACK’ s Leather upholstery manufactured with a protectant repel Over grease and dirt can break down the scuf and fading can
Caution
NOT use gasoline, naphtha similar cleaning agents the plastic leather since these can cause damage. T ake extra care when removing stains such ink lipstick since the coloring can spread. Use solvents sparingly . T much solvent can damage the seat padding. Start from the outside the stain and work toward the center . Sharp objects (e.g. pencils pens a pocket) V elcro fasteners clothing may damage the textile upholstery .
Lubrication
Chassis Lubrication
Danger
Before working servicing a vehicle, set the parking brakes, place the transmission neutral and chock the wheels. Failure can result unexpected vehicle movement and can cause serious personal injury death.
General lubrication includes lubricating all the grease fittings the drivetrain, front and rear suspensions, power steering, and front axle, using a grease gun. Grease the chassis every 000 (15,000 miles). However , the vehicle a demanding application running a dirty corrosive atmosphere, adjust the lubrication intervals reflect heavy - duty use. For example, driven heavy stop - and - traf fic with a lot maneuvering, the lubrication intervals should every 000 (10,000 miles) less. All lubricating points are found the chassis lubrication chart the next page.
Lubricating Grease
Use grease with a lithium base with additives and a consistency NLGI No. Care should taken not use any grease other than one with additives for the driveshaft. NOT use any solid lubricants, such graphite, copper molybdenum disulfide.
Lubrication Procedure
Make sure the grease fittings are cleaned f before greasing fill grease the point where old grease and contaminants are forced out from the part and only new grease comes out. new grease cannot filled old grease flushed out, the part needs checked for problems. a fitting does not accept lubrication due damage internal stoppage, replace with a new
Note: Think greasing the same way oil change. A l l old grease should come out and replaced with new Remove excess grease from shackles and other surfaces.

CHU, GU, TD,
The numbers the lubrication chart corr espond with the number notes the Lubrication Chart Notes section. For mor e information r efer
“Lubrication Notes” , page 139 .
Grease
Hub Oil
Coolant
Aut. T ransm. Fluid
Engine Oil T Oil
Hydraulic Oil
Steering Fluid
Rear Axle Oil
Brake Fluid
Auxiliary axle(s)

W indshield washer fluid level
Lubricate Dump body oil reservoir level
Lubrication Notes
1 Spring hanger: Use a lithium based grease with specification API NLGI When lubricating the left and right sides the ont springs, lift the axle f the floor , suspend the frame with axle stands and lower the The spring bushings are now the position where grease can added the contact
Note: The rock guard will have removed (if equipped).
Note: Always grease a MACK front axle with the wheels the ground.
Note: T o grease non - MACK they are typically greased with the wheels the ground. Consult with the axle manufacturer for the latest recommendation.
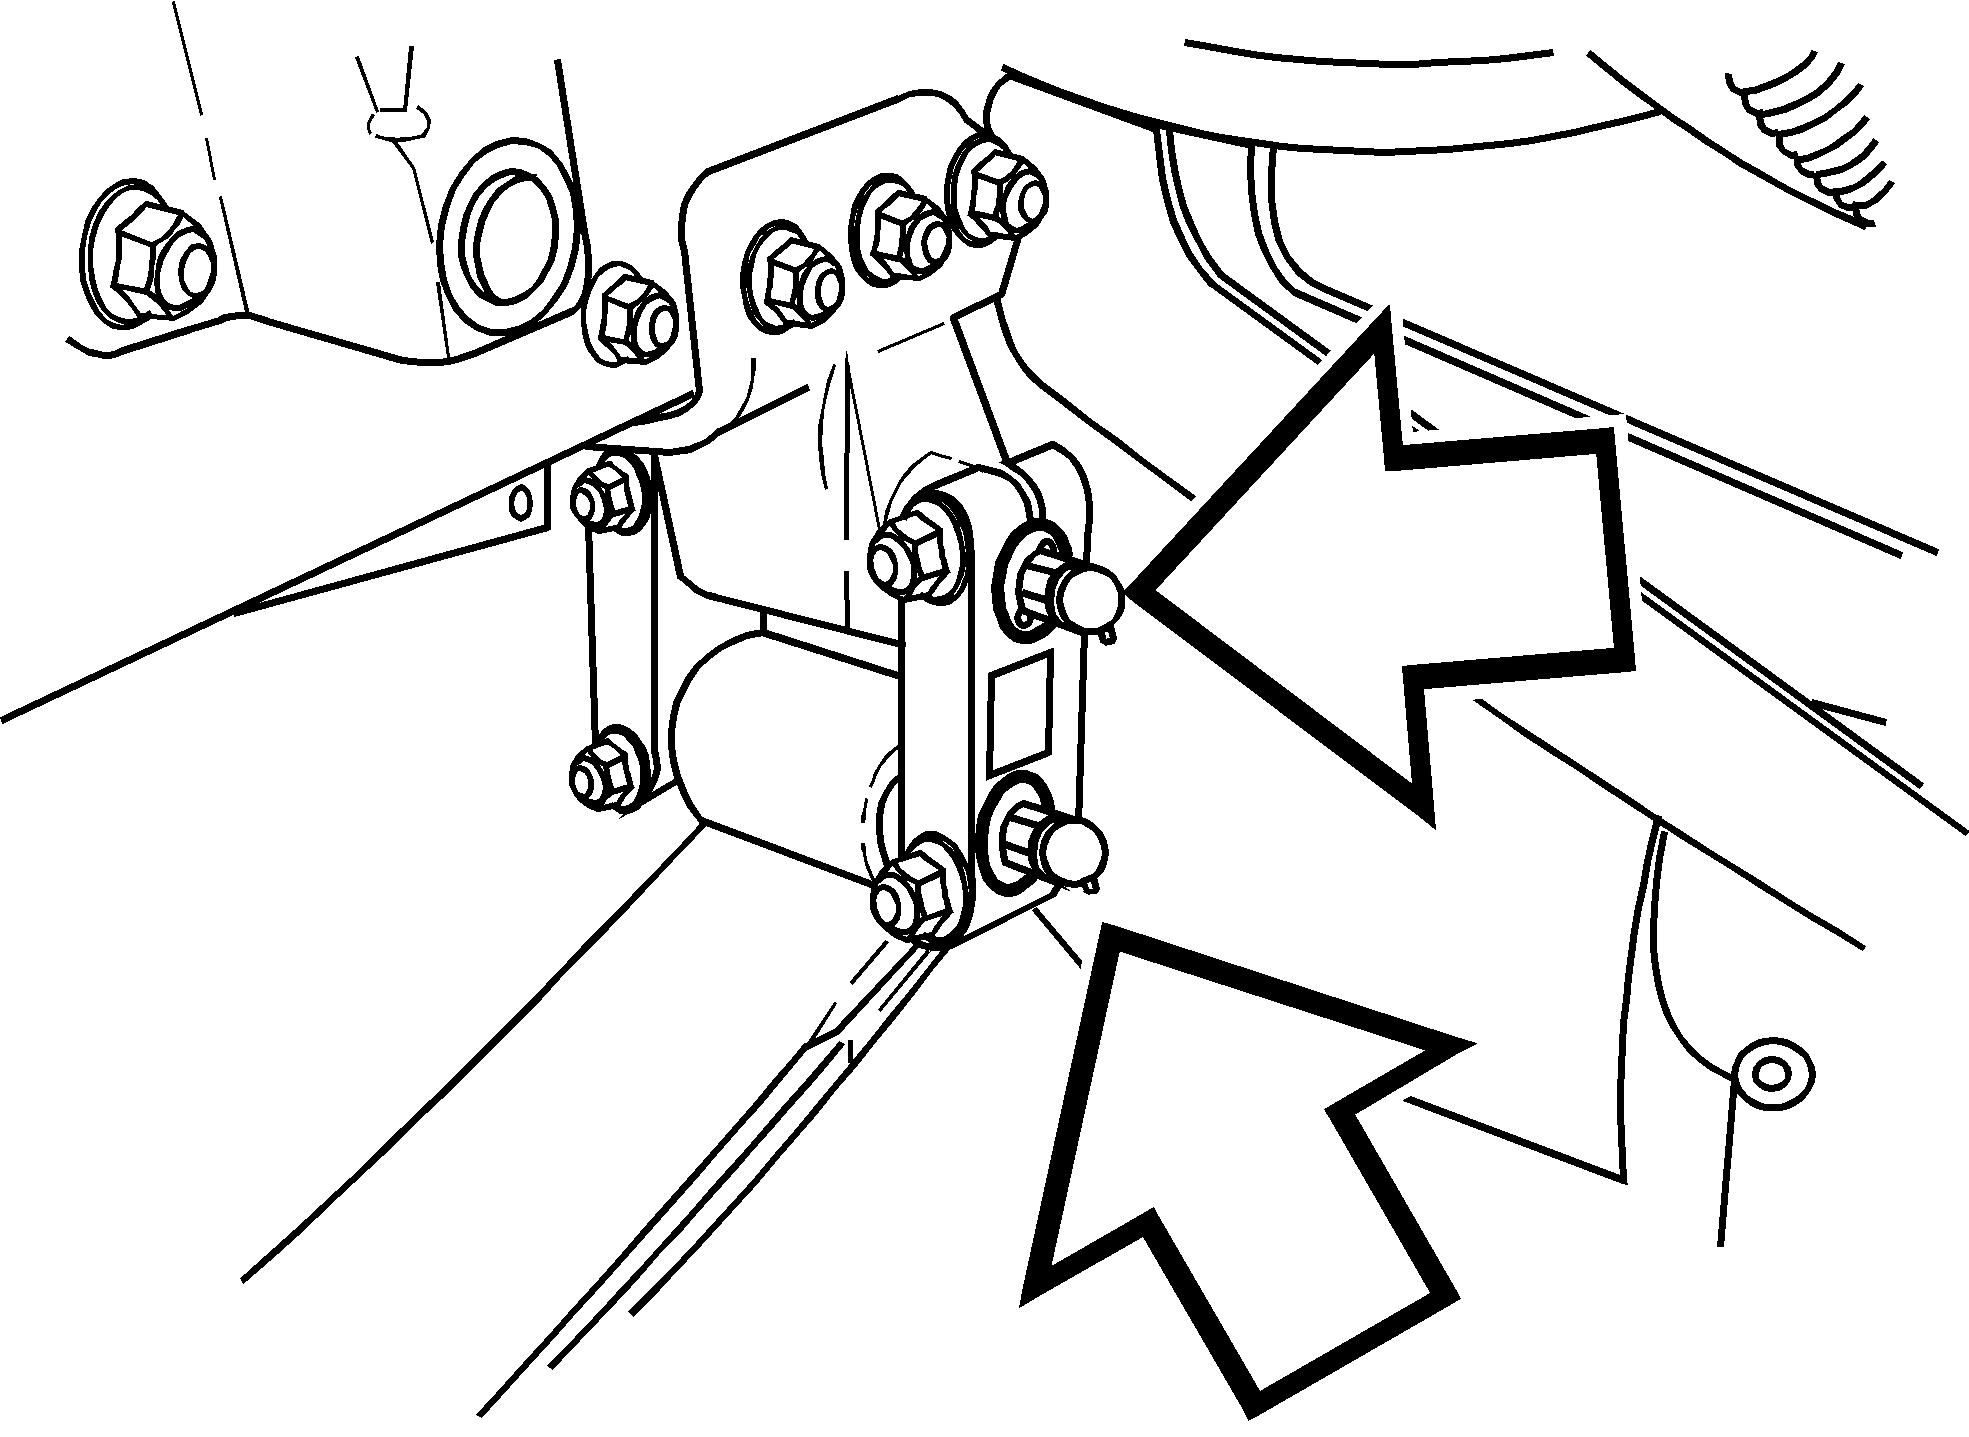
2 Slack adjuster: not grease till 1st scheduled maintenance
Note: See Manufactures Specifications for specific Adjust according the specific slack adjuster manufacturing
Brake cam:
Note: the brake cam seal does not pur ge, make sure the inner seal does not pur into the brake drum and onto the brake
3 Steering gear: Use a lithium based grease with specification API NLGI No. Only use a hand operated grease The high pressure from air operated grease gun will damage the
4 Draglink and Steering Shaft: Use a lithium based grease with specification API NLGI
5 Kingpin, upper and lower: Use a lithium based grease with specification API NLGI
Note: Always grease a MACK front axle with the wheels the ground.
Note: T o grease non - MACK axles, they are typically greased with the wheels the ground. Consult with the axle manufacturer for the latest recommendation.
6 T - r od: Use a lithium based grease with specification API NLGI No.
Note: MACK axles may use a greased - for - life tierod. provisions for adding grease are
7 Leaf Springs: Front and rear leaf spring eye pins, should pressure lubricated with chassis
V ehicles equipped with multi leaf springs should also the leaves lubricated with a spray gun brush using a rust inhibiting
Caution
Keep grease and oil, f rubber bushings. Failure will result component damage.
Note: the vehicle operated sandy dusty the spring ends should left dry . Dirt and grease can resulting a action that may cause pre - mature wear the spring
8 Brake fluid and clutch r eservoir: Check the fluid level the reservoir Add brake fluid necessary . Use only DOT 4 brake fluid the clutch release system. Mixing DOT 4 brake fluid with petroleum based oil will cause seal damage which will cause
9 Clutch bearing linkage: Use a lithium based grease with additives specification API NLGI No.
Note: Inspection cover removal necessary . Lubricate according s lubrication document and reinstall the inspection cover . See http://www for the latest heavy - duty clutch service the hub dirt found the lubrication. Use motor oil SAE 30. Lubricate both the right and the left wheel bearings.
U - Joints: Use a lithium based grease with additives specification API NLGI No.
Note: Ensure that grease pur ges out all four seals the Ujoints.
Power steering fluid: Check the fluid the reservoir with the Add oil necessary . Use A Dexron® III better . Change fluid every 150,000 miles Change filter every year . Use a lithium based grease with specification API NLGI No.
Engine oil and filter: For oil change schedule see Service Information Group 17560.
W indshield washer fluid level.
1 1
O/Hydraulic r eservoir .
Rear Suspension (48k - 70k suspension): When lubricating the spring pin busing use a lithium based grease with specification API NLGI No.
Note: Newer versions may have rubber bushing that not need
Note: Earlier versions the T - Ride and B - Ride spring cradle required lubrication.
Coolant level: Add coolant necessary . Only use pre - mixed clean water and antifreeze a 50/50 Add only the same type antifreeze, that is: extended life
Steering assist cylinder: Use a lithium based grease with additives specification API NLGI
2 grease both ball ont oil lubricated wheel bearings (if applicable): There set change interval. Change the oil (or grease) only connection with work
Automatic and manual transmission: Automatic transmission: Use Dexron® III better Automatic T ransmission fluid. See the manufacturer ’ s Operator ’ s Manual for intervals and quantity
Manual transmission: Use a mineral synthetic Check oil level periodically . Level should the bottom the inspection
M - Drive transmission: W ith the vehicle the oil should between the maximum and minimum levels the sight Only use MACK approved oils. Refer function group 1 for the approved oils list.
Auxiliary axle(s): equipped with auxiliary lift axles use a lithium based grease with specification API NLGI No. Also, lubricate the Brake, Slack adjuster and T - rod ends.
Rear axle: Check the oil level the dif ferential removing the fill/level plug the The oil should level with the bottom the fill/level plug Add oil necessary .
Caution
Most rear dif ferentials have a lar screw and nut protruding from the housing. The screw and nut hold the thrust plate shoe against the ring gear and are not confused with the fill/level plug.
Note: Refer Service information for Oil T ypes and for Appr oved/Corr ect Oils.
Fifth wheel: The fifth wheel and slider assemblies should always - lubricated after steam cleaning least every oil change.
Note: A heavy coating grease recommended the fifth wheel plate using the grease gun a putty knife direct application the top the
Due dif ferent manufactures 5th wheels and models, some 5th wheels may not have grease
Use a lithium based grease with specification API NLGI 2 tracks and moving components.
Oil Capacity T ables and V iscosity Charts
Note: Use the information the table below determine the operating condition and usage applicable your vehicle.
MP7 and MP8 Engine Oil and Filter Change Intervals
MP10 Engine Oil and Filter Change Intervals
Clutch Hydraulic System

Meritor Single RS23, 25, and 30, Meritor T andem
RT40, and For oil change intervals, see the manufactur ers operators manual
Capacity
RS23 - 160 liters (20 quarts)
RS23 - 185
22.5 liters (23.5 quarts)
R T40145/160, front tandem liters (15 quarts)
R T40145/160, rear tandem liters (13 quarts)
R T 46160 front R T 46160 rear approximately liters (19 quarts) approximately liters (17 quarts)
Select viscosity from the table T emperatures refer stable ambient temperature There upper limit these outside but the axle sump temperature MUST NEVER EXCEED 120 ° C (250 ° F).


