35 minute read
VI FUEL SYSTEM


FUEL SYSTEM SCHEMATIC
1 Fuel Tank 2 Fuel Filter 3 Supply Hose 4 Fuel Pump 5 Injector 6 Injection Pump 7 Fuel Rail Grommet 8 Return Hose 9 Fuel Tank Fill Cap (Vented) 10 Fuel Shut-off Valve (Electric)
FUEL FILTER ASSEMBLY
1 Air Bleed Plug 2 Filter Head(Base) 3 Spin-on Fuel Filter 4 Gasket 5 Filter Media
Fuel Filter Specifications:
Media Type PF 905 Filtration Area 2400 cm3 Filtration Level 2-3µm Max. Pressure 4 bar
FUEL TRANSFER PUMP
Components:
1 Fuel Transfer Pump Assembly 2 Push Rod 3 Sealing O-Ring
The fuel transfer pump is a diaphragm type pump actuated by the camshaft driven push rod. Manual fuel system bleeding is facilitated by operating the pumping bail lever.
Performance: At an engine speed of 3000 r/min, the fuel transfer pump delivers 60 l/h at a self-regulated pressure of 4.5 / 5.5 m H2O.
FUEL TRANSFER PUMP PUSH ROD PROTRUSION
With the engine rotated to position the camshaft eccentric (1) as shown, resulting in the lowest possible push rod (2) position with respect to the cylinder head plain, dimension ‘A’ should be 0.961.48mm.
If the proper clearance cannot be attained, measure the push rod (2) length. The push rod (2) should be 152.45-152.65mm in length. Replace the push rod as required. No other adjustments can be made to change fuel pump push rod protrusion.
LOMBARDINI CONTINUALLY DEVELOPS THE FOCS DIESEL LINE. CONSTANT RESEARCH AND DEVELOPMENT IS CARRIED OUT TO IMPROVE OVERALL PERFORMANCE OF FOCS PRODUCTS. AS SUCH, THE DESIGN OF THE FOCS UNIT INJECTOR HAS CHANGED DURING THE DEVELOPMENT PROCESS. THE FIGURE ABOVE PROVIDES A REFERENCE FOR THE THREE(3) DIFFERENT VERSIONS OF THE FOCS UNIT INJECTOR TO DATE.
EARLY UNIT INJECTORS ARE CHARACTERIZED BY THE HIGH PRESSURE PORT AS SHOWN. INTERMEDIATE UNIT INJECTORS ARE CHARACTERIZED BY THE LACK OF A DRILLED HIGH PRESSURE PORT (HIGH PRESSURE PLUG MAY BE PRESENT, BUT IS NOT FUNCTIONAL) AND THE ADDITIONAL INDEX PIN AS SHOWN. CURRENT UNIT INJECTORS ARE CHARACTERIZED BY OFFSET FUEL PORTS, NO HIGH PRESSURE PORT AND RELATIVELY LARGER PORT SIZES.
THE FOLLOWING CHART MAY BE USED AS A GENERAL REFERENCE FOR UNIT INJECTOR IDENTIFICATION, SPECIAL TOOL REQUIREMENTS AND CRITICAL ADJUSTMENT SPECIFICATIONS. WHEN SERVICING FOCS UNIT INJECTORS, ALWAYS REFERENCE THE ENGINE MODEL, ENGINE SERIAL NUMBER, APPLICATION AND UNIT INJECTOR REFERENCE NUMBER.
REFERENCE PART APPLICATION STATIC TIMING STATIC TIMING SPECIAL TOOLS NUMBER NUMBER (°BTDC) METHOD FOR TDC, TIMING AND PRESSURE TESTING
231-2 6590.262 502, 602, 903, 1204 11-13 HIGH PRESSURE TIMING- 1460.028 + 1460.024 PRESSURE- 1460.028 TDC- 1460.048 272-0 6590.283 502 MINI CAR 11-13 HIGH PRESSURE TIMING- 1460.028 + 1460.024 PRESSURE- 1460.028 TDC- 1460.048 235-2 6590.235 1204/T 4-6 HIGH PRESSURE TIMING- 1460.028 + 1460.024 PRESSURE- 1460.028 TDC- 1460.048 272 6590.272 502, 602, 903, 1204 8-10 LOW PRESSURE TIMING/PRESSURE-1460.056 1460.028 / TDC -1460.048 272-1 6590.285 502, 602, 903, 1204 8-10 > 2999 rpm LOW PRESSURE TIMING/PRESSURE-1460.074 12-14 < 3000 rpm TDC- 1460.048 272- 6590.286 502 MINI CAR 11-13 LOW PRESSURE TIMING/PRESSURE-1460.074 272+ 6590.307 TDC- 1460.048 235-4 6590.290 1204/T 6-8 LOW PRESSURE TIMING/PRESSURE-1460.074 235-3 6590.287 TDC- 1460.048 235-4 6590.290 702, 1003, 1404 8-10 LOW PRESSURE TIMING/PRESSURE-1460.074 TDC- 1460.048
FUEL SYSTEM SPECIAL TOOLS
UNION- 1460.028
FUNCTION: Allows high pressure testing of unit injectors. Use for both static timing and pressure testing of early unit injectors. The 1460.028 union screws directly into the unit injector after removal of the high pressure plug.
Application: 6590.262, 6590.283, 6590.235 unit injectors.
TIMING TOOL- 1460.024
FUNCTION: Allows high pressure static timing of early unit injectors. Use with the 1460.028 union.
Application: 6590.262, 6590.283, 6590.235 unit injectors.
LOW PRESSURE TEST SET
Includes adapter block, union, plug, drip tube, eccentric washers and fill tube for low pressure static timing and allows pressure testing for intermediate and current unit injectors.
PART No. 1460.056- Only for 6590.272 unit injectors
PART No. 1460.074-Use with 6590.285, 6590.286, 6590.287 and 6590.290 Unit Injectors.
TDC DETERMINATION / TIMING FIXTURE- 1460.048
FUNCTION: Determination of exact TDC for purposes of static injection timing. After exact TDC is found, the static injection point may be determined as a function of piston position as measured by the TDC fixture. Refer to the following pages for more detail.
EQUALIZATION TOOL
FUNCTION: Allows each individual cylinder fuel consumption to be measured. Thus, the individual delivery rates can be adjusted to insure equivalent fuel delivery to all cylinders. The equalization tool set includes fuel rail blocks to allow attachment to the unit injectors. Three(3) different equalization tools have been issued reflective of improvements in the tool and changes to the unit injectors. Aside from the fuel rail blocks included with the equalization tool, the equalization tool will work on all unit injector types. Fuel rail blocks as detailed below can be ordered to allow complete interchangability with all unit injector styles.
Equalization Part No.’s: 1460.020(early),1460.050(intermediate) and 1460.090 (current). Fuel Block Part No.’s: 1460.081 (early / intermediate) with in-line fuel ports. 1460.089 (current) with offset fuel ports.
UNIT INJECTOR: The unit injectors fitted within Lombardini FOCS diesel engines are designed by Lombardini. One unit injector is required for each cylinder. In the continuing development of the FOCS diesel engine, design changes have been made to the unit Injector resulting in less that total interchangability between older and newer FOCS engines. Please refer to the previous pages for details regarding the identification, special tool requirement, testing method and application of unit injectors. Always use the utmost cleanliness and care when servicing fuel injection equipment.
UNIT INJECTOR COMPONENTS
1 Circlip 12 Delivery Valve A Cup 2 Tappet 13 Shim/ Gasket B O-Ring 3 Retainer 14 Spring C Nozzle 4 Plunger 15 Filler D Spacer 5 Spring 16 Pin E Spring Seat 6 Bolt 17 O-Ring F Spring 7 Support 18 Check Valve G Shim 8 Rack Lever 19 O-Ring I Unit Inj. Body 9 Ring Nut 20 Plug L Helix 10 O-Ring 21 Gasket M Index 11 Barrel
Note: Cup (A) torque = 70 Nm.
UNIT INJECTOR RING NUT REMOVAL / REPLACEMENT
When disassembling or reassembling the unit injector, follow the numerical order presented above, then proceed through the alphabetical order A-I.
After disassembling items one(1) through seven (7) (see above), fit the injector into a suitable vice with soft jaws. Use special tool (A) 1460-029 to remove the ring nut (9) as shown.
When reassembling the unit injector, torque the ring nut to 34 Nm.
UNIT INJECTOR PLUNGER REASSEMBLY
When reassembling the unit injector, refer to the above exploded diagram. Assemble in the following order: I-A, then 21-1.
When refitting the plunger, orient the plunger helix (L) to align with the check valve(18). See also the figure and explanation on the next page.
UNIT INJECTOR REASSEMBLY (CONT.)
With reference to the previous frame, and the exploded view of the unit injector on the previous page, continue to introduce the plunger into the unit injector, while gently rotating rack lever (8) back and forth until index (M) can be engaged with the rack lever (8).
NOTE: If the plunger is accidentally installed incorrectly positioned with respect to the helix location, the engine will not operate.
BARREL AND PLUNGER DETAIL- EARLY UNIT INJECTORS (TYPICAL)
Component Dimensional Details Details
1 Plunger A = 5.5 mm (nominal) 2 Plunger End View B = 2.00/2.03 mm (Inlet Port) 3 Barrel C = 1.50/1.53 mm (Bypass) 4 Retardation Notch D = 10.00 mm 5 Helix E = 9.6 mm F = 0.7 mm
BARREL AND PLUNGER DETAIL- (TYPICAL) CURRENT UNIT INJECTORS (EXAMPLE- 6590-285)
Component Dimensional Details Details
1 Plunger A = 6.0 mm (nominal) 2 Plunger End View B = 1.50/1.53 mm (Inlet Port) 3 Barrel C = 1.50/1.53 mm (Bypass) 4 Retardation Notch D = 9.965/10.035 mm 5 Helix E = 9.565/9.635 mm F = 0.9 mm
For LDW 702,1003,1204/T,1404 CURRENT UNIT INJECTORS (EXAMPLE- 6590-290)
A = 6.5 mm (nominal)
UNIT INJECTOR TEST STAND SPECIFICATIONS
1 Rack lever in stop or no delivery position 2 Rack lever in maximum delivery position
WARNING: THE TESTING AND SERVICE OF FUEL INJECTION EQUIPMENT SUCH AS DETAILED BELOW INCLUDES HIGH PRESSURE AND SPRAYING FLUIDS. WEAR PROPER EYE AND HAND PROTECTION. DO NOT ALLOW ANY PART OF YOUR BODY TO COME INTO CONTACT WITH HIGH PRESSURE FUEL OR TESTING FLUID. FURTHER, HIGH PRESSURE FUEL IS VERY FLAMMABLE. DO NOT TEST FUEL INJECTION EQUIPMENT NEAR ANY OPEN FLAME, SPARKS OR LIT CIGARETTES.
UNIT INJECTOR POPPING PRESSURE TESTING AND ADJUSTMENTHIGH PRESSURE PROCEDURE (EARLY UNIT INJECTORS- ALL REF. NO’s OTHER THAN 272, 272-, 272-1, 235-3)
With reference to the exploded view from page 57, remove the high pressure plug(20). Fit to the injector, in place of plug(20), union 1460-028. Install the injector onto a hand pop test machine. Using extreme care and proper eye and hand protection, cycle the injector several times until all air is out of the injector. Operate the popping tester taking note of the injection pressure. The injector should require 130-140 bar before injection. If the pressure is not to specification, again refer to the exploded view as above. The pressure can be increased by adding shims(G) or reduced by removing shims(G). Shims are available ranging from 1 to 2 mm in eleven steps. When servicing the unit injector, initial pressure settings should be 10 bar higher than specified to allow for seating during operation. Injector nozzle leakage may be checked by holding a pressure of 130 bar on the injector for 10 seconds. The nozzle should be replaced if leakage is noted.
UNIT INJECTOR POPPING PRESSURE TESTING AND ADJUSTMENTLOW PRESSURE PROCEDURE (CURRENT / INTERMEDIATE UNIT INJECTORS)
Unit injectors having codes 272, 272-, 272-1, 235-3, 235-4 are not equipped with a high pressure port drilling as above. With reference to the exploded view on page 57, pressure checks of the unit injector are facilitated by removing the check valve(18) , then installing the plug, eccentric gasket and block (1) which are supplied as components within part no. 1460-074. Fit the block (1) onto the injector making sure that the rack lever is held in the maximum deliver position as is shown. Fit the supplied union (2)(part of 1460-074) onto the block. Using extreme care and proper eye and hand protection, test the injector on a hand popping pressure testing machine as is detailed above. Pressure settings, nozzle leakage testing and pressure adjustments are carried out as explained above. The new style injector should require 140 / 150 bar of pressure before injection. If service is required to increase the injection pressure, set the injector to 10 bar higher than nominal to allow for seating.
NOTE: 6590-272 (ref. no. 272) unit injectors will require the block(1) as supplied within part no. 1460-056.
INJECTOR NOZZLE PROTRUSION
Injector nozzle protrusion (B) should be 6.80 / 7.05 mm If the injector nozzle protrusion exceeds the above dimension, additional 0.25 mm copper washers(2) may be placed on the injector nozzle, resting against the cup (1) to supplement the thickness of the standard copper washer(3) and offset any injector nozzle protrusion problems. The 0.25 mm supplemental washers are available as special spare parts. Contact your local distributor for details.
UNIT INJECTOR FIRE RING
The unit injector fire ring should be replaced following unit injector removal. DO NOT REUSE fire rings. Clean the fire ring sealing surface in the cylinder head and injection nozzle. (Do not damage the injector nozzle or pre-cup ring nut. Orient the fire ring so that plane (A) will face the unit injector nozzle. Reinstall the injector, tightening the unit injector securing nuts to 20 Nm alternately and in 5 Nm steps.
,15mpo 2aa to res Tip0
P---
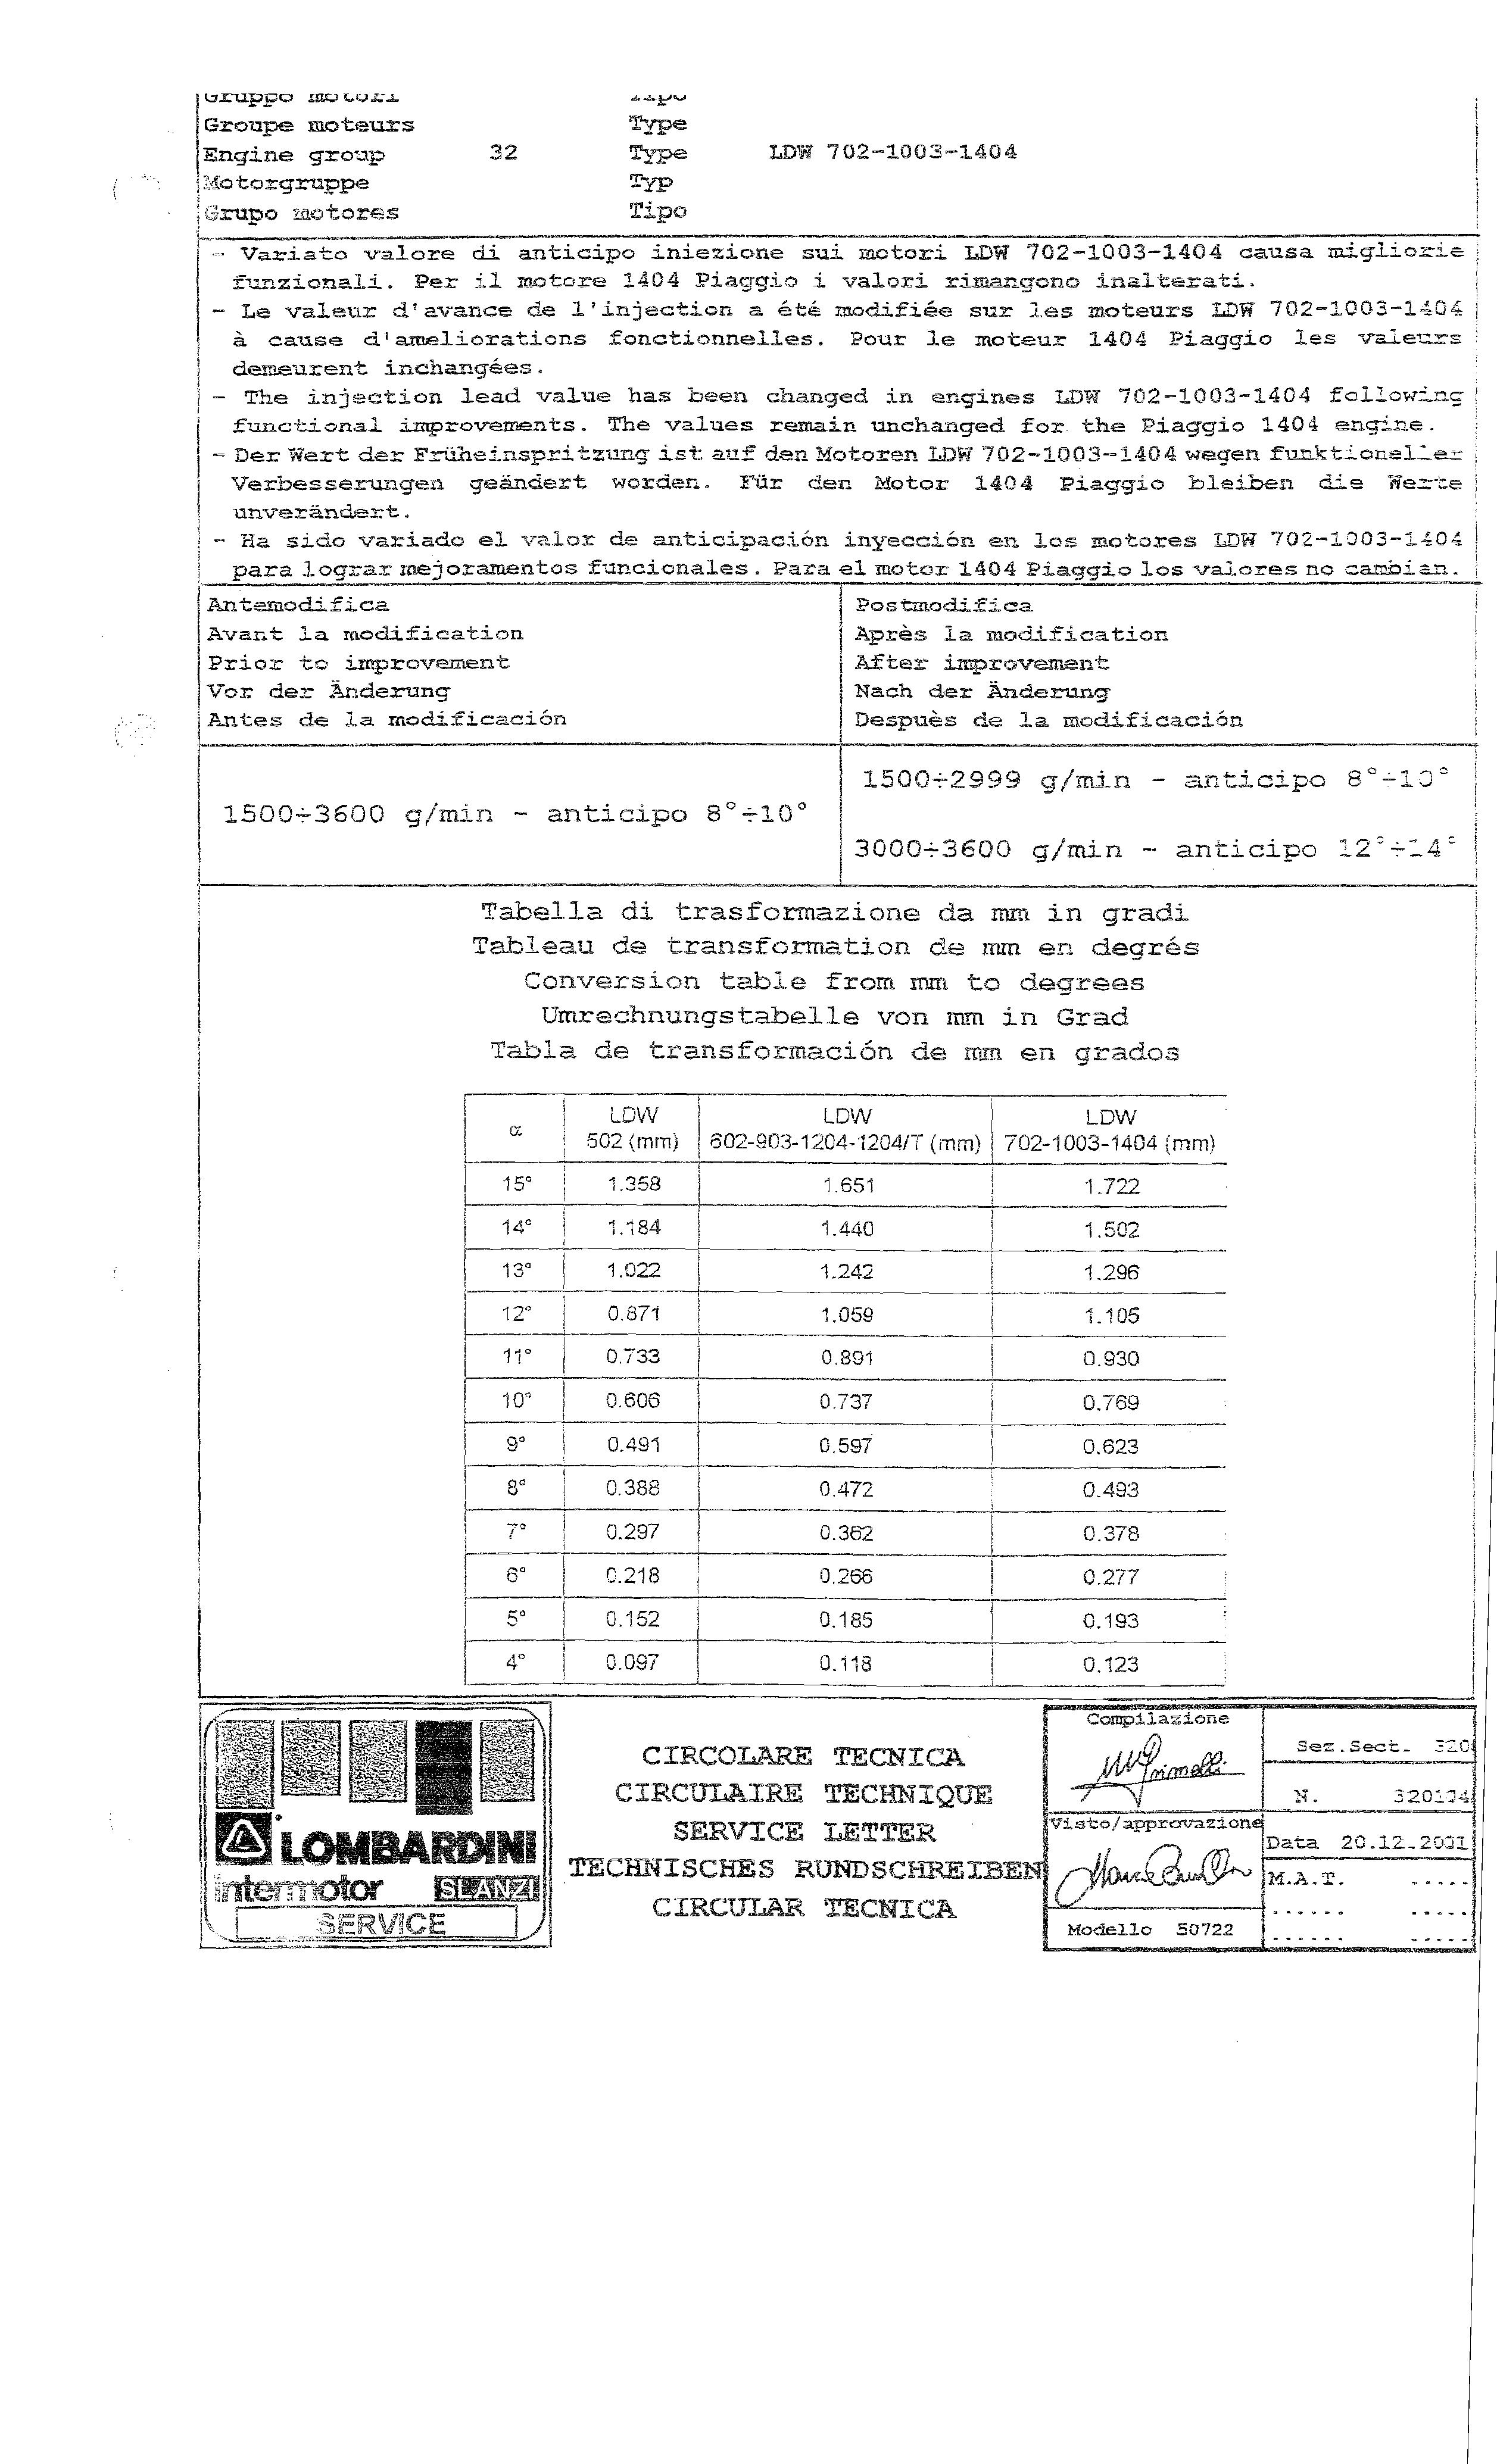
variaka valore di anticips iniezáurie au% mctori m W 702-1003-i404 caiilsa raighiazi= i z~~~zi.ana3.f. Pek il_ mt~re 1404 Piaggka L walori r--%oowo Rnalkexati. - Le valexir cif avznce de l 'injection G &b& modifiée sur ;.es ~oteu~s 702-2.003-1484 ! & caïlse d'aweiliôz-etions fonctionneiles. Pour le moteur 1404 Piaggio les -saie7=c de;lll,i-arewt, incl~i;n_g&e.-. - me injuetiun lead vabue has been c'nanged in engines LDW 702-9003-1404 foilowhnc! f.-ckiii~n.al improve~aents. The vaiues remahn uachanged for the Piaggio 1404 =.?qi~.e. i - ?:ert der F~~hei~sprikzm~~.~~:. au" deol Ynkezen U2W' ~1i2-~1~0"-1404 weqen fmktiooe~~ez i -æ
Verbezse.~igera geadezt wexckri. Fiir dez &tsz 1404 Piaggie isleilzen die Xer-:t. j
unverZn&rIt. - -7 - sido varledo e1 valnr de ~~r,ticipac.;'.ór, bsiyee~ii?r~ en 10s mo.tinzes 702-1203-1164 /
--m-
para logra.9- z&%=-jorihzuatos funcionales. Para el motor 1404 Piaggio 1.0s - ".~-- vaiores no -a~~3i&r. I
&tcq~&f bcz
dvarit la mo&f ieation Prior to improvcanient
Vcr der i&ridamnq
Antes de i,a -".- madifisaclón Despu&s c"e *p- - la. marl3l'icaeiio
j
i
1
j
I
Tzbe7La di tras Tableau de tran
CO-aversian t&i..s from mi "i0 deg:raes
linrs~chnungstabeIle von mm in Grad de transfo~~tacion ds en grados
STATIC INJECTION TEST INSTRUMENTATION- EARLY UNIT INJECTORS
Carefully remove the engine valve cover. With reference to the exploded unit injector diagram on page 57, remove plug (20). Replace plug(20) with union(1)- 1460-028. Install Injection timing tool (2)- 1460-024 onto the 1460-028 union.
NOTE 1: When refitting the plug(20), carefully check the sealing properties of the plug. NOTE 2: Later versions of the unit injector are not equipped with the plug(20). Therefore, static timing adjustments require alternative approaches than those shown. Please see page 56 for details of the static injection timing instrumentation for later versions of the FOCS unit injector.
a
13° 12° 11° 10° 9° 8° 7° 6° 5° 4° LDW 502 (mm) 1.022 0.871 0.733 0.606 0.491 0.388 0.297 0.218 0.152 0.097 LDW 602, 903, 1204,1204/T (mm) 1.242 1.059 0.891 0.737 0.597 0.472 0.362 0.266 0.185 0.118
TDC DETERMINATION and STATIC INJECTION TIMING CHECKING
LDW 702 1003,1404 (mm) 1.296 1.105 0.930 0.769 0.623 0.493 0.378 0.277 0.193 0.123
With the static injection timing instrumentation installed as described above, fit the engine with the timing fixture(1), part no. 1460-048 as shown. The dial indicator support should be oriented over the engine valve spring cap. Remove the injection pump rack assembly starting aid spring. Adjust and secure the injection pump rack at 1/2 stroke.
Rotate the engine until the cylinder being static timed approaches TDC, compression stroke. Alternately, rotate the crankshaft toward TDC and press down on the timing fixture lever(2) until minimum dial indicator travel is established. At minimum dial indicator travel, TDC is established. Zero the dial indicator at the TDC position.
Insure that a good supply of clean diesel fuel is available to the engine, preferable from an external fuel tank elevated above the level of the engine.
EARLY UNIT INJECTORS (Ref No’s: 231-2, 235-2, 272o)-With reference to the upper figure, bleed the injection the injection timing tool by bringing the engine to such as position as the injection pump is being acted upon via the camshaft. Alternately rotate the engine back and forth until fuel is injected out of the injection timing tool and free of air. Rotate the engine in opposite normal direction approximately 90°. Rotate the engine in normal direction of rotation until a fuel movement is noted in the static timing sight glass. Stop rotation IMMEDIATELY upon any notice of fuel movement. Depress the timing fixture lever and note the dial indicator reading. Check the corresponding dimension listed in the chart to the leftdetermine static injection timing from the chart. Correct, if needed, the injection timing by turning screw(E)- see next page. Refer to the chart on page 55 for static timing specifications with respect to the injector reference number. See the following page for static timing adjustment procedures.
LATE/ INTERMEDIATE UNIT INJECTORS- (6590-272, 6590-285, 6590286, 6590-287, 6590-290) Remove the check valve from all injectors, remove the check valve side o-ring from all injectors, replace the o-ring with special eccentric gasket supplied within 1460-074. With reference to the lower diagram, fit the unit injectors with a special tool block(1), bleed fitting(2), union(3), supply fitting(4) and nylon bleed tube(5) as supplied within 1460074. Note: 6590-272 unit injectors do not require the eccentric gaskets
as detailed above but do require a special block(1) as supplied under part no. 1460-056.
Place a small cup beneath the nylon bleed tube, rotate the engine in the normal direction of rotation until fuel stops flowing from the bleed tube. At the very instant of fuel flow stoppage, stop rotating the engine. The fuel flow stoppage indicates the beginning of injection. Depress the timing fixture lever and note the dial indicator reading. Check the corresponding dimension listed in the chart to the left- determine static injection timing from the chart. Correct, if needed, the injection timing by turning screw(E)- see next page. Refer to page 64 for the static timing specification with respect to the unit injector reference number. See the following page for static timing adjust procedures.
STATIC TIMING ADJUSTMENT
Should the static timing testing procedures as presented on the previous page show the need for static timing adjustment, proceed as follows.
1. Locate timing adjustment screw (E), loosen the locking nut. 2. Rotate the adjustment screw(E) clockwise to advance the static timing, or rotate the adjustment screw counterclockwise to delay the static timing. 3. Tighten the timing adjustment screw lock nut. 4. Repeat the static timing test procedure.
NOTE: 1/2 turn equates to approximately a 5° change in static timing.
ENGINE TIMING REFERENCE MARKS
Although not as accurate as the procedure presented in the previous section, TDC for FOCS diesel engines may be determined via timing marks on the timing cover and crankshaft pulley. Further, the timing marks on the timing cover can greatly assist the static timing test due to outside confirmation of TDC with respect to the findings of the timing fixture assembly- 1460-048. Lombardini strongly recommends the use of the 1460-048 timing fixture for purposes of static timing adjustments.
With reference to the figure to the left, Pulley mark (D) corresponds to the No. 1 piston (flywheel side piston). Timing cover mark (C) corresponds to approximately 11°-13° BTDC.
With reference to the figure below, note the following:
D aligns with A- TDC No. 1 cyl. and No. 4 cyl.,1204,1204/T,1404 TDC No. 1 and No. 2 cyl., 502
E aligns with A- TDC No. 2 cyl., 903,1003
F aligns with A- TDC No. 2 cyl., 602,702 TDC No. 2 cyl. and No. 3 cyl.,1204,1204/T,1404
G aligns with A- TDC No. 3 cyl., 903, 1003
NOTE 1: The firing order of the LDW 903, 1003 is 1-3-2, thus on the crankshaft pulley, D,G,E.
NOTE 2: The firing order of the LDW 1204 and LDW 1204/T,1404 is 1-3-4-2, thus on the crankshaft pulley, D,F,D,F. However, in order to properly follow the LDW 1204 and 1204/T firing order, an initial establishment of TDC compression stroke for No. 1 cylinder must be made.
UNIT INJECTOR DELIVERY EQUALIZATION- PREPARATION
Due to the fact that unit injectors are both injection pump and injector, all unit injectors within a FOCS diesel engine must be equalized to facilitate the identical delivery of fuel within individual cylinders. The equalization procedure is a operational test with the valve cover removed. Therefore, proper eye protection must be worn and great care must be taken to insure no body or clothing contact with rotating engine components.
After carefully removing the engine valve cover, install a M8x1.25x10mm capscrew and 8mm copper gasket at position(1) as shown. Failure to install the bolt as shown will result in a large scale oil spill and loss of oil pressure to the engine during the operational procedure presented below.
NOTE: SEE PAGE 74 FOR INITIAL INJECTOR CONTROL RACK AND GOVERNOR ADJUSTMENT PROCEDURES.
UNIT INJECTOR DELIVERY EQUALIZATION- PREPARATION (cont.)
Remove the fuel manifold assembly(A). In place of the fuel manifold, install on each unit injector a test head(B). The test heads are supplied as part of the equalization tool package. Please note that early versions of the unit injector and late versions of the unit injector require different test heads. Please refer to page 56 for further details.
EQUALIZATION TOOL INSTALLATION, PLUMBING
Place the equalization tool on a stable surface , with the base of the equalization tool at least 20cm higher than the level of the unit injectors. Close all valves(2,3). Remove fuel cap(6) and fill the reservoir with clean diesel fuel. With reference to the diagram, connect the lower hoses (A)coming from the equalization fixture to the test head position(A). The hoses should be connected to the test heads in a logical manner. That is, the left most hose should be connected to No. 1 unit injector (flywheel side), then subsequent hoses from left to right, connected to cylinders 2, 3, 4 as required. Connect the upper hoses(B) to the test head position (B). Make sure that the control lever(4) is in the upper position.
After completion of the hose routing/ plumbing, open the valves (2,3). Start the engine and allow to idle. Increase and lock the engine speed to 1500 rpm. Once the engine operates smoothly and the 1500rpm is reconfirmed, pull the control lever(4) downward for approximately one(1) minute. While closely watching the fuel level in the cylinder tubes(5), note the rate at which fuel is consumed. NOTE:, the control lever(4) must be returned to the upper position prior to fuel depletion in the tubes(5).
During operation with the control lever down, determine the cylinder(s) which are consuming more fuel as indicated by the speed at which the fuel is depleted from each individual tube(5). Delivery rates in each cylinder should be within 2 cm3 during one(1) minute of operation. Reduce the fuel delivery rate to the cylinder(s) consuming the most fuel. Delivery may be adjusted as follows:
FUEL RATE ADJUSTMENT DETAILS
To increase the fuel delivery of an individual unit injector, the injector rack must be moved slightly toward the flywheel end of the engine. With reference to the figure on the left, loosen screws (1) and (2) 1/2 turn. Increase the cylinder fuel delivery by moving plate (4) slightly towards the flywheel, thus changing the relative position of control rod (3). Reductions in fuel delivery can be facilitated by moving the plate away from the flywheel. After adjustment, torque screws (1) and (2) to 1.1 Nm.
Repeat the equalization test until the individual cylinder fuel consumptions are within 2 cm3 during a one(1) minute period.
NOTE: The equalization procedure should be performed following an injector re
ELECTRICAL SYSTEM SERVICE PRECAUTIONS / WARNING:
The improper service of electrical components can result in shock injuries, burn injuries (from both heat and chemical acids) and produce sparks which could ignite fires. Therefore proper precautions must always be taken.
1. Always wear safety glasses and hand protection when performing diagnostic work of electrical systems.
2. Keep hands, arms, clothing, hair, etc. well away from rotating components.
3. Always remove the negative (-) battery cable before removing and/or handling any electrical system wires or components.
4. Use extreme care when handling batteries. Hand protection and eye protection should be worn at all times. Batteries contain acids which can cause severe chemical burns.
5. The fumes emitted from batteries are flammable, therefore do not weld, smoke or use an open flame around batteries.
6. Read, understand and follow the operational and safety precautions supplied with your electrical service equipment (battery chargers, load testers, meters, etc.).
BATTERY SIZING: The chart presented below provides strict guidelines for the sizing of system batteries for Lombardini FOCS diesel engines. Batteries must be sized so as to provide sufficient reserve capacity (Amp-Hours), but yet not so large as to damage the starter motor due to excessive amperage. Depending on the cold starting ambient conditions (Normal or Extreme), size the system battery according to the data presented below with respect to the engine model and engine starter rating.
ENGINE MODEL STARTER RATING (KW) NORMAL AMBIENT CONDITIONS EXTREME AMBIENT CONDITIONS
Amp-Hours @ 20 hour Rating Maximum Battery Amps @ -18°C Amp-Hours @ 20 hour Rating
Maximum Battery Amps @ -18°C LDW 502 FOCS 1.2 44 210 66 300 LDW 502 FOCS 1.1 44 210 66 300 LDW 602 FOCS 1.1 44 210 66 300 LDW 602 FOCS 1.6 66 300 88 330 LDW 903 FOCS 1.1 44 210 66 300 LDW 903 FOCS 1.6 66 310 88 330 LDW 1204 FOCS 1.1 44 210 66 300 LDW 1204 FOCS 1.6 66 310 88 330 LDW 1204/ T FOCS 1.1 55 255 66 300 LDW 1204/ T FOCS 1.6 66 300 88 330
ISKRA ALTERNATOR- 14V / 33A
NOMINAL VOLTAGE: 14V NOMINAL CURRENT OUTPUT: 33A MAXIMUM r/min: 12000 r/min VOLTAGE REGULATOR: AER 1503 ROTATION (VIEWED AT PULLEY END): CLOCKWISE
NOTE: Pulley nut torque (1): 35-45 Nm
ISKRA 14V / 33A PERFORMANCE CURVE
The attached performance curve was plotted at a constant system voltage voltage of 13V and at an ambient temperature of 25°C.
NOTE: The rpm shown is reflective of an ISKRA alternator fitted to an engine with a 88mm crankshaft pulley. The rpm shown is that of the alternator rotor. Thus, at at an engine speed of 3600 rpm, the alternator is turning approximately 4680 rpm, or a ratio of 1.3 :1.
12V ELECTRICAL SCHEMATIC- ISKRA 14V-33A
1 Alternator 2 Starter Motor 3 Battery- (See below for sizing details) 4 Glow Plugs 5 Thermistor (Glow Plug Controller Circuit) 6 Glow Plug Controller / Timer 7 Key Switch 8 System Fuse, 30A (502, 602), 50A (903), 80A (1204, 1204/T) 9 Fuse (Accessory)- 5A 10 Fuel Valve 11 Glow Plug Indicator Lamp 12 Coolant High Temperature Lamp 13 Coolant High Temperature Switch (N.O.) 14 Oil Pressure (Low) Lamp 15 Oil Pressure Switch (N.C.) 16 Alternator Charging Lamp (Off if Charging) 17 Air Filter High Restriction Indicator Lamp 18 Air Filter Restriction Switch (N.O.) 19 Low Fuel Level Lamp 20 Low Fuel Level Switch (N.O.)
MARELLI ALTERNATOR (AA 125 R) - 14V / 45A
NOMINAL VOLTAGE: 14V NOMINAL CURRENT OUTPUT: 45A MAXIMUM r/min: 14000 r/min VOLTAGE REGULATOR: RTT 119 A BEARING (Pulley End): 6203-2Z BEARING (Voltage Regulator End) 6201-2Z/C3 ROTATION (VIEWED AT PULLEY END): CLOCKWISE
NOTE:1. Pulley nut torque (1): 60 Nm 2. Use only high temperature grease when servicing bearings.
MARELLI AA 125 R, 14V / 45A PERFORMANCE CURVE
The attached performance curve was plotted at a constant system voltage voltage of 13.5V and at an ambient temperature of 25°C.
P1 = Power Output (KW) I = Current Output (Amps) n= Efficiency
NOTES:
1. The RPM shown is that of the alternator. The value of the rpm axis must be multiplied by 1000.
2. Alternator speed is a function of engine speed and the crankshaft pulley diameter. If the engine pulley is 88 mm, then the alternator speed ration is 1.3:1. If the engine pulley is 108 mm, then the alternator speed ratio is 1.6 : 1.
12V ELECTRICAL SCHEMATIC- MARELLI 14V-33A
1 Alternator 2 Starter Motor 3 Battery- (See below for sizing details) 4 Glow Plugs 5 Thermistor (Glow Plug Controller Circuit) 6 Glow Plug Controller / Timer 7 Key Switch 8 System Fuse, 30A (502, 602), 50A (903), 80A (1204, 1204/T) 9 Fuse (Accessory)- 5A 10 Fuel Valve 11 Glow Plug Indicator Lamp 12 Coolant High Temperature Lamp 13 Coolant High Temperature Switch (N.O.) 14 Oil Pressure (Low) Lamp 15 Oil Pressure Switch (N.C.) 16 Alternator Charging Lamp (Off if Charging) 17 Diode 18 Air Filter High Restriction Indicator Lamp 19 Air Filter Restriction Switch (N.O.) 20 Low Fuel Level Lamp 21 Low Fuel Level Switch (N.O.)
A Accessory Position B Off Position C On Position D Starting Position
BATTERY SIZING- PLEASE REVIEW PAGE 62
FLYWHEEL ALTERNATOR- 12V
Flywheel driven alternators are available in two(2) amperage ratings at 3600 r/min - 20A and 30A.
COMPONENTS:
1 Flywheel 2 Ring Gear 3 Magnet Ring (Rotor) 4 Stator
PERFORMANCE CURVE- 20A FLYWHEEL ALTERNATOR
The performance curve at the left was plotted at a constant system voltage of 12V and an ambient temperature of 20°C.
RPM values shown on the performance curve are engine speeds.
The statistical charging output of the flywheel alternator is +10% to 5% of the values shown.
PERFORMANCE CURVE- 30A FLYWHEEL ALTERNATOR
The performance curve at the left was plotted at a constant system voltage of 12V and an ambient temperature of 20°C.
RPM values shown on the performance curve are engine speeds.
The statistical charging output of the flywheel alternator is +10% to 5% of the values shown.
12V ELECTRICAL SCHEMATIC- 20/30A FLYWHEEL ALTERNATOR
1 Alternator 2 Starter Motor 3 Battery- (See below for sizing details) 4 Glow Plugs 5 Thermistor (Glow Plug Controller Circuit) 6 Glow Plug Controller / Timer 7 Key Switch 8 System Fuse, 30A (502, 602), 50A (903,702,1003), 80A (1204, 1204/T, 1404) 9 Fuse (Accessory)- 5A 10 Fuel Valve 11 Glow Plug Indicator Lamp 12 Coolant High Temperature Lamp 13 Coolant High Temperature Switch (N.O.) 14 Oil Pressure (Low) Lamp 15 Oil Pressure Switch (N.C.) 16 Alternator Charging Lamp (Off if Charging) 17 Voltage Regulator 18 Air Filter High Restriction Indicator Lamp 19 Air Filter Restriction Switch (N.O.) 20 Low Fuel Level Lamp 21 Low Fuel Level Switch (N.O.)
A Accessory Position B Off Position C On Position D Starting Position
BATTERY SIZING- PLEASE SEE PAGE 62
VOLTAGE REGULATOR CONNECTION DETAILS (FLYWHEEL ALTERNATOR ONLY)
SAPRISA, AETSA, NICSA STD. WIRE COLOR DUCATI CONNECTOR DIMENSIONS
WIDTH
THICKNESS ~ YELLOW G 6.35 0.8 R RED R 9.5 1.2 + RED B 9.5 1.2 LE GREEN L 4.75 0.5 BROWN C 6.35 0.8
LOMBARDINI SUPPLIED CONTROL PANEL As an accessory, LDW-FOCS series engines may be fitted with a Lombardini supplied engine control panel. The control panel includes indicator lamps for low oil pressure, high coolant temperature, charging failure, high air filter restriction, low fuel level, glow plug heating and “OK”. Intergral to the panel, a glow plug relay and solid state glow plug controller is included. The diagram below provides details of the control panel. Please also refer to the diagram on page 70, which details the interface engine side wiring harness for the Lombardini control panel. The panel connector index numbers correspond to the index numbers for the engine side harness.
In conjuction with the engine control panel detailed on page 69, LDW-FOCS engines may be fitted with an engine side wiring harness and optional sensors. The following diagram details the engine side wiring harness. Please also reference the diagram on page 69. The connector index numbers as shown on the engine side wiring harness interfaces with the connector index numbers for the control panel.
BOSCH 12V / 1.1 KW STARTER MOTOR (DW 12V)
NOTE: Before removing the starter motor or attempting to service any electrical component, remove the negative(-) cable from the system battery.
Distance (A), from starter mounting flange to ring gear face must be checked and confirmed to be 17.5 / 19.5mm.
Please refer to your local BOSCH distributor for service parts, repair criterion and warranty service.
PERFORMANCE CURVE- BOSCH 12V / 1.1KW (DW 12V) STARTER
The performance data presented is reflective of an ambient temperature of -20°C and operation with a fully charged 66Ah battery.
U= Starter Motor Voltage n= Armature r/min I= Absorbed Amperage P= Starter Output Power (KW) M= Starter Output Torque (Nm)
BOSCH 12V / 1.6 KW STARTER MOTOR (DW 12V)
NOTE: Before removing the starter motor or attempting to service any electrical component, remove the negative(-) cable from the system battery.
Please refer to your local BOSCH distributor for service parts, repair criterion and warranty service.
Distance (A), from starter mounting flange to ring gear face must be checked and confirmed to be 29.5 / 31.5mm.
PERFORMANCE CURVE- BOSCH 12V / 1.6KW (DW 12V) STARTER
The performance data presented is reflective of an ambient temperature of -20°C and operation with a fully charged 88Ah battery.
U= Starter Motor Voltage n= Armature r/min I= Absorbed Amperage P= Starter Output Power (KW) M= Starter Output Torque (Nm)
GLOW PLUG
One(1) glow plug is required per engine cylinder. Proper glow plug operation is required for good start ability at any ambient temperature. All FOCS diesel engines should be preheated before attempting to start the engine. Further, Lombardini recommends that all applications be fitted with an automatic glow plug controller system such as is detailed below. The use of a glow plug control circuit will insure the proper amount of preheat at all temperatures.
Glow Plug Specifications: Nominal Voltage- 12.5V Current Absorption-12/14A at 5 seconds Sheath Temperature-850°C at 5 seconds
COMPONENTS: 1 Sheath 2 Primary Heating Coil 3 Secondary Heating Coil NOTE: GLOW PLUG TORQUE- 20Nm
GLOW PLUG CONTROLLER / RELAY WITH COOLANT TEMP. SENSOR
As discussed above, a glow plug control circuit is available. The glow plug controller acts as both a load relay and timer. The timer function is a function of coolant temperature as measured by a temperature sensor (thermistor) as shown below. An electrical schematic of the glow plug control circuit is shown on page 65.
THERMISTOR INPUT GLOW PLUG HEAT TIME (sec)
Resistance (ohms) Coolant Temp. (°C) Pre-heat Post-heat
7000 -20 26.5±3 5 (+2, -1) 2400 0 15.0±1.5 5 (+2, -1) 1000 +20 9.5±1 5 (+2, -1) 460 +40 7.0±1 5 (+2, -1) #320 +50 0 0
TEMPERATURE SENSOR (THERMISTOR)
The thermistor is located on the thermostat housing, adjacent to the high coolant temperature switch. The thermistor must be installed in the thermostat housing in the port located nearest to the cylinder head. (see the figure to the left)
THERMISTOR SPECIFICATIONS: Temperature Range:30-50°C Voltage Range: 6-24V Maximum Temperature: 150°C Installation Torque: 30 Nm
OIL PRESSURE (LOW) SWITCH, COOLANT TEMPERATURE (HIGH) SWITCH
Oil Pressure (low) Switch Specifications:
General: Single Pole, N.C. Opening Pressure: 0.15 / 0.45 bar Installation Torque: 25 Nm
Coolant Temperature (High) Switch Specifications:
General: Single Pole, N.O. Closing Temp.: 107 / 113°C Max. Power Absorption: 3 W Voltage Range: 6 / 24V Installation Torque: 25 Nm
IDLE SPEED ADJUSTMENT
1. Check and/or fill the engine with coolant and engine oil. Fill the engine or machine fuel tank with fuel. 2. Attach or set-up a calibrated tachometer. 3. Start the engine and allow a 10 Minute warm-up period. 4. Remove all loads from the engine. 5. Loosen the locknut at position(1). Adjust screw(1) until an idle speed of 850 - 900 r/min is achieved. 6. Tighten the locknut at position(1).
NOTE: Rotating the screw(1) clockwise increases the idle speed, while rotating the screw(1) counter-clockwise reduces the idle speed.
HIGH (MAXIMUM) SPEED ADJUSTMENT
1. Check and/or fill the engine with coolant and engine oil. Fill the engine or machine fuel tank with fuel. 2. Attach or set-up a calibrated tachometer. 3. Start the engine and allow a 10 Minute warm-up period. 4. Remove all loads from the engine. 5. Loosen the lock nut at position(2). Simultaneously adjust screw(2) and hold the throttle lever at full travel as shown until the maximum speed is 3800 r/min. 6. Tighten the locknut at position(2)
NOTES: Rotating screw(2) clockwise will reduce the maximum speed, while rotating the screw(2) counter-clockwise will allow a higher maximum speed. Setting the maximum no-load speed at 3800 r/min will allow for 3600 r/min operation when the engine is fully loaded. Some fine adjustment may be required after the engine is applied within the given machine.
TORQUE DEVICE ADJUSTMENT (WITHOUT DYNAMOMETER)
Lombardini recommends that the engine torque device be adjusted on a dynamometer. Therefore, the adjustment procedure presented in the following is only approximate. WARNING: ADJUSTMENT OF
THE TORQUE DEVICE WILL REQUIRE THE USE OF TOOLS IN CLOSE PROXIMITY TO THE COOLING FAN. DO NOT PERFORM THIS OPERATION WITHOUT A PROPER FAN GUARD IN PLACE. USE EXTREME CARE NOT TO ALLOW TOOLS OR BODY PARTS TO COME IN CONTACT WITH THE COOLING FAN, FAN SUPPORT OR FAN BELT.
1. Loosen the torque device locknut at point(C). 2. Rotate the torque device(C) clockwise several revolutions. 3. Tighten the torque device locknut. 4. Start the engine, allow to warm and lock the speed at 3800 r/min. 5. Loosen the locknut at position(C) 6. Rotate the torque device(C) counter-clockwise until the speed begins to reduce. 7. Rotate the torque device(C) clockwise 2.5 revolutions. 8. Tighten the locknut at position(C).
TORQUE DEVICE DETAILS
The torque device(C) serves two(2) primary functions. First, the torque device limits the maximum power output by limiting maximum fuel delivery. Fuel delivery is limited by controlling the travel of lever(L), thus the injection control rack. Secondly, the torque device(C) provides a torque rise in the engine as the fuel delivery is limited. As the governor spring(N) pulls the lever(L) toward the torque device(C) during high load situations, an additional travel equivalent to (H) is allowed providing for the maximum fuel delivery and maximum enginer torque. The distance (H) is a direct function of the internal torque device spring(M). (H) is typically equal to 0.4mm.
INJECTION PUMP CONTROL ROD STROKE LIMIT ADJUSTMENT
1. Remove the valve/ rocker cover. 2. Loosen bolt(B) completely. 3. Push the injection pump control rod toward the fan end of the engine and hold in position as shown. 4. Rotate screw(B) clockwise until contact is made with the control rod. 5. Rotate screw(B) clockwise an additional 1/2 to 1 turn. 6. While holding screw(B) in position and preventing rotation, tighten the locknut. 7. Replace the valve cover following the instructions from page 29.
GOVERNOR / UNIT INJECTOR RACK ADJUSTMENT
1. Remove the valve/ rocker cover. 2. Loosen screws(C). 3. Make sure that starting aid spring(D) is connected to the control arm(A) as shown. 4. Push the control arm(A) fully toward the flywheel (“right” as shown). 5. Slide each plate(B)- (One(1) per unit injector) toward the flywheel(“right as shown). 6. While holding the plates in the direction shown tighten screws(C) at each unit injector. 7. Torque screws(C) to 1.1Nm
POWER, TORQUE DEVICE and SPEED ADJUSTMENTSDYNAMOMETER METHOD. (SEE WARNINGS REGARDING TORQUE DEVICE ADJUSTMENT ON PAGE 73.)
1. Assemble the engine to the dyno. Fill the engine with fluids. Start the engine and allow an idling warm-up of 5 minutes. 2. Loosen the torque device locknut and rotate the torque device several revolutions clockwise. Tighten the locknut. 3. Adjust the engine speed and dynamometer load as required. 4. Allow the engine to stabilize thermally. 5. Check the specific fuel consumption. If the fuel consumption is not within specification, remove the load, allow the engine to cool and readjust the governor and fuel delivery rates. Repeat steps 1-4. 6. Rotate the torque device counterclockwise until the engine speed begins to fall. Lock the torque device locknut. 7. Remove the dyno load while maintaining the existing throttle position. Note the speed increase for purposes of droop calculation. 8. Allow the engine to cool at idle speed for 10 minutes.
DYNO TEST PARAMETERS- kW and SPECIFIC FUEL CONSUMPTION
ENGINE r/min NB Output (kW) Specific Fuel Consumption Sec./100cc g/kW*hr LDW 502 2200 5.5 285-299 3600 9.1 115-120 326-340 LDW 602 2200 7.4 147-155 265-279 3600 10.3 89-93 326-340 LDW 903 2200 11.1 99-105 261-274 3600 15.6 58-60 328-342 LDW 1204 2200 22.0 75-79 258-272 3600 20.2 44-45.8 326-340 LDW 1204/T3600 28.5 35-36 284-290
STORAGE Measures shouLd be taken to protect your FOCS series engine if the engine is not operated for a period of 30 days or more. Proper storage will protect the engine from corrosion and prevent costly repairs due to storage induced problems.
STORAGE - 1 to 6 MONTHS 1. Start and idle the engine at a no-load condition for 15 minutes. 2. Stop the engine, allow the engine to cool enough to safely drain the oil as shown. Reinstall the oil drain plug, then fill the crankcase with MIL-L-644-P9 protectant oil. Fill the fuel tank with a high grade fuel preservative (add-mix) such as STA-BIL per the manufacturer recommendations. 3. Start and operate the engine at 3/4 speed for 5-10 minutes. 4. Stop the engine, allow to cool enough to safely drain the engine oil as shown. Reinstall the oil drain plug. 5. Refill the engine with standard recommended lubricating oil. See page 17. 6. Drain the fuel tank. Remove the fuel filter. Install a new fuel filter. 7. Carefully clean all debris from the radiators fins. 8. Remove the intake manifold. Rotate the engine until the íntake valve opens at each cylinder. Using suitable means, pour approximately one(1) teaspoon of engine oil into each cylinder. Rotate the engine several revolutions. Spray the inside of the intake manifold with SAE 10 W oil. Replace the intake manifold using a new gasket. 9. Spray the inside of the exhaust manifold with SAE 10 W oil. 10. Cover all openings with tape. 11. Apply grease to any and all unpainted surfaces. 12. Loosen the fan belt. 13. Wrap the engine in plastic film and store in a dry place off of the ground and away from any high voltage source.
STORAGE- IN EXCESS OF 6 MONTHS
Perform the storage preparation procedures approximately as detailed above, except with the following changes.
I. Replace the oil in step 2 above with MIL-L-21260 P 10, grade 2, SAE 30W rustproof oil. 2. Delete step 5 from above. 3. Delete step 11 from above. 4. Cod any and all unpainted surfaces with MIL-C 16173D, grade 3 anti-rust grease. 5. Replace the anti-freeze solution every two(2) years by draining the crankcase water jacket as shown and refilling with a premixed coolant solution according to the prevailling lowest ambient temperatures and the recommendations from pag 17.
PREPARING THE ENGINE FOR USE AFTER STORAGE
I. Romun all plastic wraps and protective tape. 2. Clean all grease, dirt and oil from the exterior of the engine. 3. Drain the oil. 4. Drain the coolant as shown. 5. Refill the engine with the recommended lubricating oil (page 17). Install a new oil filter. 6. Refill the engine with the recommended anti-freeze / coolant (page 19) 7. Remove the injectors. Test and repair the injectors as required. 8. Pour a teaspoon of oil into each cylinder. Rotate the engine several revolutions. 9. Reassemble the injectors, adjust the govemor, adjust the valves. 10. Inspect the fuel tank for rust and corrosion. Clean as required. 11. Fill the fuel tank with fresh fuel. Install a new fuel filter. 12. Install a new air filter. 13. Carefully start the engine and allow to idle for 20 minutes. Repeat step 5.
NOTE: lf the engine has been stored for more than six(6) months, remove the oil pan and inspect several engine bearings to make sure no corrosion damage has taken place.
