10 minute read
Operation


PRE-OPERATION CHECKS
WARNING: If anything in the pre-operation check is not working properly, have it inspected and repaired before operating the outboard motor. Failure to do so could result in an accident.
CONTROLS
• Check throttle, shift, and steering for proper operation before starting the engine. • The controls should work smoothly, without binding or unusual free play. • Look for loose or damaged connections. • Check operation of the starter and stop switches when the outboard motor is in the water. • If the engine has not been used in some time, rev it in neutral to be sure it returns to idle before putting it in gear.
ENGINE
• Check the engine and engine mounting. • Look for loose or damaged fasteners. • Check the propeller for damage.
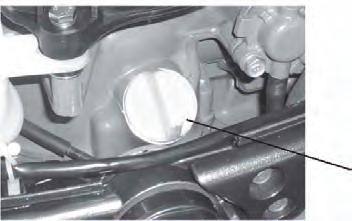
CHECKING THE ENGINE OIL LEVEL
1. Put the outboard motor in an upright position (not tilted). 2. Screw the oil dipstick all the way in. Unscrew it and check the oil level using the oil dipstick to be sure the level falls between the upper and lower marks. Fill with oil if it is below the lower mark, or drain to the specified level if it is above the upper mark.
Recommended engine oil: 4-stroke motor oil with a combination of the following SAE and API oil classifications
Engine oil type SAE: 10W-30
OIL DIPSTICK OIL DIPSTICK
UPPER LEVEL MARK
LOWER LEVEL MARK
Engine oil grade API: SE,S F, SG, SH, SJ, SL
Engine oil quantity: 0.53USqt (0.5L)
WARNING: ALL ENGINES ARE SHIPPED FROM THE FACTORY WITHOUT ENGINE OIL.
ADD OIL BEFORE STARTING ENGINE.
FUEL
• Check to be sure you have plenty of fuel for your trip. • Make sure there are no fuel leaks or propane fumes.
FUELING INSTRUCTIONS
WARNING: PROPANE AND ITS VAPORS ARE HIGHLY FLAMMABLE AND EXPLOSIVE!
• Stop engine before refueling. • Do not smoke when refueling, and keep away from sparks, flames, or other sources of ignition. • Refuel in a well-ventilated area. • Refuel portable fuel tanks off the boat.
USE THE CORRECT PROPANE CANISTER
Always use propane canisters or “bottles” that are the correct size. The 17 ounce or 16.4 ounce / 465g canisters that are approximately 3-7/8 inches (9.5 cm) in diameter are the correct canisters.
NOTE: Do not use smaller diameter canisters as they will not latch securely to the unit and vibration may cause damage to the unit and potentially result in a dangerous leak.
OPERATION
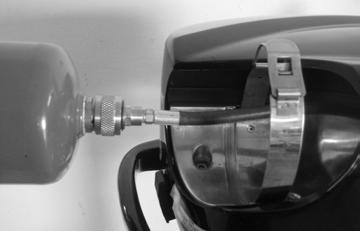
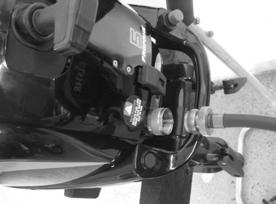
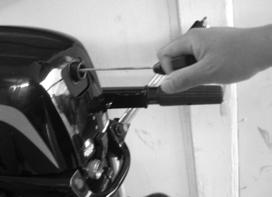
INSTALLING THE PROPANE CANISTER
1. Make sure the engine is off. 2. If the propane canister to be installed has a protective plastic cap over the threaded end, remove it. Make sure the canister clamp is in the unlatched position. If the rubber tank plug is in place, remove it. Save the plug for future use. 3. Pull the propane connector out from the bottle bracket through the canister clamp. 4. Insert the propane connector onto the threaded end of the canister and screw it clockwise onto threads. Screw it until snug. Do not over tighten.
NOTE: It may be normal to hear or smell a slight momentary leak of propane as the connector is being screwed in. Make sure that the connector is installed tight enough that any leakage stops. Hand tight is sufficient.
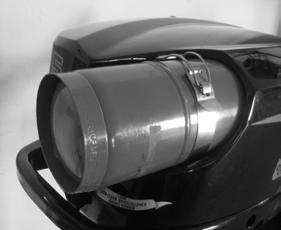
5. Insert the connected propane canister through the canister clamp and against the bottle bracket until it stops against it. 6. Latch the canister clamp closed.
CLAMP BOTTLE BRACKET
CONNECTOR
CANISTER

REMOVING THE PROPANE CANISTER
1. Make sure the engine is off. 2. Unlatch the canister clamp, pull the canister out, and remove the propane connector by turning it counterclockwise. 3. Remove the empty canister. 4. Dispose of empty propane canisters in accordance to Federal, State and Local regulations.
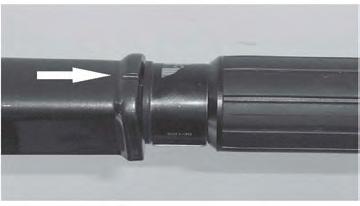
CONNECTING REMOTE PROPANE TANK
1. Make sure the engine is off and the propane tank is closed. 2. Connect the remote hose to the remote propane tank. Use only a high pressure propane hose. Do not use a hose with a regulator attached. 3. Unscrew the brass connector plug from the remote propane connector on the engine. Connect the remote hose to the remote propane connector.
4. If the engine is intended to be operated solely on the larger remote tank, insert the brass connector plug into the rear propane connector for the small bottle and install the provided rubber tank plug, and clamp it into place.
NOTE: When a new hose from a remote tank is being used, it may take a few seconds for the propane to flow to reach the engine. The engine may start and then die, or not start immediately. A few extra pulls of the starter are usually sufficient for the flow to reach the engine.
REMOTE HOSE
REMOTE PROPANE TANK REMOTE CONNECTOR

RUBBER TANK PLUG
OPERATION
STARTING ENGINE
1. Place the gear shift lever in neutral. The engine is equipped with a lockout which will prevent the stater rope from being pulled if the engine is engaged in forward or reverse.
WARNING: Keep hands, hair, and clothing away from rotating parts while the engine is running. Do not touch or remove electrical parts when starting or during operation.
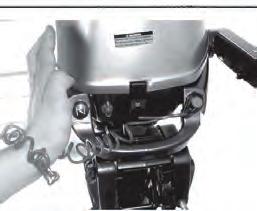
2. Attach the stop switch lanyard to a secure place on your clothing, or your arm or leg. Then install the lock plate on the other end of the lanyard into the engine stop switch.
• Do not attach the lanyard to clothing that could tear loose. Do not route the lanyard where it could become entangled, preventing it from functioning. • Avoid accidentally pulling the lanyard during normal operation. Loss of engine power means the loss of most steering control. Also, without engine power, the boat could slow rapidly. This could cause people and objects in the boat to be thrown forward.
GEAR SHIFT LEVER STOP SWITCH LANYARD
3. Place the throttle grip in the "START" position. If the engine is cold, set the position about 1/8 to 1/4 of a turn faster than the “start” or Idle position. 4. Pull the manual starter handle slowly until you feel resistance. Then give a strong pull straight out to start the engine. Repeat if necessary.
THROTTLE GRIP
5. After the engine starts, slowly return the manual starter handle to the original position before releasing it. 6. Slowly return the throttle grip to the fully closed position.
NOTE: If the engine fails to start after 4 or 5 tries, open the throttle a small amount (between 1/8 - 1/4 throttle) and try again. Also if the engine is warm and fails to start, open the throttle a small amount and try to start the engine again. If the weather is below 45 degrees F, open the throttle to 1/4 - 1/2 to start cold.
WARMING UP ENGINE
1. Warm up the engine by operating at 1/2 throttle or less for the first 4 minutes. Failure to do so will cause engine to stall in cold weather, and will shorten engine life. 2. Check for a steady flow of water from the cooling water pilot hole.
NOTE: A continuous flow of water from the cooling water pilot hole shows that the water pump is pumping water through the cooling passages. If water is not flowing out of the hole at all times while the engine is running, over heating and serious damage could occur. Stop the engine and check whether the cooling water inlet on the lower case or the cooling water pilot hole is blocked. Consult your dealer if the problem cannot be located and corrected.
COOLING WATER PILOT HOLE (BOTTOM VIEW OF ENGINE)
OPERATION
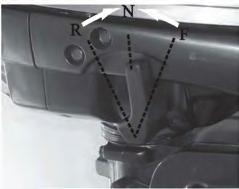
SHIFTING
WARNING: Before shifting, make sure no swimmers are in the water near your boat. 1. Place the throttle in the slowest position. 2. Move the gear shift lever quickly to the desired gear from neutral to forward or reverse. WARNING: When operating your outboard engine in reverse, go slowly. Do not attempt to open the throttle more than half throttle in reverse. Otherwise your boat can become unstable which can result in loss of control or a possible accident.
STOPPING ENGINE
1. Push and hold the engine stop button until the engine completely stops. 2. After the engine has stopped disconnect the propane canister.
ADJUSTING BOAT TRIM
WARNING: Stop the engine before adjusting the trim angle. Use care to avoid being pinched when removing the trim rod. Use caution when trying a trim position for the first time. Increase speed gradually and watch for any signs of instability or control problems. Improper trim angle can cause loss of control.
• Tilt the engine up slightly. • Reposition the rod inside the desired hole. • To raise the bow (”trim-out”), move the trim rod away from the transom. • To lower the bow (”trim-in”), move the trim rod closer to the transom. • Test the boat with the trim set to different angles to find the position that works best for your boat and operating conditions.
NOTE: The outboard motor trim angle can be changed approximately 4 degrees by shifting the trim rod one hole.
TRIM ROD
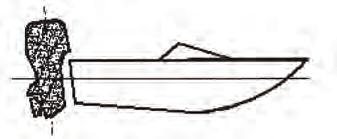
When the boat is on plane, a bow-up attitude results in less drag, greater stability and efficiency. This is generally when the keel line of the boat is up about 3 to 5 degrees. With the bow up, the bow of the boat may have a greater tendency to steer to one side or the other. Compensate for this as you steer. The trim tab can also be adjusted to help to help offset this effect. When the bow is down, it is easier to accelerate from a standing start onto plane.
BOW UP
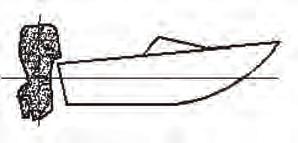
Too much trim-out puts the bow of the boat too high in the water. Performance and economy are decreased because the hull of the boat is pushing the water and there is more drag. Excessive trim-out can also cause the propeller to ventilate, which reduces performance further, and the boat may “porpoise” (hop in the water) which could throw the operator and passengers overboard.
OPERATION
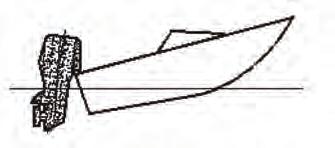
BOW DOWN
Too much trim-in causes the boat to “plow” through the water, decreasing fuel economy and making it hard to increase speed. Operating with excessive trim-in at higher speeds also makes the boat unstable. Resistance at the bow is greatly increased, heightening the danger of “bow steering” and making operation difficult and dangerous.
NOTE: Depending on the type of boat, the outboard motor trim angle may have little effect on the trim of the boat when operating. TILTING UP AND DOWN
If the engine will be stopped for some time and the boat is moored in shallows, the outboard motor should be tilted up to protect the propeller and casing from damage from collision with obstructions, and also to reduce salt corrosion.
WARNING: Before tilting the outboard motor, follow the procedure under “Stopping Engine” in this section. Never tilt the outboard motor while the engine is running. Sever damage from overheating can result. Do not tilt the engine by pushing the tiller handle because this could break the handle. Keep the power unit higher than the propeller at all times otherwise water could run into the cylinder and cause damage. The outboard motor cannot be tilted while in reverse.
WARNING: Be sure all people are clear of the outboard motor when tilting up and down, also be careful not to pinch any body parts between the drive unit and engine bracket.
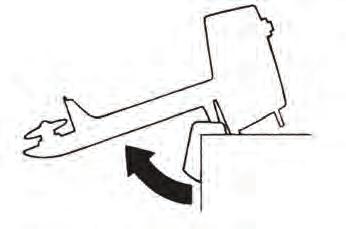
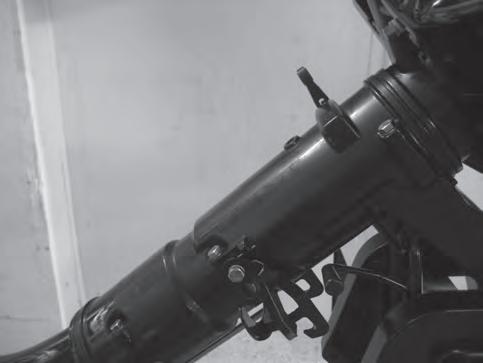
PROCEDURE FOR TILTING UP
1. Place the gear shifter lever in neutral and face the outboard motor forward. 2. Tighten the steering friction adjuster by turning it clockwise to prevent the motor from turning freely. 3. Hold the carrying handle and tilt the engine up fully until the tilt support lever automatically locks.
PROCEDURE FOR TILTING DOWN
1. Slightly tilt the outboard motor up. 2. Slowly tilt the outboard motor down while pulling the tilt support lever up. 3. Loosen the steering friction adjuster by turning it counterclockwise, and adjust the steering friction according to operator preference.
STEERING FRICTION ADJUSTER
TILT SUPPORT LEVER