8 minute read
RT540E OPERATOR’S MANUALLUBRICATION


Lubrication Points
A regular frequency of lubrication must be established for all lubrication points. Normally, this is based on component operating time. The most efficient method of keeping track of lube requirements is to maintain a job log indicating crane usage. The log must use the engine hourmeter to ensure coverage of lube points that will receive attention based on their readings. Other lubrication requirements must be made on a time basis, i.e. weekly, monthly, etc.
All oil levels are to be checked with the crane parked on a level surface in transport position, and while the oil is cold, unless otherwise specified.
On plug type check points, the oil levels are to be at the bottom edge of the check port.
On all hoists with a check plug in the drum, the fill plug shall be directly on top of the hoist, and the check plug level.
All grease fittin gs are SAE STANDA RD unless otherwise indicated. Grease non-sealed fittings until grease is seen extruding from the fitting. One ounce(28 grams) of EP-MPG equals one pump on a standard one pound (0.45 kg) grease gun.
Over lubrication on non-sealed fittings will not harm the fittings or components, but under lubrication will definitely lead to a shorter lifetime.
On sealed U-joints, care must be exercised to prevent rupturing seals. Fill only until expansion of the seals first becomes visible.
Unless otherwise indicated, items not equipped with grease fittings, such as linkages, pins, levers, etc., should be lubricated with oil once a week. Motor oil, applied sparingly, will provide the necessary lubrication and help prevent the formation of rust. An Anti-Seize compound may be used if rust has not formed, otherw ise the component must be cleaned first.
Grease fittings that are worn and will not hold the grease gun, or those that have a stuck check ball, must be replaced. Where wear pads are used, cycle the components and relubricate to ensure complete lubrication of the entire wear area.
CraneLUBE
Manitowoc highly recommends the use of CraneLUBE lubricants to increase your crane’s reliability and performance. Contact your Manitowoc Distributor for information about the Manitowoc’s CraneLUBE lubrication program.
Safety
To lubricate many of the locations the engine will need to be started. After positioning areas of the unit for lubrication the engine must be turned off and the moved areas stable before approaching.
Warning
Movement of the superstructure and the boom may create a crushing and/or pinching hazard. Failure to observe this warning could result in death or serious injury if the message is ignored.
Steering and Suspension

•Check level every
•Drain
•Check level every
•Drain and fill every
Fill to bottom of hole in housing on the steer cylinder side
NOTE: Lube level close enough to the hole to be seen or touched is not sufficient. It must be level with the hole. When checking lube level, also check and clean housing breathers.
CAUTION: Use of non-approved lubricant may damage components and/or invalidate published lubricant intervals.
CAUTION: If the makeup amount is substantially more than 0.23 liter (0.5 pint), check for leaks.
•Check level every 500 hours or 3
•Drain and fill every 4000 hours or 2
Fill to the bottom of the level hole in the housing with the fill plug and the oil level mark horizontal.
CAUTION:


•Check level every 10 hours or daily
•Drain, fill and replace filter every 500 hours or 6 months
•Check level every 10 hours or daily
•Drain and refill every 1000 hours or 6 months
•Change transmission filter after first 50 and 100 hours of service, then every 500 hours thereafter
•Check level through dipstick.
•Fill engine oil through fill cap on engine valve cover.
Through fill pipe to FULL mark on dipstick
NOTE:
•Check fluid level with engine running at 1000 rpm idle and the oil at 82 to 93° C (150 to 200 ° F). Do not attempt an oil level check with cold oil. To bring the oil temperature to this range, it is necessary to either work the crane or stall the converter. Converter stall should be accomplished by engaging shift lever in forward high range with the brakes applied and then accelerating the engine to half or three-quarter throttle. Hold the stall until the required converter temperature is reached and stabilized. Do not operate the converter at stall condition for longer than 30 seconds at one time. Shift to neutral for 15 seconds and repeat the procedure until the desired temperature is reached. Excessive temperature, i.e, 120° C (250° F) maximum will cause damage to transmission clutches, fluid, converter and seals.
•Drain and fill with the oil at 65 to 93° C (150 to 200° F).
•Transmission filters are located on the outside left hand frame in the area of the hydraulic oil cooler.
•To add fluid: a. Fill to FULL mark on dipstick b. Run engine at 800 rpm to prime torque converter and lines c. Check oil level with engine running at 800 rpm and oil at 82 to 93° C (180 to 200° F). Add oil to bring oil level to FULL mark on dipstick.
•Check coolant level every 10 hours or
•Drain and fill every 2000 hours or 1 year
•Fill surge tank to bottom of filler neck. Run engine through two (2) thermal cycles.
•Check coolant level and refill as required.
16
Change strainer screen after first 100 hours and every 2000 hours or 12 months intervals thereafter.
Close shutoff valves. Unscrew hex plug to clean filter.


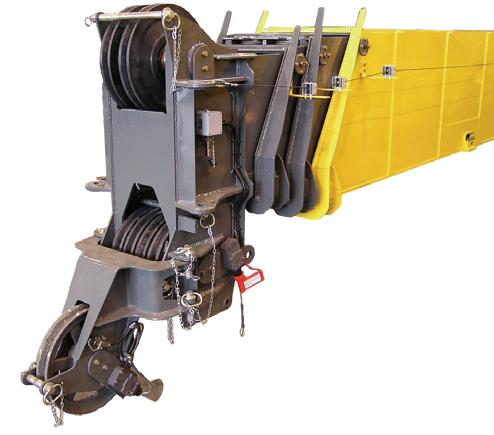
17 Driveline - Slip Joints Figure 5-4
EP-MPG Extreme Pressure Multipurpose Grease
A6-829-003477
Until grease extrudes 500 hours or 3 months3 grease fittings
•Replace/Clean filter element when indicator shows red (25” H20).
52 Air Cleaner FilterFigure 5-4------
•View indicator through grill from rear of crane.
•Refer to Service Manual
Remove panel behind ladder to access air filter.
53a
53b a. Fuel Filter b. Water Separator Figure 5-4------
•Change filter every 500 hours or 6 months.
•Drain water trap every 10 hours or daily.
•Fuel filter is located on the intake manifold of engine.
•Strainer is located near battery box.


---50
Brush bottom
---50 hours or 1 week
Brush lubricant on OD of jack cylinder barrel and wear band before installing jack cylinders
---50 hours or 1 week
Brush lubricant on OD of jack cylinder support tubes (4) places before installing jack cylinders

4.0
•Check and fill every 50 hours
•Drain and fill after first 250 hours and every 500 hours or 12 months thereafter.
Use dipstick. If no dipstick, fill to top of case.
Coat all teeth 500 hours or 6 monthsSpray on
Until grease extrudes the whole circumference of the bearing
500 hours or 6 months
2 grease fittings at the front of the turntable
NOTE: Rotate the turntable 90° and apply grease to fittings. Continue rotating 90° and grease the fittings until the whole bearing is greased.


NOTE: Lubricate items more frequently than interval indicated in table if environmental conditions and/or operating conditions necessitate.


•Check and fill every 50 hours or weekly
•Drain and fill every 1000 hours or 12 months
•Check and fill every 50 hours or weekly
•Drain and fill every 1000 hours or 12 months
Oil level must be visible in the sight glass
Oil level must be visible in the sight glass
NOTE: Line up the Fill/Drain Plug with the top cutout hole (A). Let hoist sit idle for 20 minutes for an accurate reading. If oil level is not visible in sight glass, the hoist may be underfilled. Oil escaping from vent plug is an indication the hoist may be overfilled. If hoist is over filled move the Fill/Drain Plug to the lower cutout hole (B) and drain until oil level falls within the sight glass.
47
Thoroughly coat 250 hours or 3 monthsSpray on
A6-829-003477
NOTE: Lubricate more frequently than interval indicated in table if environmental conditions and/or operating conditions necessitate.

NOTE:
•Use sight gauge on side of tank, with boom down and all outrigger cylinders retracted.
•Drain and refill as necessary
•Environmental and other conditions can dramatically affect the condition of hydraulic oil and filters. Therefore, specific intervals for servicing/changing hydraulic oil, filters and hydraulic tank breathers cannot be set. However, it is imperative for the continued satisfactory performance of Grove cranes that inspections be performed on the basis of how and where each crane is used. Air borne and ingested contaminants can significantly reduce the life of oil and the condition of hydraulic oil filters and tank breathers.
•Under normal operating conditions, it is recommended that hydraulic oil, filters and breathers be inspected and oils sampled at least every 3 to 6 months and more frequently for severe operating conditions. The inspections should be for air borne and/or ingested particles and water that deteriorate and contaminate the oil (e.g., oil appears “milky” or no longer has a transparent clear to amber color). The return filter by-pass indicator should be observed daily to determine if the contaminants content may be high. If the indicator reaches the red zone or indicates a by-pass condition, the hydraulic oil must be sampled. The hydraulic tank breather should also be inspected to assure that it is not restricting air flow into and out of the reservoir.
•To inspect hydraulic oil, fill a small glass container with a sample of reservoir oil and another glass container with fresh oil. Let the samples stand, undisturbed, for one to two hours and then compare the samples. If the reservoir oil is heavily contaminated with water the sample will appear "milky" with only a small layer of transparent oil on top. If the "milky” appearance was due to air foaming, it will dissipate and the oil should closely match the fresh oil. Should you have any questions, please contact your local authorized Manitowoc distibutor.
•The hydraulic oil shall meet of exceed ISO #4406 class 17/14 cleanliness level.

Section 6
Maintenance Checklist Section Contents
General
This section contains a list of daily inspection and maintenance checks. Performing the checks will help maintain the safety, dependability, and productivity designed into your crane.
Refer to your Inspection and Lubrication Service Log for further requirements.
Daily or 10 Hour Check List
Instructions
Refer to your Service Manual for specific maintenance and adjustment procedures.
Refer to Section 5 - Lubrication (in this Operator Manual) for lubrication intervals, types of fluids and lube point locations.
1 Operator’s Manual: Is item properly installed on machine?
2 Signal and Running Lights and Horn: Check for cracked or broken glass. Check for proper working order.
3 Back-up Alarm: Check for proper operation while operating machine.
4 Gauges and Instruments: Check for proper working order. Check for proper reading while operating engine. Check for proper operation while operating machine.
5 Brakes (Swing, Foot and Parking): Check for proper working order. Check for proper operation while operating machine.
6 Boom Angle Indicator: Check for proper operation while operating machine.
7 Load Moment Indicator: Check for proper operation while operating machine. Check connectors and wiring for proper alignment and insulation.
8 Anti-two Block (A2B) Electrical and Hydraulic: Check for proper operation while operating machine. Check connectors and wiring for proper alignment and insulation.
9 Brakes and Air System (if equipped): Check for proper working order. Check for proper operation while operating machine. Drain moisture.
10 Tires: Check for proper inflation/pressure. Check for excessive wear.Check for excess dirt, grease or foreign matter.
11 Hourmeter: Check for proper working order. Check for proper reading while operating engine. Check connectors and wiring for proper alignment and insulation.
12 Hydraulic Tank: Check for proper service/level. Check for excess dirt, grease, or foreign matter.
13 Hydraulic Oil Filter: Check for proper service/level.
14 Wire Rope: Check for damaged, frayed, or broken strands.
15 Hoists: Is item properly installed on machine. Check for excess dirt, grease, or foreign matter.Check for proper operation while operating machine.
16 Boom and Attachments: Is item properly installed on machine. Check for excess dirt, grease, or foreign matter. Check for proper operation while operating machine.
17 Crankcase: Check for proper service/level. Check for excess dirt, grease, or foreign matter.
18 Transmission/Torque Converter: Check for proper service/level.
19 Cooling System: Check for proper service/level. Check for cracks or leaks.
20 Fuel/Water Separator: Drain moisture.
21 Air Cleaner: Check for proper service/level.Check for cracks or leaks.
22 Hook Block and Headache Ball Safety Latch: Check for proper working order. Check for cracks and leaks. Check for excessive wear.
23 Lock-out Cylinder and Swing Potentiometer: Check for proper operation while operating machine. Check for proper adjustment.
Weekly or 50 Hour Check List
1 Sheaves: Check for proper operation, excessive wear, and damage.