4 minute read
OPERATION


The operator is responsible for the safe operation of this equipment. The operator must be properly trained. Operators should be familiar with the equipment, the tractor, and all safety practices before starting operation. Read the safety rules and safety decals, page5 through page7.
The box blades are designed for a wide range of applications: scarifying, scraping, leveling, grading, and backfilling.
Power unit must be equipped with ROPS or ROPS cab and seat belt. Keep seat belt securely fastened. Falling off power unit can result in death from being run over or crushed. Keep foldable ROPS system in “locked up” position at all times. Never allow children or untrained persons to operate equipment.
Keep bystanders away from equipment.
NEVER GO UNDERNEATH EQUIPMENT. Never place any part of the body underneath equipment or between moveable parts even when the engine has been turned off. Hydraulic system leak-down, hydraulic system failures, mechanical failures, or movement of control levers can cause equipment to drop or rotate unexpectedly and cause severe injury or death.
•Service work does not require going underneath.
•Read Operator's Manual for service instructions or have service performed by a qualified dealer.
Keep hands, feet, hair, and clothing away from equipment while engine is running. Stay clear of all moving parts.
PRE-OPERATION CHECK LIST (OWNER'S RESPONSIBILITY)
___Review and follow all safety rules and safety decal instructions, page5 through page7.
___Check that equipment is properly and securely attached to tractor.
___Check that all safety decals are installed and in good condition. Replace if damaged.
___Check that all hardware is properly installed and secured.
___Do not allow riders.
___Make sure tractor ROPS or ROPS cab and seat belt are in good condition. Keep seat belt securely fastened during operation.
Connect Box Blade To Tractor
This box blade should be mounted on tractors with a maximum engine rating of 25 hp (18.7 kW) and not to exceed 2000 lbs (909 kg).
This box blade is compatible with Category 1 and Category 0, 3-point tractors equipped with side swing type lower lift arms.
Adjust or remove tractor drawbar to eliminate interference with box blade.
Category 1
Notice
The 3/4" bolt and sleeve in the lower hole provide the attachment point for a Category 1 quick coupler. Do not remove this bolt and sleeve when operating the box blade.
Stop power unit and equipment immediately upon striking an obstruction. Turn off engine, remove key, inspect, and repair any damage before resuming operation.
Always wear relatively tight and belted clothing to avoid getting caught in moving parts. Wear sturdy, rough-soled work shoes and protective equipment for eyes, hair, hands, hearing, and head; and respirator or filter mask where appropriate.
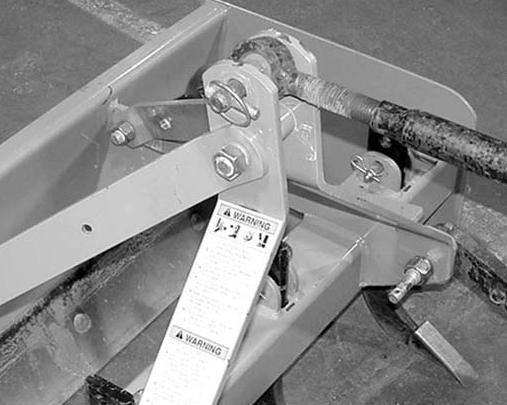
1. Place tractor 3-point lower lift arms over outer hitch pins.
2. Secure with klik pin (not provided) as shown in Figure 1.
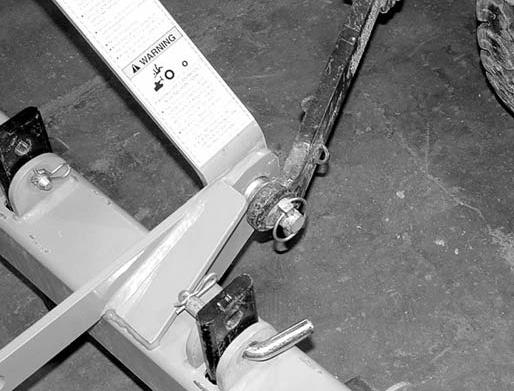
3. Attach the tractor's top link to the top of the box blade's A-frame bars.
4. Secure with the heavy-duty top link pin and retaining pin supplied with the top link (Figure 2).
Category 0
1. Remove cap screw (29), sleeve (7), lock washer (27), and hex nut (26) from lower hole on A-frame bars.
2. Replace cap screw, sleeve, lock washer, and hex nut into top hole on A-frame bars Figure 3.
3. Place tractor 3-point lower lift arms over inner hitch pins.
4. Secure with safety pins (not provided).
5. Connect tractor top link by inserting tractor clevis pin into lower hitch point on A-frame bars and secure.
Optional Quick Coupler Bushing Kit
(BB1048L - CAT 1 ONLY)
1. Bushing kit 5WP1004653 is available through your dealer.
2. Install quick coupler sleeves over implement Category 1 mounting pins and secure with klik pins. See Figure 13, page15.
Adjusting Top Link
The box blade is leveled by adjusting the length of the tractor's top link.
● Shortening the top link will deepen the scarifier tooth penetration.
● Lengthening the top link will provide better scraping and leveling action.
Experience will allow the operator to determine the best setting for each application.
Backfilling
1. Raise or remove scarifier shanks (see page12).
2. Lower the blade to the ground and back up into the fill material.
3. Shorten the top link to raise the cutting blade and control how much the blade digs in.
Scarifying
1. Place the scarifier shanks in position with the points facing toward the tractor.
2. Lock into position with the pins provided. The lower shank position provides the greatest ground penetration.
3. Lower the box blade and drive the tractor ahead to begin the scarifying operation.
4. Adjust the depth of the scarifier by tilting the unit with the tractor top link. Shortening the top link will provide deeper and more aggressive operation.
Scraping
1. Raise or remove the scarifier shanks (see page12). Lower the box blade and drive forward to move material.
2. Adjust the depth of the blade by tilting the unit with the tractor top link.
Shortening the top link when scraping will transfer more weight on the front of the box blade and will raise the cutting blade to provide a more shallow cut.
NOTE: When the top link is adjusted properly, the bowl of the blade should fill easily and material can be pulled to a desired location.
3. To change the level of the blade, shorten or lengthen the tractor lift arm top link to provide the correct slope.
4. Spread material by gradually raising the box blade as the tractor moves forward.
NOTE: Top link adjustment for loose or previously scarified material will differ from adjustment for hard or compacted material.
Leveling
1. Raise or remove scarifier shanks.
2. Shorten the top link so the cutting edge clears the ground.
3. Drive forward with the box blade in this position and loose material will be leveled.
Storage
To help prevent injury caused by a falling implement, always detach on a hard level surface.
Block equipment securely for storage (see Figure 4).
Do not climb or lean on equipment stored on stand. Refer to Cleaning instructions on page12.