20 minute read
Maintenance - Maintenance schedule

from Dynapac Vibratory rollers CC800 900 1000 Operating & Maintenance Instruction Manual 4812160801 - PDF

Every 1000 hours of operation
Refer to the contents to find the page number of the sections referred to !
4 Clean the outside/inside of the radiator core
2 Check lubrication on controls and joints
5 Check the tension and condition of the fan belt
7 Replace the air cleaner filter element, check that hoses and connectors are tight
6 Change the fuel filter
6 Change the engine oil and oil filter
4 Check coolant freezing point
16 Check the oil level in the drums
13 Check the hydraulic reservoir cover/breather
12 Change hydraulic fluid filter
6 Check the engine valve clearances
5 Replace fan belt
Check the belt tension on the hydraulic vibration and steering pump drive belt
In dusty environments, as necessary
Lubricate if necessary
Replace if necessary
Refer to the engine manual
Refer to the engine manual
Change the coolant every other year
Refer to the engine manual
Refer to the engine manual
2020-10-27
4812160801_G.pdf
2020-10-27
Maintenance, 10h
Every 10 hours of operation (Daily)
Park the roller on a level surface. The engine must be switched off and the parking brake activated when checking or adjusting the roller, unless otherwise specified.
Ensure that there is good ventilation (air extraction) if the engine is run indoors. Risk of carbon monoxide poisoning.
Ensure that the engine cover is fully open when work is carried out under the cover.
Diesel engine Check oil level
Open the engine cover lock and lower the engine cover forwards.
Check the oil level using the dipstick (1). The level should be between the marks. If the level is near the lower mark, top off with fresh engine oil via the filler cap (2). See under the heading lubricants for the correct oil grade.
Never overfill with oil, as this can damage the engine.
4812160801_G.pdf
Hydraulic reservoir, Level check - Filling
Wipe the sight glass (1) clean. Check that the fluid level is between the min. and max. markings. Where required, top off with fresh hydraulic fluid through the filler hose (2).
See under the heading ‘Lubricants’ for the correct fluid grade.
Check - Coolant system
Check that all hoses/hose connectors are intact and tight. Fill with coolant as specified in the lubricants specification.
Take great care when opening the radiator cap while the engine is hot. Wear protective gloves and goggles. Also check the freezing point. Change the coolant every other year.
2020-10-27
2020-10-27
Refueling
Refuel the tank every day before starting work. Open the tank cap and fill through the filler pipe (1). Never refuel while the engine is running. Do not smoke and avoid spilling fuel.
Stop the engine. Short circuit the fueling nozzle during refueling by pressing it against the filler pipe (1)
The tank holds 23 liters (6.1 gal) of fuel.
Water tank - Filling

Unscrew the tank cap (1), and fill with clean water.
Fill the water tank.
The CC version tank holds 110 liters.
The Plus version tank holds 190 liters.
Only additive: A small amount of environmentally friendly antifreeze.

Sprinkler system/Drum Cleaning of sprinkler nozzle
Dismantle the blocked nozzle by hand.
Blow the nozzle (1) and fine filter (3) clean using compressed air. Alternatively, fit replacement parts and clean the blocked parts later on.
After inspecting and carrying out any necessary cleaning, start the system and check that it works. Wear protective goggles when working with compressed air.
Sprinkler system - Check, cleaning
Check that the holes in the sprinkler nozzles (1) are not blocked. Clean where necessary.
Sprinkler system - Check, cleaning
Check that the water filter (1) is not blocked. Clean where necessary. Clean the water filter by unscrewing the filter’s lower section, and clean the strainer and filter housing. Reassemble in the reverse order.
Air circulation - Check
Check that the circulation of air to the engine through the grille in the engine cover is unobstructed.
Scrapers - Check, adjustment
Make sure that the scrapers are undamaged. Adjust the scrapers if necessary in the following way:
For firmer application of the scraper, undo the locking nut (2) and adjust it until the desired application is achieved.
Lock the setting by tightening the lock nut against the mounting bracket (3).
Adjust the pressure on both scraper brackets.
To set a lower scraper pressure, adjust in the reverse order to the above.
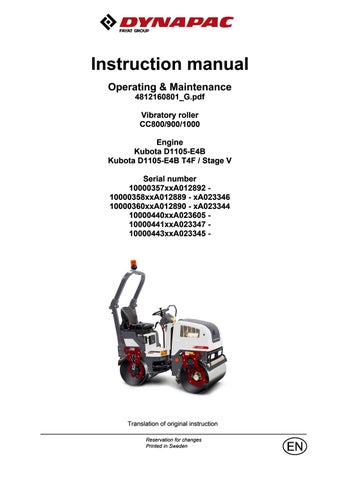
Warning lamps - Check
Check that the warning lamps on the control panel function.
Air cleaner indicator
If the indicator (1) on the air cleaner turns red, empty the dust pouch (2) on the air cleaner. The dust pouch is emptied by pressing the rubber bellows with your fingers. Check also that the air hoses are in good condition.
Clean the air cleaner when operated in extremely dusty environments.
Brakes - Check
Check operation of the brakes as follows:
Run the roller very slowly forward. Hold the steering wheel firmly and brace yourself for a sudden stop.
Press in the emergency stop button (3). The roller will stop abruptly and the engine will switch off.
After testing the brakes, set the forward/reverse lever in neutral.
Pull out the emergency stop button (3). Start the engine.
The roller is now ready for operation.
Refer also to the section in the manual on operation.
2020-10-27
Maintenance - 50h
Every 50 hours of operation (Weekly) Park the roller on a level surface. The engine must be switched off and the parking brake activated when checking or adjusting the roller, unless otherwise specified.
Ensure that there is good ventilation (air extraction) if the engine is run indoors. Risk of carbon monoxide poisoning.
1
Ensure that the engine cover is fully open when work is being carried out under it
After the first 50 hours of operation, the oil filters should be changed.
Air cleaner - emptying
Empty the air cleaner dust trap (1) through pressing the rubber bellows using the fingers. Check also that the air hoses are intact.
Clean the air cleaner when operated in extremely dusty environments
Refer also to the section in the manual on operation.
4812160801_G.pdf
Rubber elements and fastening screws - Check
Check all the rubber elements (1), and replace all the elements if more than 20% of them on one side of the drum are cracked deeper than 10-15 mm.
Use a the blade of a knife or pointed object to check.
Check also that the screw fasteners (2) are tightened. The screws on the rubber elements are sealed with Loctite. Check the rubber elements on both sides of the roller.
Belt
If the hydraulic pump drive belt can be pressed in 5-6 mm between the pulleys with a force of 50 Nm, then the belt is correctly tensioned.
Do as follows to tension the belt:
- Undo the screws (1) and (2).
- Press over the hydraulic pump so that the belt tensions to the specified extent.
- Tighten screw (1) and then screw (2).
- Check that the belt still has the correct tension after tightening.
Replace the belt when necessary, or after 2000 h.
2020-10-27
Maintenance measures - 250 h
Maintenance measures - 250 h
Every 250/750/1250/1750..... hours of operation (every 3 months)
Park the roller on a level surface. The engine must be switched off and the parking brake activated when checking or adjusting the roller, unless otherwise specified.
Ensure that there is good ventilation (air extraction) if the engine is run indoors. Risk of carbon monoxide poisoning.
Ensure that the engine cover is fully open when work is being carried out under it
Air cleaner - Cleaning - Change
Clean the air cleaner. Remove the main filter (3) by undoing the catches (1), and then the cover (2).
Check that the filter element is undamaged. Clean the element by banging it against your hand or other soft object.
Then blow clean with compressed air (max 5 bars) from the inside of the filter. Also clean the filter housing (5) and the cover (2).
Replace the filter cartridge after 5 cleanings or more frequently.
4812160801_G.pdf
Clean the hydraulic fluid cooler’s cooling flanges, ideally with compressed air. Blow the cooler clean by blowing air from the inside outwards.
Wear gloves and eye protectors when working with compressed air.
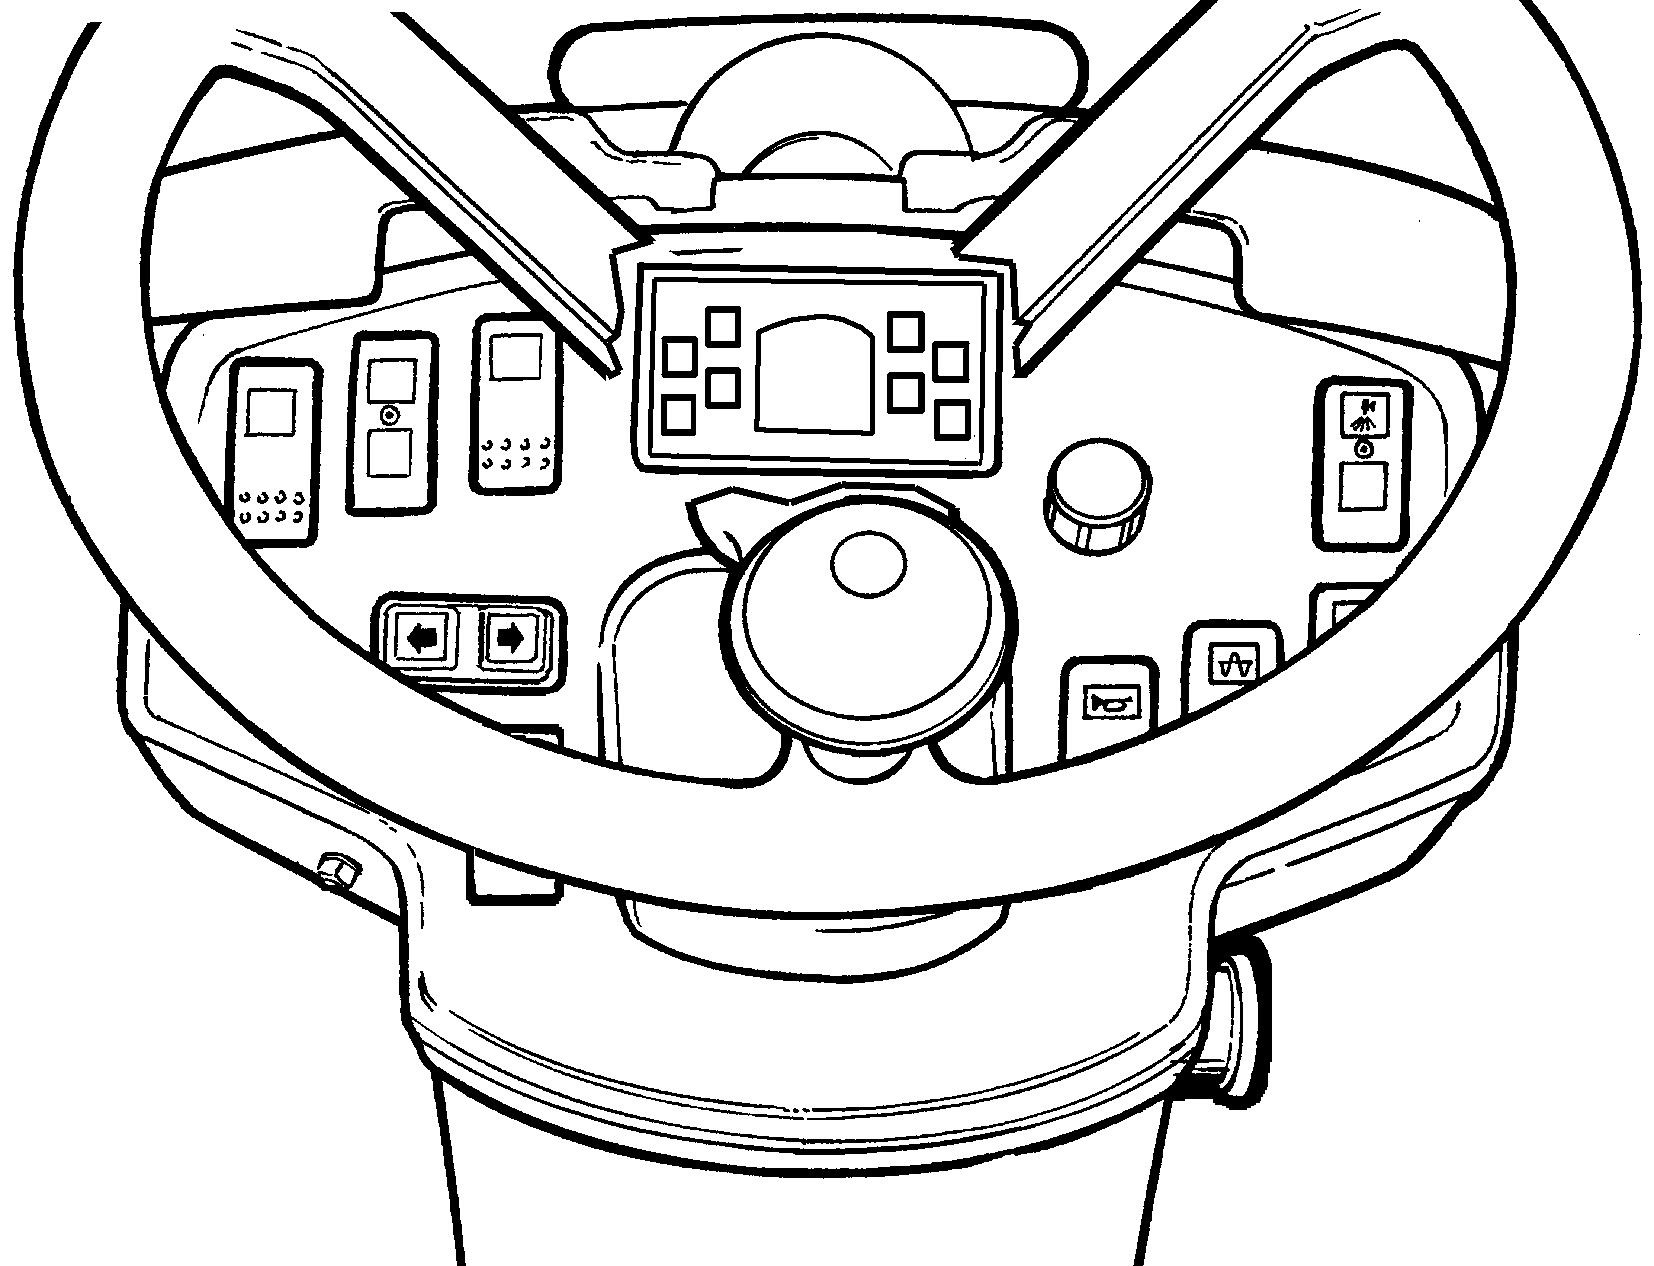
Forward/Reverse controls and joints - Check and lubrication
Remove the plate (1). Check the friction of the forward/reverse controls. The friction screws should be set so that the forward/reverse lever remains in the position in which it is set whilst the machine is operated. The control’s ‘0 position’ is determined by a screw which engages with the groove on the shaft between the controls.
If the control begins to be stiff after a longer period of use, lubricate the controls by the bearings and the control cable with a few drops of oil.
If the forward/reverse lever still is stiff after the above adjustments, lubricate the other end of the control cable with a few drops of oil. The cable is located on the top of the propulsion pump.
2020-10-27
Maintenance measures - 500 h
Maintenance measures - 500 h
Every 500/1500..... hours of operation (every six months)
Park the roller on a level surface. The engine must be switched off and the parking brake activated when checking or adjusting the roller, unless otherwise specified.
Ensure that there is good ventilation (air extraction) if the engine is run indoors. Risk of carbon monoxide poisoning.
Ensure that the engine cover is fully open when work is being carried out under it
Hydraulic fluid cooler - Cleaning
Clean the hydraulic fluid cooler’s cooling flanges, ideally with compressed air. Blow the cooler clean by blowing air from the inside outwards.
Wear gloves and eye protectors when working with compressed air.
4812160801_G.pdf
1
2
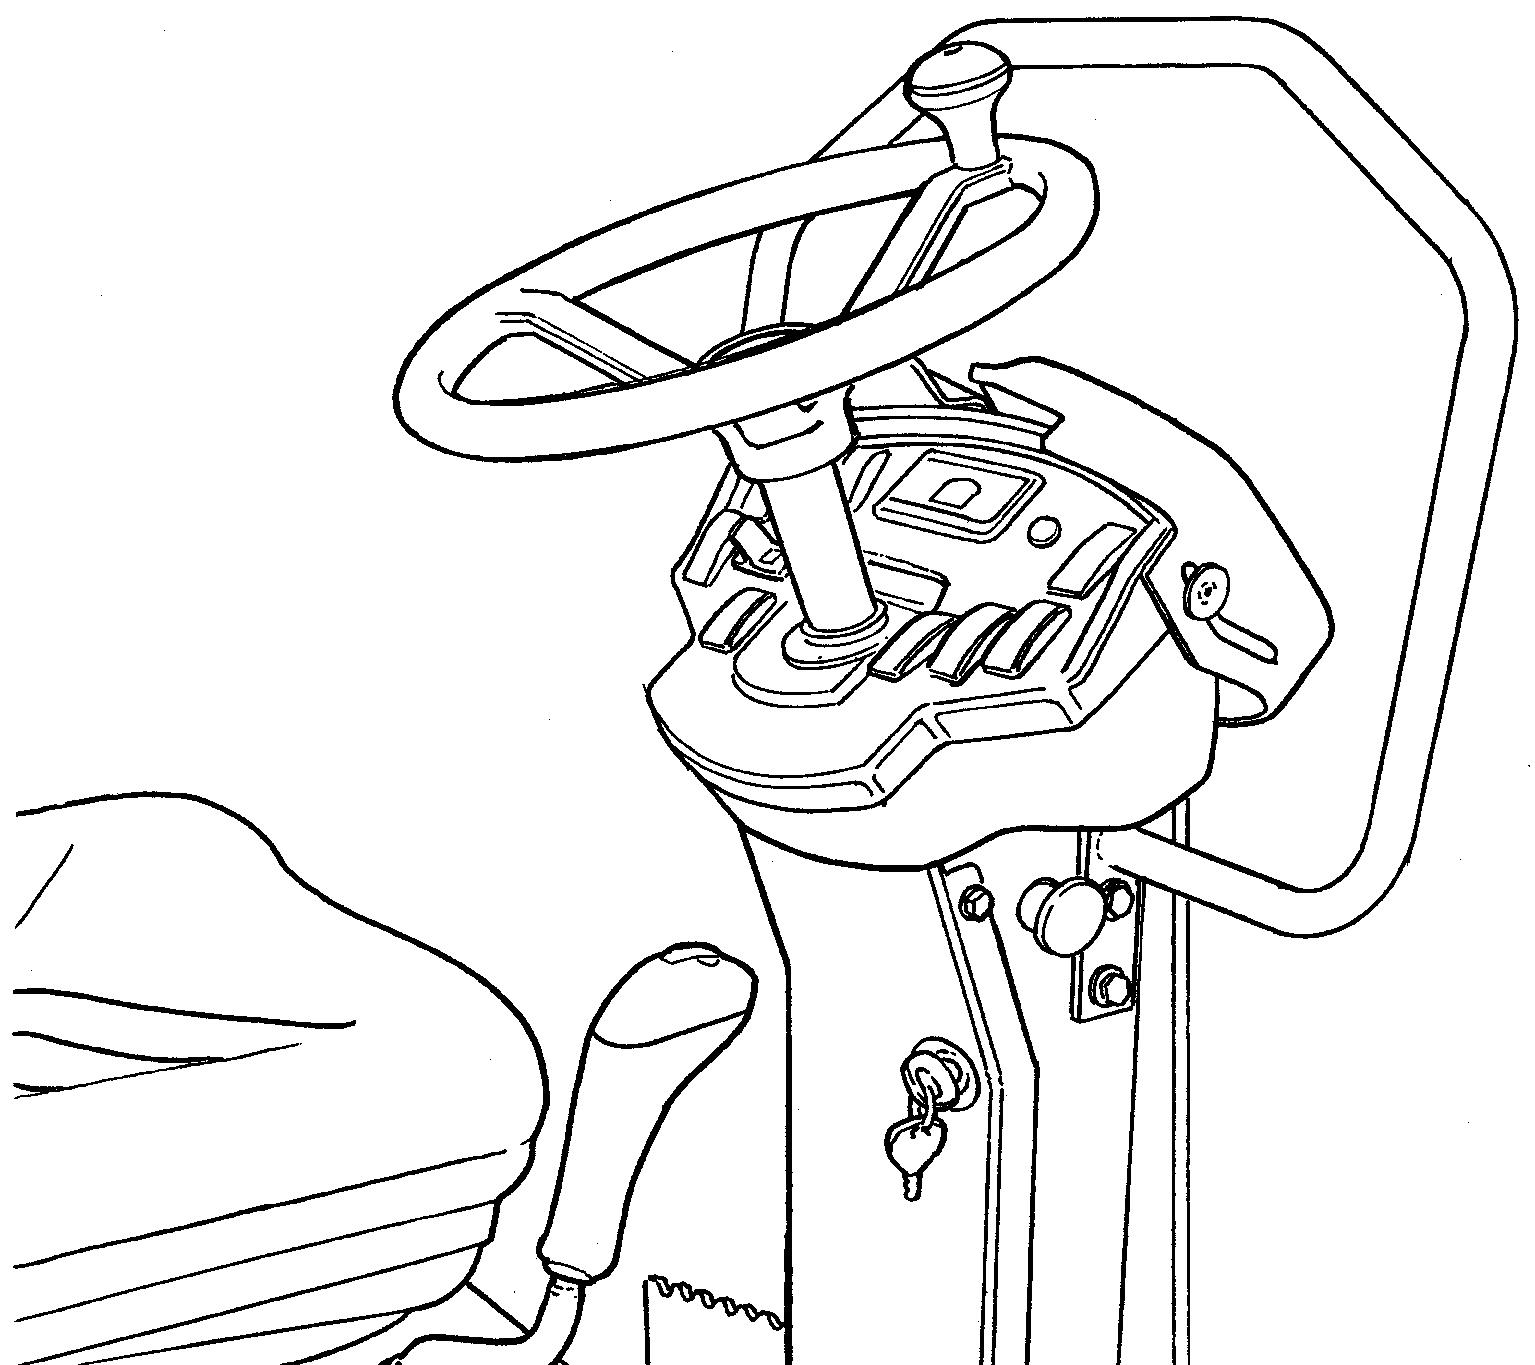
Forward/Reverse controls and joints - Check and lubrication
Remove the plate (1). Check the friction of the forward/reverse controls. The friction screws should be set so that the forward/reverse lever remains in the position in which it is set whilst the machine is operated. The control’s ‘0 position’ is determined by a screw which engages with the groove on the shaft between the controls.
If the control begins to be stiff after a longer period of use, lubricate the controls by the bearings and the control cable with a few drops of oil.
If the forward/reverse lever still is stiff after the above adjustments, lubricate the other end of the control cable with a few drops of oil. The cable is located on the top of the propulsion pump.
Clean the air cleaner. Remove the main filter (3) by undoing the catches (1), and then the cover (2).
Check that the filter element is undamaged. Clean the element by banging it against your hand or other soft object.
Then blow clean with compressed air (max 5 bars) from the inside of the filter. Also clean the filter housing (5) and the cover (2).
Replace the filter cartridge after 5 cleanings or more frequently.
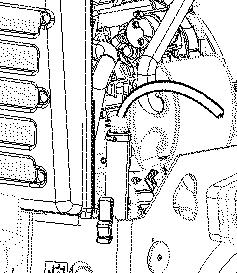
Engine oil and oil filter - Change
Run the engine until it is warm before draining the oil Switch off the engine and push in the emergency brake button.
Take great care when draining fluids and oils. Wear protective gloves and goggles.
Set a container which can hold at least 5 liters (1,3 gal) under the drain plug (2).
Undo the oil filler cap (3), and undo the plug (2) in the end of the drain hose (1). Let all the engine oil flow out. Deliver the drained oil to special waste handling.
Refer to the engine manual for detailed instructions when changing oil and filters.
Remove the oil filter (4) and fit a new filter. Collect any spillage.
Fit the drain plug (2) to the end of the hose.
Fill with fresh engine oil. See under the heading lubricants, for the correct oil grade. Fit the filler cap (3) and check that the oil level is correct using the dipstick.
Start the engine and allow it to idle for a few minutes. During this time, check around the oil filter for leaks.
Switch off the engine, wait for a minute or so and then check the oil level. Top up with more oil if necessary.
2020-10-27
Check
Check that all hoses/hose connectors are intact and tight. Fill with coolant as specified in the lubricants specification.
Take great care when opening the radiator cap while the engine is hot. Wear protective gloves and goggles. Also check the freezing point. Change the coolant every other year.
Drum - Checking the oil level
Park the roller on a level surface, and drive the roller slowly until the oil plug (1) is in the middle of the semicircle shaped notch in the drum suspension. Switch off the engine, disconnect the power and push in the emergency stop button.
Unscrew the plug and check that the oil level reaches the hole’s lower edge. If necessary, top off with fresh transmission fluid. See under the heading lubricants for correct fluid grade.
Clean the magnetic oil plug (1) from any metallic residue, and refit the plug.
Hydraulic reservoir - Check/venting
Unscrew and make sure that the reservoir cap is not blocked. Air must have unobstructed passage through the cap in both directions.
If blocked in either direction, clean with a little diesel oil and blow with compressed air until unblocked or replace the cap with a new one.
Wear eye protectors and gloves when working with compressed air.
Belt tension on the hydraulic vibration and steering pump drive belt - Check
If the hydraulic pump drive belt can be pressed in 5-6 mm between the pulleys with a force of 50 Nm, then the belt is correctly tensioned.
Do as follows to tension the belt:
- Undo the screws (1) and (2).
- Press over the hydraulic pump so that the belt tensions to the specified extent.
- Tighten screw (1) and then screw (2).
- Check that the belt still has the correct tension after tightening.
Replace the belt when necessary, or after 2000 h.
2020-10-27
Maintenance - 1000h
Performed after 1000 operating hours (each year) Park the roller on a level surface. The engine must be switched off and the parking brake activated when checking or adjusting the roller, unless otherwise specified.
Ensure that there is good ventilation (air extraction) if the engine is run indoors. Risk of carbon monoxide poisoning.
Ensure that the engine cover is fully open when work is being carried out under it
Hydraulic fluid cooler - Cleaning
Clean the hydraulic fluid cooler’s cooling flanges, ideally with compressed air. Blow the cooler clean by blowing air from the inside outwards.
Wear gloves and eye protectors when working with compressed air.
1
2
Forward/Reverse controls and joints - Check and lubrication
Remove the plate (1). Check the friction of the forward/reverse controls. The friction screws should be set so that the forward/reverse lever remains in the position in which it is set whilst the machine is operated. The control’s ‘0 position’ is determined by a screw which engages with the groove on the shaft between the controls.
If the control begins to be stiff after a longer period of use, lubricate the controls by the bearings and the control cable with a few drops of oil.
If the forward/reverse lever still is stiff after the above adjustments, lubricate the other end of the control cable with a few drops of oil. The cable is located on the top of the propulsion pump.
Clean the air cleaner. Remove the main filter (3) by undoing the catches (1), and then the cover (2).
Check that the filter element is undamaged. Clean the element by banging it against your hand or other soft object.
Then blow clean with compressed air (max 5 bars) from the inside of the filter. Also clean the filter housing (5) and the cover (2).
Replace the filter cartridge after 5 cleanings or more frequently.
Engine oil and oil filter - Change
Run the engine until it is warm before draining the oil Switch off the engine and push in the emergency brake button.
Take great care when draining fluids and oils. Wear protective gloves and goggles.
Set a container which can hold at least 5 liters (1,3 gal) under the drain plug (2).
Undo the oil filler cap (3), and undo the plug (2) in the end of the drain hose (1). Let all the engine oil flow out. Deliver the drained oil to special waste handling.
Refer to the engine manual for detailed instructions when changing oil and filters.
Remove the oil filter (4) and fit a new filter. Collect any spillage.
Fit the drain plug (2) to the end of the hose.
Fill with fresh engine oil. See under the heading lubricants, for the correct oil grade. Fit the filler cap (3) and check that the oil level is correct using the dipstick.
Start the engine and allow it to idle for a few minutes. During this time, check around the oil filter for leaks.
Switch off the engine, wait for a minute or so and then check the oil level. Top up with more oil if necessary.
Check that all hoses/hose connectors are intact and tight. Fill with coolant as specified in the lubricants specification.
Take great care when opening the radiator cap while the engine is hot. Wear protective gloves and goggles. Also check the freezing point. Change the coolant every other year.
Drum - Checking the oil level
Park the roller on a level surface, and drive the roller slowly until the oil plug (1) is in the middle of the semicircle shaped notch in the drum suspension. Switch off the engine, disconnect the power and push in the emergency stop button.
Unscrew the plug and check that the oil level reaches the hole’s lower edge. If necessary, top off with fresh transmission fluid. See under the heading lubricants for correct fluid grade.
Clean the magnetic oil plug (1) from any metallic residue, and refit the plug.
Hydraulic reservoir - Check/venting
Unscrew and make sure that the reservoir cap is not blocked. Air must have unobstructed passage through the cap in both directions.
If blocked in either direction, clean with a little diesel oil and blow with compressed air until unblocked or replace the cap with a new one.
Wear eye protectors and gloves when working with compressed air.
Check the hydraulic oil level in the sight glass (1) and top off where necessary. See under the heading ‘Every 10 hours of operation’.
2020-10-27
Hydraulic fluid filter - Change
Remove the filter (1) and deliver to special waste handling. This is a single-use filter and cannot be cleaned.
Thoroughly clean the filter holder sealing surface. Apply a thin coat of fresh hydraulic fluid to the rubber gasket on the new filter.
Screw the filter on by hand, firstly until the filter gasket makes contact with the filter base. Then rotate a further ½ turn.
Do not over-tighten. The seal can be damaged.
Start the engine and check that the filter does not leak.
Alternator belt - Checking tension - Change
Switch off the engine, disconnect the power and switch on the emergency brake button.
Undo the two hexagonal socket screws (1) and (2). Bend off the old alternator belt and replace with a new Press the alternator across so that the alternator belt is tensioned to the measurement given below.
When the alternator belt (3) can be pressed by hand in around 10 mm halfway between the pulleys, it is correctly tensioned.
Tighten first screw (1) and then screw (2). Check that the belt still has the correct tension after tightening.
4812160801_G.pdf
Belt tension on the hydraulic vibration and steering pump drive belt - Check
If the hydraulic pump drive belt can be pressed in 5-6 mm between the pulleys with a force of 50 Nm, then the belt is correctly tensioned.
Do as follows to tension the belt:
- Undo the screws (1) and (2).
- Press over the hydraulic pump so that the belt tensions to the specified extent.
- Tighten screw (1) and then screw (2).
- Check that the belt still has the correct tension after tightening.
Replace the belt when necessary, or after 2000 h.
2020-10-27
Maintenance - 2000h
Performed after 2000 operating hours (every two years)
Park the roller on a level surface. The engine must be switched off and the parking brake activated when checking or adjusting the roller, unless otherwise specified.
Ensure that there is good ventilation (air extraction) if the engine is run indoors. Risk of carbon monoxide poisoning.
Ensure that the engine cover is fully open when work is being carried out under it
Hydraulic fluid cooler - Cleaning
Clean the hydraulic fluid cooler’s cooling flanges, ideally with compressed air. Blow the cooler clean by blowing air from the inside outwards.
Wear gloves and eye protectors when working with compressed air.
4812160801_G.pdf
1
2
Forward/Reverse controls and joints - Check and lubrication
Remove the plate (1). Check the friction of the forward/reverse controls. The friction screws should be set so that the forward/reverse lever remains in the position in which it is set whilst the machine is operated. The control’s ‘0 position’ is determined by a screw which engages with the groove on the shaft between the controls.
If the control begins to be stiff after a longer period of use, lubricate the controls by the bearings and the control cable with a few drops of oil.
If the forward/reverse lever still is stiff after the above adjustments, lubricate the other end of the control cable with a few drops of oil. The cable is located on the top of the propulsion pump.
Clean the air cleaner. Remove the main filter (3) by undoing the catches (1), and then the cover (2).
Check that the filter element is undamaged. Clean the element by banging it against your hand or other soft object.
Then blow clean with compressed air (max 5 bars) from the inside of the filter. Also clean the filter housing (5) and the cover (2).
Replace the filter cartridge after 5 cleanings or more frequently.
Engine oil and oil filter - Change
Run the engine until it is warm before draining the oil Switch off the engine and push in the emergency brake button.
Take great care when draining fluids and oils. Wear protective gloves and goggles.
Set a container which can hold at least 5 liters (1,3 gal) under the drain plug (2).
Undo the oil filler cap (3), and undo the plug (2) in the end of the drain hose (1). Let all the engine oil flow out. Deliver the drained oil to special waste handling.
Refer to the engine manual for detailed instructions when changing oil and filters.
Remove the oil filter (4) and fit a new filter. Collect any spillage.
Fit the drain plug (2) to the end of the hose.
Fill with fresh engine oil. See under the heading lubricants, for the correct oil grade. Fit the filler cap (3) and check that the oil level is correct using the dipstick.
Start the engine and allow it to idle for a few minutes. During this time, check around the oil filter for leaks.
Switch off the engine, wait for a minute or so and then check the oil level. Top up with more oil if necessary.
Check that all hoses/hose connectors are intact and tight. Fill with coolant as specified in the lubricants specification.
Take great care when opening the radiator cap while the engine is hot. Wear protective gloves and goggles. Also check the freezing point. Change the coolant every other year.
Drum - Checking the oil level
Park the roller on a level surface, and drive the roller slowly until the oil plug (1) is in the middle of the semicircle shaped notch in the drum suspension. Switch off the engine, disconnect the power and push in the emergency stop button.
Unscrew the plug and check that the oil level reaches the hole’s lower edge. If necessary, top off with fresh transmission fluid. See under the heading lubricants for correct fluid grade.
Clean the magnetic oil plug (1) from any metallic residue, and refit the plug.
Hydraulic reservoir - Check/venting
Unscrew and make sure that the reservoir cap is not blocked. Air must have unobstructed passage through the cap in both directions.
If blocked in either direction, clean with a little diesel oil and blow with compressed air until unblocked or replace the cap with a new one.
Wear eye protectors and gloves when working with compressed air.
Check the hydraulic oil level in the sight glass (1) and top off where necessary. See under the heading ‘Every 10 hours of operation’.
2020-10-27
1
Hydraulic fluid filter - Change
Remove the filter (1) and deliver to special waste handling. This is a single-use filter and cannot be cleaned.
Thoroughly clean the filter holder sealing surface. Apply a thin coat of fresh hydraulic fluid to the rubber gasket on the new filter.
Screw the filter on by hand, firstly until the filter gasket makes contact with the filter base. Then rotate a further ½ turn.
Do not over-tighten. The seal can be damaged.
Start the engine and check that the filter does not leak.
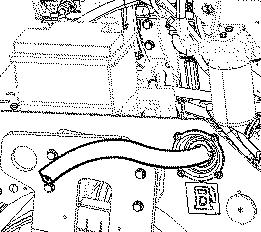
Hydraulic reservoir - fluid change
Use an external drainage pump when draining/emptying the hydraulic reservoir. Risk of burn injuries when draining hot oil. Wear protective gloves and goggles.
Unscrew the tank cap. Place the pump's suction hose in the filler/drain outlet in the hydraulic tank. Place the other hose in a container.
Use a receptacle that holds at least 15 liters (4 gal).
Start the pumpen so that it sucks out the fluid from the tank.
Check that the hose to the pump reaches the bottom of the hydraulic reservoir to ensure that as much of the fluid as possible is drained.
Collect the oil and deliver to special waste handling.
Fill up with the recommended hydraulic fluid to the correct level. Replace the cap on the tank and wipe clean.
Change the hydraulic fluid filter, see under heading 'Every 1000 hours of operation'.
Start the engine and operate the various hydraulic functions. Check the level in the reservoir and top off as required.
2020-10-27
Alternator belt - Checking tension - Change
Switch off the engine, disconnect the power and switch on the emergency brake button.
Undo the two hexagonal socket screws (1) and (2). Bend off the old alternator belt and replace with a new Press the alternator across so that the alternator belt is tensioned to the measurement given below.
When the alternator belt (3) can be pressed by hand in around 10 mm halfway between the pulleys, it is correctly tensioned.
Tighten first screw (1) and then screw (2). Check that the belt still has the correct tension after tightening.
Water tank - Cleaning
Drain the tank through the drainage tap (1) alongside the filter.
Clean the tanks with water and a suitable detergent for plastic surfaces.
Clean the water filter (2). Fill the tank with water and check that the sprinkler functions.
109
Drum - Changing the oil
Park the roller on a level surface, and drive the roller slowly until the plug (1) is in the bottom position. Switch off the engine, disconnect the power and push in the emergency stop button.
Place a receptacle that will hold at least 4 liters (1 gal) under the plug.
Remove the plug (1) and let the oil run out.
Deliver the drained oil to special waste handling.
Refit the plug. Top up with new oil in position 2. See 'Every 500 hours of operation' for filling oil.
Fuel tank - Cleaning
It is easiest to clean the tank when it is almost empty. Pump out any bottom sediment using an external pump.
To remove any additional bottom sediment, fill the tank with two liters of diesel, and then pump it out using the external pump.
Collect in a container which holds at least 28 liters and deliver to special waste handling.
Keep in mind fire risk when handling fuel.
The fuel tank is made of plastic (polyethylene) and is recyclable.
Steering joint - Check
Inspect the steering joint to detect any damage or cracks.
Check and tighten any loose bolts.
Check also for any stiffness and play in the steering joint. Rectify if necessary.
Belt tension on the hydraulic vibration and steering pump drive belt - Check
If the hydraulic pump drive belt can be pressed in 5-6 mm between the pulleys with a force of 50 Nm, then the belt is correctly tensioned.
Do as follows to tension the belt:
- Undo the screws (1) and (2).
- Press over the hydraulic pump so that the belt tensions to the specified extent.
- Tighten screw (1) and then screw (2).
- Check that the belt still has the correct tension after tightening.
Replace the belt when necessary, or after 2000 h.