4 minute read
Exhaust Conditioner


EXHAUST CONDITIONER
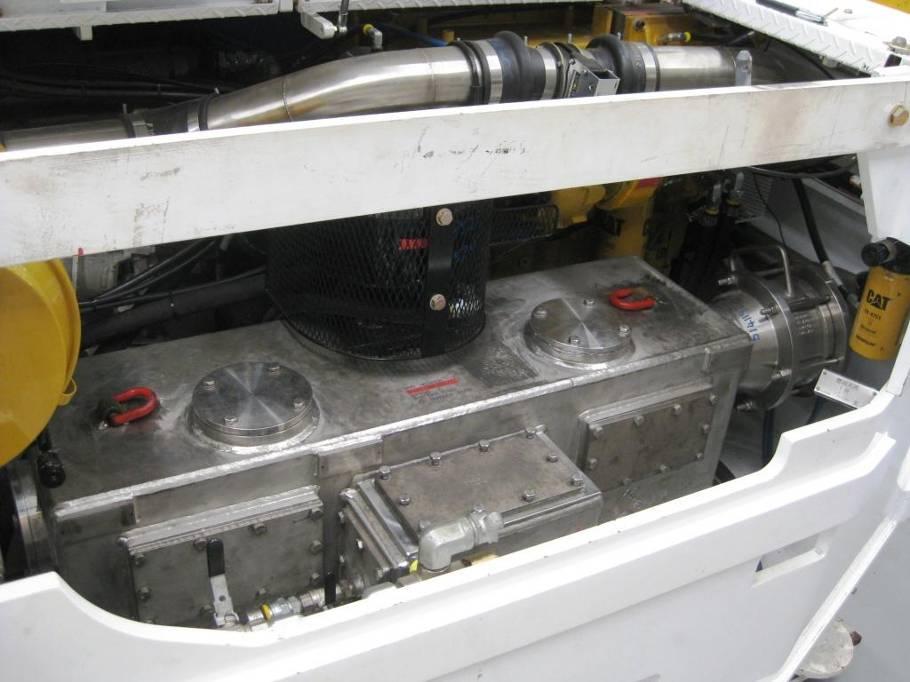
Exhaust gas is piped from the engine through a water-cooled manifold and downpipe/ purifier to the exhaust conditioner. The exhaust gas then passes through a water barrier which cools it below 70°C. The exhaust then passes through an outlet flame trap and is directed via the outlet pipe and is dispersed by the radiator fan. Make up water is taken directly via a two-way ball valve to the make up valve and into the low water shutdown chamber. This valve maintains a constant safe water level.
Two shutdown floats are positioned in the low water shutdown chamber in the exhaust conditioner, they will shutdown the engine if the water level in the exhaust conditioner goes below the set level.
Wear suitable eye protection, gloves, hearing protection and dust mask when performing maintenance tasks on the exhaust system as particulate matter may be harmful to the respiratory system.
Immediately wash any particulate matter from skin with warm, soapy water.
Ensure Mine Manager’s Rules are followed and the equipment is correctly isolated and tagged while maintenance tasks are being performed.
Allow sufficient time for the exhaust items to cool prior to performing maintenance tasks on the exhaust conditioner assembly.
EXHAUST CONDITIONER
Maintenance
Daily:
1. Flame path and connecting bolts inspection. 2. Exhaust conditioner low water shutdown testing.
To test the low water shutdown system:
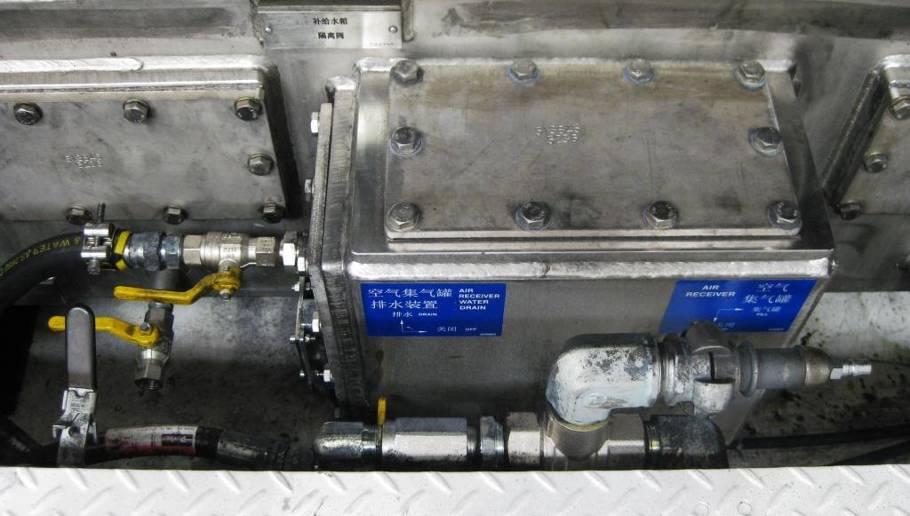
1. Ensure the machine is parked on level surface. 2. Ensure that the make up tank is full of water. 3. With the engine running close the float chamber inlet valve to the exhaust conditioner. 4. Open the low water shutdown test valve at the side of the exhaust conditioner. 5. Once the water drops below the prescribed level in the float chamber the shutdown float sensors will shutdown the machine. The engine should shutdown before water stops flowing out of the lower water shutdown test valve. 6. Enter the Operator’s compartment and view the SEMS display screen. The Scrubber Level 1 and Scrubber Level 2 will be red. 7. Reset the on/off toggle switch and try to start the machine, it should not start. 8. Close the lower water shutdown test valve and open the main float chamber inlet valve to allow the exhaust conditioner to fill again. 9. Once the exhaust conditioner has filled restart the machine as per the start up procedure in Section 7 in the Operator’s Manual.
If the engine fails to stop or the water stops flowing out the test valve before the engine stops report to service personnel. DO NOT use the machine until the fault is rectified and tested.
Test Point for Setting Floats Main Supply/Isolation Valve
WET BATH EXHAUST CONDITIONER
Maintenance
Every 2000 service hours:
1. Adjust the floats. 2. Clean exhaust conditioner.
To adjust the make up float:
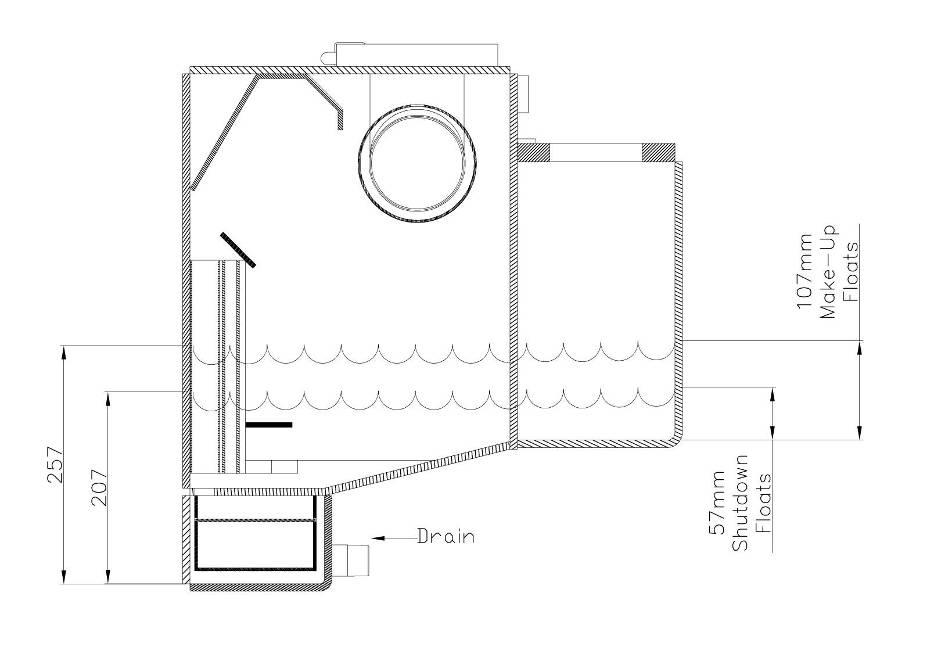
1. Remove the cover on top of the float chamber to allow access to the floats. 2. Open make up supply valve. 3. Allow the water to flow into the scrubber and float chamber. 4. Once the water has stopped measure the water against the prescribed level. 5. If the level is incorrect adjust the make up float to achieve a static water level in the float chamber of 107 mm.
The shutdown floats normally shutdown the engine, however it is important to test floats individually.
Should the system not shutdown at the correct level, the float assemblies can be removed and the floats adjusted to compensate for shutdown levels.
The water in the exhaust conditioner is very hot. Personal protective equipment and long sleeve clothing should be warn.
The engine should not be running while this test takes place.
To adjust the shutdown floats
1. Close the make up tank isolation valve. 2. Turn on the diesel control system display – The machine does not have to be running. 3. Open the test valve in the tank and allow the water to drain. 4. Watch the diesel control system display. 5. When the Scrubber Level 1 message comes on for low water close the test valve. 6. Record the water level in the float chamber. 7. Adjust the shutdown float level until a water level of 57 mm is achieved. 8. At this point ensure that water is flowing out of the drain tap when the Scrubber Level 2 message comes on – if not float adjustment is necessary. 9. Repeat for the second float.
EXHAUST CONDITIONER
To clean exhaust conditioner:
1. Ensure that the engine has had sufficient time to cool and is isolated and tagged as described in Section 1. 2. Shut off the main supply/isolation valve. 3. Locate the drain valve at the bottom of exhaust conditioner. 4. Open valve to release all water in conditioner. 5. Remove the two inspection covers on the side of conditioner and the float assembly. 6. Remove the exhaust flame trap and clean with detergent and clean water. 7. Clean all soot deposit build up from the exhaust conditioner components. 8. Clean and inspect gasket surfaces. 9. Reinstall the inspection covers, float assembly and exhaust flame trap with new gaskets. 10. Check and fill water in the make up tank and supply/isolation valve. 11. Check for leaks. 12. Start the engine and see if any leaking or shortage of water, fill if necessary.
Over time particulate matter (the small particles that are present in exhaust smoke) will build up on the exhaust conditioner components which may result in decreased efficiency. To minimise build up the exhaust conditioner should be cleaned every 2000 hours.