6 minute read
OPERATING PROCEDURE (CONT’D)


Warning
AVOID INJURY OR DEATH
•Keep the lift arms as low as possible.
•Do not travel or turn with the lift arms up.
•Turn on level ground.
•Go up and down slopes, not across them.
•Keep the heavy end of the machine uphill.
•Do not overload the machine.
Failure to obey warnings can cause the machine to tip or roll over and cause injury or death.
W-2018-1187
Raise the bucket only high enough to avoid obstructions on rough ground.
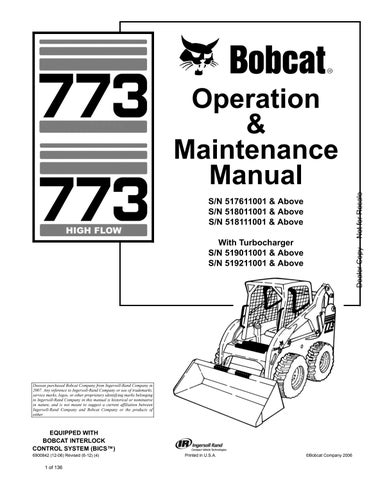
Filling the Bucket (Foot Pedals)
Push the top of the lift pedal (Item 1) [Figure OI-68] until the lift arms are all the way down.
Push the top of the tilt pedal (Item 2) [Figure OI-68] to put the cutting edge of the bucket on the ground.
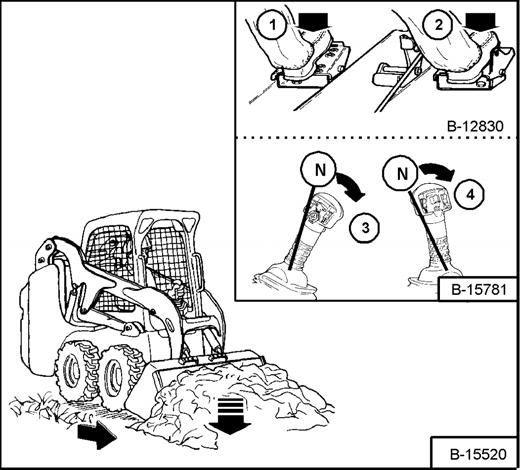
Drive slowly forward into the material. Push the bottom of the tilt pedal (Item 1) [Figure OI-69] to raise the front of the bucket.
Drive backward away from the material.
Warning
Load, unload and turn on flat level ground. Do not exceed Rated Operating Capacity (ROC) shown on sign (decal) in cab. Failure to obey warnings can cause the machine to tip or roll over and cause injury or death.
W-2056-0903
Filling the Bucket (Hand Controls)
Move the left hand lever, from neutral position (N), toward the operator (Item 3) [Figure OI-68] until the lift arms are all the way down.
Move the right hand lever, from neutral position (N) away from the operator (Item 4) [Figure OI-68] to put the cutting edge of the bucket on the ground.
Drive slowly forward into the material. Move the right hand lever, from neutral position (N), toward the operator (Item 2) [Figure OI-69] to raise the front of the bucket.
Drive backward away from the material.
OPERATING PROCEDURE (CONT’D)
Emptying the Bucket (Foot Pedals)
Figure OI-70
Push the bottom of the lift pedal (Item 1) [Figure OI-70] to raise the lift arms. Push the top of the tilt pedal while raising the lift arms to level the bucket or attachment and help prevent material from falling off the back of the bucket or attachment.


Drive forward slowly until the bucket is over the top of the truck box or bin.
Push the top of the tilt pedal (Item 2) [Figure OI-70] until the bucket is empty. If all the material is near the side of the truck or bin, push it to the other side with the bucket.
Emptying the Bucket (Hand Controls)
Move the left hand lever, from neutral position (N), away from the operator (Item 3) [Figure OI-70] to raise the lift arms. Move the right hand lever, from neutral position (N), away from the operator to level the bucket or attachment and help prevent material from falling off the back of the bucket or attachment.
Drive forward slowly until the bucket is over the top of the truck box or bin.
Move the right hand lever, from neutral position (N), away from the operator (Item 4) [Figure OI-70] until the bucket is empty. If all the material is near the side of the truck or bin, push it to the other side with the bucket.
Leveling the Ground (Using Lift Arms in Float Position) (Foot Pedals)
Figure OI-71
Push the top of the lift pedal (Item 1) [Figure OI-71] all the way forward until the pedal is in the locked position to put the lift arms in the float position.
Push the tilt pedal (Item 2) [Figure OI-71] to change the position of the cutting edge on the bucket.
With the bucket tilted farther forward, there is more force on the cutting edge and more loose material can be moved.
Drive backward to level loose material.
Push the bottom of the lift pedal to unlock from the float position.
OPERATING PROCEDURE (CONT’D)
Leveling the Ground (Using Lift Arms in Float Position) (Hand Controls)
Move the left hand lever, from neutral position (N), all the way down and in (Item 3) [Figure OI-71] until the hand lever is in the locked position to put the lift arms in the float position.
Later ACS & AHC Models With Float Button
- To Engage: Press and hold the Float Button (Item 6) [Figure OI-70] while the lever is in neutral. Move the lever to the lift arm down position (Item 5) [Figure OI-70], then release the button.
- To Disengage: Press Float Button again or move the lever to the lift arm up position (Item 4) [Figure OI-70]
Move the right hand lever, from neutral position (N), away from the operator (Item 4) [Figure OI-71], to change the position of the cutting edge on the bucket.
With the bucket tilted farther forward, there is more force on the cutting edge and more loose material can be moved.
Drive backward to level loose material.
Move the left hand lever upward to unlock from the float position.
Warning
Never dump over an obstruction, such as a post, that can enter the operator cab. The machine could tip forward and cause injury or death.
W-2057-0694
Important
Never drive forward when the hydraulic control for lift arms is in float position.
I-2005-1285
Digging Into the Ground (Foot Pedals)
Figure OI-72
Put the lift arms all the way down. Push the top of the tilt pedal (Item 1) [Figure OI-72] until the cutting edge of the bucket is on the ground.
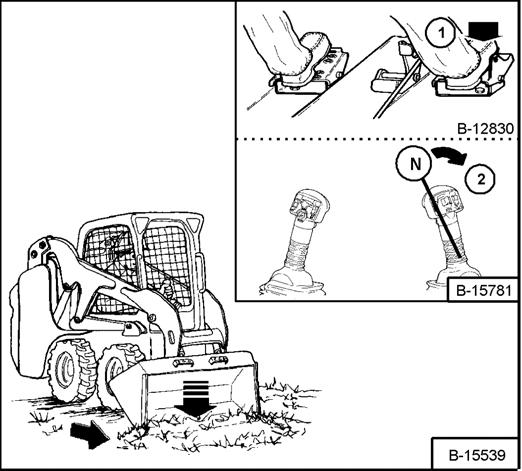
Drive forward slowly and continue to tilt the bucket down (Item 1) [Figure OI-72] until it enters the ground.
Push the bottom of the tilt pedal a small amount to increase traction and keep an even digging depth. Continue to drive forward until the bucket is full. When the ground is hard, raise and lower the cutting edge of the bucket with the tilt pedal while driving forward slowly.
OPERATING PROCEDURE (CONT’D)
Digging Into the Ground (Foot Pedals) (Cont’d)
Figure OI-73
Push the bottom of the tilt pedal (Item 1) [Figure OI-73] to tilt the bucket backward as far as it will go when the bucket is full.
Digging Into the Ground (Hand Controls)
Put the lift arms all the way down. Move the right hand lever away from the operator (Item 2) [Figure OI-72] until the cutting edge of the bucket is on the ground. Drive forward slowly and continue to tilt the bucket down until it enters the ground.


Move the right hand lever toward the operator a small amount to increase traction and keep an even digging depth. Continue to drive forward until the bucket is full. When the ground is hard, raise and lower the cutting edge of the bucket with the hand lever while driving forward slowly.
Move the right hand lever toward the operator (Item 2) [Figure OI-73] to tilt the bucket backwards as far as it will go when the bucket is full.
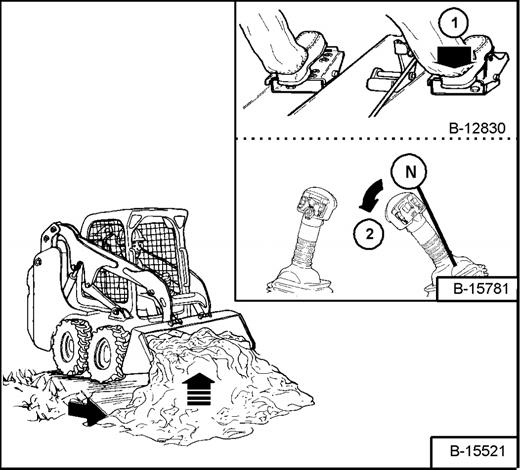
Backfilling (Foot Pedals)
Figure OI-74
Lower the lift arms (Item 1) [Figure OI-74] and put the cutting edge of the bucket on the ground. Drive forward to the edge of the hole to push the material into the hole.
Tilt the bucket forward (Item 2) [Figure OI-74] as soon as it is past the edge of the hole.
If necessary, raise the lift arms to empty the bucket.
Backfilling (Hand Controls)
Lower the lift arms (Item 3) [Figure OI-74] and put the cutting edge of the bucket on the ground. Drive forward to the edge of the hole to push the material into the hole.
Tilt the bucket forward (Item 4) [Figure OI-74] as soon as it is past the edge of the hole.
If necessary, raise the lift arms to empty the bucket.
Parking The Bobcat Loader
Stop the Bobcat Loader on level ground.
Figure OI-75
Warning
Before you leave the operator’s seat:
•Lower the lift arms, put the attachment flat on the ground.
•Stop the engine.
•Engage the parking brake.
•Raise seat bar
•(Foot Pedal Controls Only) Move pedals until both lock.
•(Advanced Control System (ACS) and Advanced Hand Controls (AHC) Move the hydraulic controls to the NEUTRAL POSITION to make sure that both lift and tilt functions are deactivated. The seat bar system must deactivate the lift and tilt control functions when the seat bar is up. Service the system if hand controls do not deactivate.
W-2398-1003
Engage the parking brake.
Lift the seat bar and make sure the lift and tilt functions are deactivated.
Lower the lift arms fully and put the attachment flat on the ground [Figure OI-75]
Pull the engine speed control lever all the way backward. Turn the key switch to STOP (Standard Panel) OR press the STOP Button (Deluxe Panel).
Unbuckle the seat belt.
Remove the key from the switch (Standard Panel) to prevent operation of the loader by unauthorized personnel.