4 minute read
TIRE MAINTENANCE


Wheel Nuts
See the Service Schedule Page 25 for the service interval to check the wheel nuts. The correct torque is 40–45 ft.–lbs. (54–61 Nm) torque [A].
Tire Rotation
Check the tires regularly for wear, damage and pressure.
Correct Tire Pressure:
Standard – 40 PSI (276 kPa)
Flotation – 35 PSI (242 kPa)
Rear tires usually wear faster than front tires. To keep tire wear even, move the front tires to the rear and rear tires to the front [A].
It is important to keep the same size tires on each side of the loader to avoid excessive wear. If different sizes are used, each tire will be turning at a different rate and cause excessive wear. The tread bars of all the tires must face the same direction.
Recommended tire pressure must be maintained to avoid excessive tire wear and loss of stability and handling capability. Check for the correct pressure before operating the loader.
Tire Inflation
When an engine is running in an enclosed area, fresh air must be added to avoid concentration of exhaust fumes. If the engine is stationary, vent the exhaust outside. Exhaust fumes contain odorless, invisible gases which can kill without warning.
W–2050–1285
Tires are to be repaired only by an authorized person using the proper procedures and safety equipment. Tires and rims must always be checked for correct size before mounting. Check rim and tire bead for damage.
The rim flange must be cleaned and free of rust. The tire bead and rim flange must be lubricated with a rubber lubricant before mounting the tire, avoid excess pressure which can rupture the tire and cause serious injury or death. During inflation of the tire, check the tire pressure frequently to avoid over–inflation.
FINAL DRIVE TRANSMISSION (CHAINCASE)
The chaincase contains the final drive sprockets and the chains. The chaincase is filled with the sametype of fluid as the hydraulic/hydrostatic system and is used for chain lubrication. (See Specifications, Page 61 for the correct fluid.)
To check the chaincase fluid level, use the following procedure:
Put the Bobcat loader on a level surface.
Lower the lift arms and stop the engine.
Remove the plug (Item 1) [A] at the front of the transmission housing.
Add fluid through the check plug hole until the fluid flows from the hole. Install and tighten the plug.
Lubrication Of The Bobcat Loader
Lubricate the Bobcat loader as specified in the Service Schedule Page 25 for the best performance of the loader.
Always use a good quality lithium based multi–purpose grease when you lubricate the loader. Apply the lubricant until the extra grease shows.

Lubricate the following locations on the loader [A]
Every 250 Hours:
Raise the operator cab. (See Page 26.)
Grease the pivot bearings [B] & [C]
Add oil or grease as needed to the steering control shaft (Item 1) [D].
BOB–TACH
Check the Bob–Tach for wear or damage.
Check for free movement of the wedges and the Bob–Tach lever.
Clean the Bob–Tach to keep the lever in good working condition.
Push the Bob–Tach lever (Item 1) [A] down into locked position.
The wedges (Item 1) [B] must extend far enough to engage into the holes in theattachment. Replace wedges that are bent or broken.

Pivot Pins
All pivot pins, lift arms, Bob–Tach and cylinders have a large pin held in position with lockbolts (Item 1)[A]. Check that the lockbolts are tightened to 8–10 ft.–lbs. (11–13 Nm) torque. Do Not over tighten.
Parking Brake Adjustment
Avoid Injury Or Death
Before you leave the operator’s seat:
• Lower the lift arms, put the attachment flat on the ground.
• Stop the engine.
• Engage the parking brake.
• Raise seat bar, move pedals until both lock.
W–2045–1086
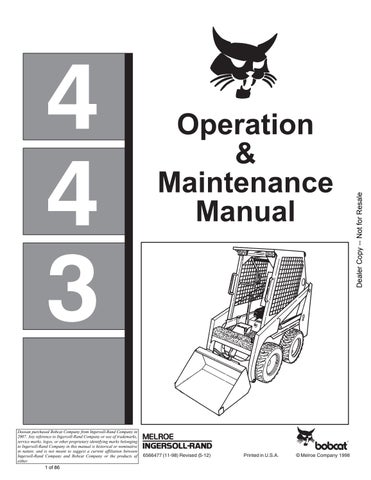
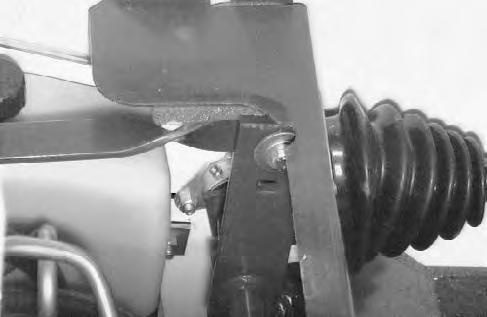
To adjust the parking brake, use the following procedure: There must be 1/4’’ (6,35 mm) of movement under the bottom edge (heel) of the brake pedal [B].
Turn the nut on the end of the linkage rod (Item 1) [B]. The brake pucks must make contact with the brake discs when the pedal is moved 1/4’’ (6,35 mm), but not fully engaged.
NOTE:If the parking brake is too loose after adjustment is done. The loader must be returned to the dealer for further adjustment.
Troubleshooting
The following information identifies loader problems which can occur most often. Service procedures for correcting loader porblems can be found in this manual on thepages indicated. Some procedures are marked D/S (Dealer Service) and must be performed only by qualified Bobcat service personnel.
Instructions are necessary before operating or servicing machine. Read Operation & Maintenance Manual, Handbook and signs (decals) on machine. Follow warnings and instructions in the manuals when making repairs, adjustments or servicing. Check for correct function after adjustments, repairs or service. Failure to follow instructions can cause injury or death. W–2003–0797
Engine won’t turn over with Battery has low charge. Charge battery and find cause36 starter. of discharge to the battery.
Cables loose or dirty. Clean and tighten the cables36 cables.
Damaged starter, solenoid orCheck the starting circuit. MakeD/S wiring. repairs as needed.
Engine turns with starter, but isWrong starting procedure.Use correct starting procedure.11 difficult to start. Pre–Heat rough.
Engine has little power or runsDefective injection system.Make repairs as needed.
Problem Correction
Engine has little power or runsEngine is hot. Check the coolant system. 34 rough (Cont’d)
Dirty air cleaner. Install new air cleaner. 30
Engine has lost compression.Recondition the engine. D/S
Engine overheats. Cooling system is dirty. Air flowClean cooling system. Check for34 restricted. debris on radiator.
Coolant level is low. Fill as needed. 34
Blower shrouding damaged orCheck shrounding. D/S missing.
Engine is overheated. Run at full throttle.
Troubleshooting The Hydraulic System
No Hydraulic action. No hydraulic oil. Check oil level, and add as 38 needed.
Pedals are disconnected.Check linkage, and repair asD/S needed.
Relief valve is damaged.Replace the relief valve. D/S
Hydraulic pump is damaged.Check pump and replace if D/S damaged.
Hydraulic oil is too thick. Let machine warm up. 3
Hydraulic action is rough.Hydraulic oil level is low. Check oil level, and add as 38 needed.
Hydraulic action is slow. Pedal is hitting floor or dirt underCheck adjustment. Remove dirtD/S pedal.
Cylinders leak internally. Check condition of cylinders andD/S make repairs.
Hydraulic pump is damaged or Check pump and replace asD/S worn. necessary.
Control valve is damaged.Check valve and replace as D/S necessary.
Hydraulic oil is too thick. Let machine warm up. 3
Hydraulic cylinders leaks oil.Damage to cylinder rods or seals.Make repair of cylinders. D/S
Troubleshooting The Drive System
brake will not hold.Out of adjustment.