1 minute read
Replacing the keyboard cover


Replacing the keyboard
v Tools you need to complete this task:
Flat-blade driver Scribe or non-marring tool - OR -
Phillips #0 screwdriver
Screws removed during this task:

To replace the keyboard: 1 Complete the steps in “Preparing the notebook” on page 55. 2 Remove the keyboard cover by following the steps in “Replacing the keyboard cover” on page 78. 3 Lift the center of the back edge of the keyboard slightly and, at the same time, press inward on the left side and then the right side. This will release the keyboard from the side tabs. 4 Slowly slide the keyboard toward the LCD panel to release the keyboard retaining tabs located on the front edge of the keyboard.
5 Carefully rotate the keyboard toward you so it lies keys-down on top of your notebook. Be careful not to damage the LCD panel.
2 black M2.5×5 (Keyboard cover)

6 Swing the keyboard connector clip upward, then slide the cable out of the clip. Be careful not to touch or damage any other components.
7 Place the new keyboard keys-down on your notebook with the space bar away from you. 8 Make sure the keyboard connector clip is fully lifted up, insert the cable into the connector, then swing the clip downward to lock the connector in place.
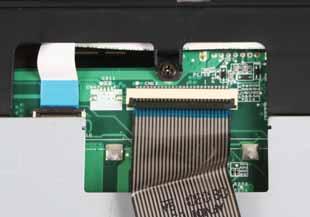
Clip
Important: The keyboard cable is correctly oriented if it is not twisted and the blue band is facing up. 9 Insert the tabs on the front edge of the keyboard into the slots under the palm rest.
You may need to press down on the keyboard keys along the front edge of the keyboard to seat the retaining tabs into their corresponding slots.
10 Gently press the keyboard down until it is flat all the way across. Be careful to not damage the LCDpanel. 11 Press down on the right side and left side of the keyboard to make sure that the side tabs secure the keyboard. 12 Replace the keyboard cover by following the steps in “Replacing the keyboard cover” on page 78.