1. Terminal block (continued)
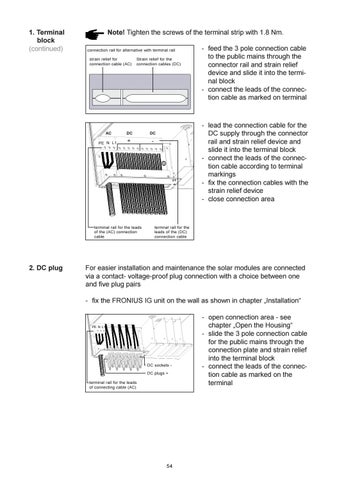
Note! Tighten the screws of the terminal strip with 1.8 Nm. connection rail for alternative with terminal rail strain relief for connection cable (AC)
Strain relief for the connection cables (DC)
AC
DC
DC
PE N L1
+
-
terminal rail for the leads of the (AC) connection cable
2. DC plug
- feed the 3 pole connection cable to the public mains through the connector rail and strain relief device and slide it into the terminal block - connect the leads of the connection cable as marked on terminal
- lead the connection cable for the DC supply through the connector rail and strain relief device and slide it into the terminal block - connect the leads of the connection cable according to terminal markings - fix the connection cables with the strain relief device - close connection area
termnal rail for the leads of the (DC) connection cable
For easier installation and maintenance the solar modules are connected via a contact- voltage-proof plug connection with a choice between one and five plug pairs - fix the FRONIUS IG unit on the wall as shown in chapter „Installation“
PE N L1
DC sockets DC plugs + terminal rail for the leads of connecting cable (AC)
54
- open connection area - see chapter „Open the Housing“ - slide the 3 pole connection cable for the public mains through the connection plate and strain relief into the terminal block - connect the leads of the connection cable as marked on the terminal