p56-58 Technical_Ad
3/25/08
1:47 PM
Page 58
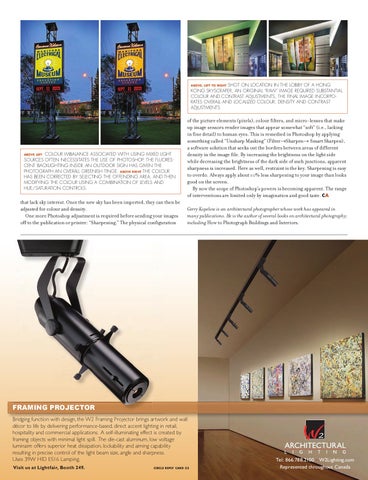
ABOVE, LEFT TO RIGHT SHOT ON LOCATION IN THE LOBBY OF A HONG KONG SKYSCRAPER, AN ORIGINAL “RAW” IMAGE REQUIRED SUBSTANTIAL COLOUR AND CONTRAST ADJUSTMENTS; THE FINAL IMAGE INCORPORATES OVERALL AND LOCALIZED COLOUR, DENSITY AND CONTRAST ADJUSTMENTS.
COLOUR IMBALANCE ASSOCIATED WITH USING MIXED LIGHT SOURCES OFTEN NECESSITATES THE USE OF PHOTOSHOP. THE FLUORESCENT BACKLIGHTING INSIDE AN OUTDOOR SIGN HAS GIVEN THE PHOTOGRAPH AN OVERALL GREENISH TINGE. ABOVE RIGHT THE COLOUR HAS BEEN CORRECTED BY SELECTING THE OFFENDING AREA, AND THEN MODIFYING THE COLOUR USING A COMBINATION OF LEVELS AND HUE/SATURATION CONTROLS. ABOVE LEFT
that lack sky interest. Once the new sky has been imported, they can then be adjusted for colour and density. One more Photoshop adjustment is required before sending your images off to the publication or printer: “Sharpening.” The physical configuration
of the picture elements (pixels), colour filters, and micro-lenses that make up image sensors render images that appear somewhat “soft” (i.e., lacking in fine detail) to human eyes. This is remedied in Photoshop by applying something called “Unsharp Masking” (Filter→Sharpen→ Smart Sharpen), a software solution that seeks out the borders between areas of different density in the image file. By increasing the brightness on the light side while decreasing the brightness of the dark side of such junctions, apparent sharpness is increased. Here as well, restraint is the key. Sharpening is easy to overdo. Always apply about 10% less sharpening to your image than looks good on the screen. By now the scope of Photoshop’s powers is becoming apparent. The range of interventions are limited only by imagination and good taste. CA Gerry Kopelow is an architectural photographer whose work has appeared in many publications. He is the author of several books on architectural photography, including How to Photograph Buildings and Interiors.
FRAMING PROJECTOR Bridging function with design, the W2 Framing Projector brings artwork and wall décor to life by delivering performance-based, direct accent lighting in retail, hospitality and commercial applications. A self-illuminating effect is created by framing objects with minimal light spill. The die-cast aluminum, low voltage luminaire offers superior heat dissipation, lockability and aiming capability resulting in precise control of the light beam size, angle and sharpness. Uses 39W HID ES16 Lamping. Visit us at Lightfair, Booth 249.
CIRCLE REPLY CARD 33
Tel: 866.788.2100 s W2Lighting.com Represented throughout Canada