User Manual
V1.2

The anywAiR app runs on its own dedicated wall mounted touch screen. This touch screen creates a hub for control of your anywAiR system.
The anywAiR touch screen runs Android, which means it can do so much more than just control your anywAiR system. You can also install apps such as News apps, Email & Weather from the Google Play Store.
Your anywAiR touch screen is permanently attached to your wall with the ability to pivot between portrait & landscape modes so that you can enjoy all your apps in the orientation that suits them best.
To exit the anywAiR app press the home button from any screen as pictured below.
If you are not familiar with the Android operating system, an abundance of information can be found on the internet.
AnywAiR allows you to control your anywAiR system from your Android or Apple devices, after installing the anywAiR app on your phone.


Smart Device control can be used inside your home via your personal Wi-Fi network or remotely using your phones internet connection.
To use this option you will first need to connect your wall mounted touch screen to your Home Wi-Fi:
1. Ensure you have an existing home Wi-Fi network & you have your password on hand.
TIP: Some routers have the network name (SSID) & password printed on a sticker located on the bottom of the router.
2. Go to your anywAiR wall mounted touch screen & press the home button.
5. Enter your home Wi-Fi network password then press CONNECT.
6. Once you have connected successfully (it may take up to 2 minutes) you will see the word Connected below your home Wi-Fi network name.


To start downloading items from the Apple App Store, you need to first have an Apple ID.
1. If you do not have an Apple ID and password, then create one and verify your email by checking and following the instructions in the email sent to you from Apple.
a. See instructions here: http://support.apple.com/kb/ht2534
b. Be sure to set your country to Australia or New Zealand.
2. Download the anywAiR app from the Apple App Store.
a. Using your iPhone/iPod/iPad - click on the App Store icon.
b. Click on the Search tab at the bottom bar of the screen.
c. Type “anywAiR” into the search box.
d. Press Search.
e. Select the anywAiR app (It’s free).
f. To install, press the blue GET button, and then INSTALL button.
g. Enter your Apple ID password (it’s case sensitive).
1. Do you have an older Apple device? anywAiR requires your device to be running on latest Apple iOS.
TIP: Check if you can update your iOS version.
2. If you are using an iPad, then in the App Store you will need to select the iPhone apps button at the top of the search results screen.
3. Check your Apple device is connected to your Home Wi-Fi. Need help? Please call 1300 364 484(AU) , 04 974 4719(NZ).
To start downloading items from the Google Play Store app, you need to add a Google Account to your Android phone.
Here’s how to add a Google Account to your device:
1. Open the “settings” app.
2. Under “Accounts”, press + Add account.
3. Select Google.
4. Choose Existing (if you want to add an account you already have) or New (if you wish to create a new one).
5. Follow the instructions to add or create your google account.
Download the anywAiR app from the Google Play Store.
1. Open the Google Play Store app on your device.
2. Search for “anywAiR”
3. Press the anywAiR app.
4. Press INSTALL (It’s free).
5. Press Accept after reviewing the app’s permissions
1. Do you have an older Android device? AnywAiR requires your device to be running on latest Android version.
TIP: Check if you can update your Android version.
2. Check your Android phone is connected to your Home Wi-Fi.
Need help? Please call 1300 364 484(AU) , 04 974 4719(NZ).
AnywAiR has the ability to control your system from your Android or Apple smart phone when you are outside of the home Wi-Fi network using your phones internet connection (e.g. 3G/4G).
Remote access requires a reliable Wi-Fi connection between your modem/router & your wall mounted anywAiR tablet.
Enable/Disable Remote Access Remote access is enabled by default; These instructions show how to disable or re-enable remote access.
HINT: Disabling remote access also clears all paired smartphones/tablets.


The below instructions assume your anywAiR wall mounted touch screen is connected to the home Wi-Fi network (as shown in section 2) & you can control your system from your mobile device when connected to your home Wi-Fi network.
1. Open the anywAiR app on your wall mounted touch screen and press the Setup button.
5. After pressing enable, it can take up to 5 minutes before remote access is fully enabled. While your system is enabling remote access you will notice the status code will change numerous times. Once remote access has been successfully enabled, the status will change to FG26. If after 5 minutes your status is not FG26, then please refer to troubleshooting guide below.
6. To pair your phone with your anywAiR touch screen open the anywAiR app on your Android or Apple device while it is connected to the same home Wi-Fi network as your anywAiR tablet then wait 10 seconds.
7. Congratulations, when your phone has an internet connection you will now be able to use the anywAiR app on your phone to control your anywAiR system.
The following info may be useful to the homeowners I.T. professional when troubleshooting remote access in the anywAiR app.
FG21 Remote Connection Error
FG22
The wall mounted touch screen is no longer connected to the internet
FG26
Remote Access should be working
Check the anywAiR wall mounted touch screen is connected to the home Wi-Fi network & has access to the internet.
Please try again in 10 minutes
Check the anywAiR wall mounted touch screen is connected to the home Wi-Fi network & has access to the internet.
Your remote access should be working, if you are having trouble try connecting your phone via WiFi for 10 seconds.
Welcome to your new anywAiR smart air conditioning system.
The information provided in this user manual will help you get the most out of your new air conditioning system.
Upon first power up, the system will take a few minutes to initialise. If you walk away from your screen it will go to sleep, to wake the screen simply double tap on a corner of the screen.
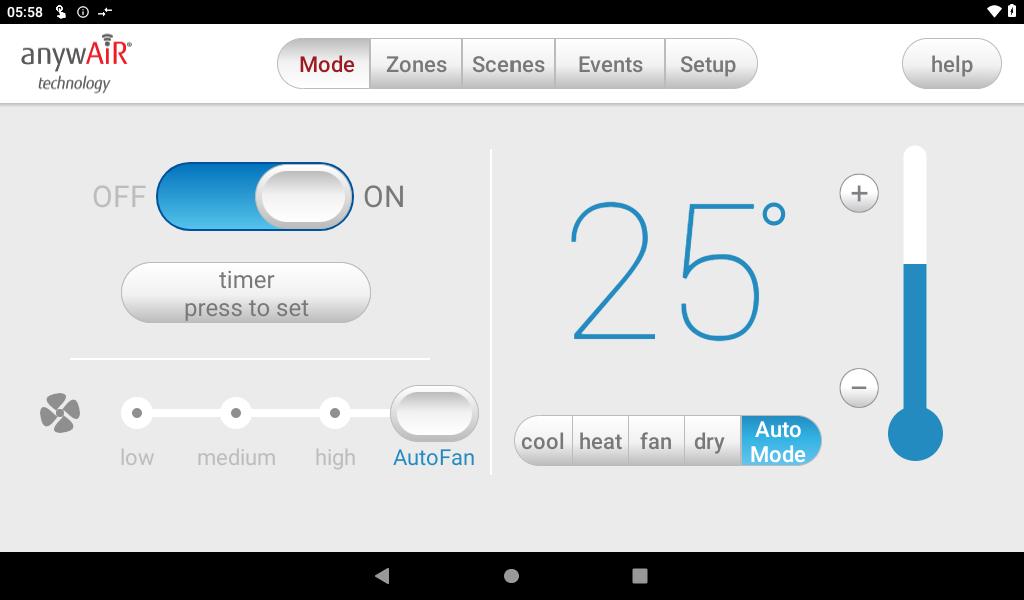
The Mode screen on the anywAiR app allows you to control your air conditioner’s operation.

From the Mode Screen you can perform the following actions:
• Turn the air con unit ON or OFF;
• Set an ON or OFF Timer;
• Select the unit FAN speed;
• Set the Target Temperature; and
Mode
• Select the air con unit mode.
Press this button to turn your Aircon ON or OFF.
Aircon On Aircon Off
OFF ON OFF ON
The color indicates the current air con mode
Target Temperature & Mode
Target temperature
Press to turn your air con ON or OFF.
Simple Timer
The Simple Timer can be used to turn the air con unit ON or OFF after a set time. The timer can be set up for 12hours in advance.
Pressing the Trash icon clears the timer.
NOTE: This is a once-only timer that does not repeat each day. More advanced timers can be setup in the Scene Page.
Target Temperature
The Target Temperature is the temperature you would like to achieve. Press the + orsymbols to adjust the number.
Fan Speed

The air con Fan speed can be set to LOW, MEDIUM or HIGH
AutoFan
Timer
Allows you to turn your Aircon ON or OFF at intervals of up to 12 hours. For example if your Aircon is ON you can set a timer for it to turn OFF hours.
Automatically adjusts the unit fan speed based on the current number of open zones.
HANDY TIP: Your air con unit is most efficient when maintaining a Target Temperature. Ensure your Target is set to a Temperature that is comfortable for you. Cooling or Heating a home past what is comfortable will result in higher energy usage.
Operation Mode Selector
• COOL – Cool your home in summer
• HEAT – Warm your home in winter
• FAN – Used to recirculate air within the home, a great energy efficient option if you just want to move some air around the home as only your fan in the roof space will run & not the outside unit.
• DRY - This can be used to reduce the humidity in your home.
• AUTOMODE - This will average all open zones and aim to maintain them at a temperature between the set minimum and maximum temperatures. The auto mode settings can be changed in the options page.

Pressing a Zone name toggles that Zone between ON and OFF. Zones are OFF when they are in grey colour.
There are four different types of zones in anywAiR depending on the option you selected when purchasing your system.
• Airflow Zone
If there is no sensor installed in a particular zone then it will be shown as an AIRFLOW zone. In this instance, you have the ability to control the air in 5% increments. Use the - / + buttons when a zone is turned ON, to adjust the amount of airflow going to that zone.
• Temperature Zone (Optional)
If your zone has a temperature sensor installed, anywAiR will allow you to choose your desired temperature with the - / + buttons. AnywAiR will aim to maintain the desired temperature in that zone by automatically controlling airflow when the air conditioner is running.
• Temperature Control (Optional)
If temperature control was enabled (by your dealer), different options on how your controller will automate zones will be available. The options are MainZone, MainTemp and AutoMode. This is explained on the following page.

This feature acts as an automated MainZone. MainTemp will automatically select the zone with the greatest difference between actual and desired temperatures. Once this zone is selected and the desired temperature is reached, a new room will be selected and the process repeated.

NOTE: This mode is only available when using cooling or heating.
There is no need to manually set a zone to be MainZone, MainTemp will select a zone as MainZone for you.
This feature can be particularly important when you have an unusually high requirement for air conditioning in a particular area at a given time. For example, a group of people are watching a movie in the theatre room. After two hours, they eat dinner together, MainZone will transfer automatically from the theatre room to the dining room when the dining room demands higher requirement. Different temperatures can be set on each zone and your zone controller will changing MainZone to achieve the desired temperature for each zone.
When this option is enabled, changing the temperature on the mode page and manually selecting a room as MainZone is disabled. The adjustment of temperature can only be done on the zone page.
MainZone
The MainZone feature makes that particular zone the “information centre” for the air conditioning unit. That means the set-point for that zone becomes the setpoint the air conditioning unit will work toward. The actual measured temperature of that zone is the temperature sent to the unit for it to make its decisions about whether to start/stop or speed up/down to effectively achieve the set-point while maintaining constant airflow in the MainZone.
The MainZone can be any temperature controlled zone that is currently turned ON, to change the MainZone to another zone press the thermometer symbol next to the zone you want to be the new MainZone
Press to set this zone as MainZone
Active MainZone
This feature can be particularly important when you have an unusually high requirement for air conditioning in a particular area. For example, a group of people watching a movie in Theatre room with all the electronic A/V equipment turned on will have a larger requirement for air conditioning than in other rooms in the house. Setting the Theatre as MainZone will ensure that the system continues running until the temperature set-point for that room is achieved.
Only one temperature controlled zone can be the MainZone at any one time, if you are using multiple zones it is recommended that you make the largest zone the MainZone and then move the MainZone around as you move around the home. MainZone is an optional feature available on systems where MainZone has been enabled; your dealer may enable this feature depending on the way you use your system and the layout of the installation.
NOTE: MainZone is not available for systems with no temperature sensors installed.
AutoMode
Taking MainTemp to the next level, AutoMode gives you full temperature automation. This feature not only selects a zone as MainZone, it will also change the mode of air conditioning between cooling and heating.
When enabled, it will average all open zones temperatures and aim to maintain them at a temperature between 20 and 24 degrees (default range). this temperature range can be adjusted in the options page.

Once this feature is enabled you can select it on the main mode page.
This feature is ideal for ever-changing weather conditions during the day and night. AutoMode will change the mode to heat on a chilly morning and to cool during a hot midday. Like in MainTemp, it will automatically assign the MainZone to an open zone that needs a higher requirement.
When this option is enabled, you will be unable to change the temperature and MainZone as AutoZone will take care of it.
Depending on your specific installation, your anywAiR system may be set up with electronic Constant Zones. These are pre-programmed by your installer to relieve excess air pressure in your air-conditioning system if insufficient zones are open.
Constant Zones are noted with a small letter C to the right of the zone name. Your installer may setup 1, 2 or 3 constant zones depending on the size of your system & the design of the home.

Example: Below you can see one constant zone is set, Living indicated by the C to the right of the zone name.
In this example this zone may open automatically to relieve excess air pressure when needed.
Scenes allows you to set your air con to a pre-determined setting at the touch of a button.

For example, you can set up a scene which turns the air con on from Monday to Friday at 7am, at 23 degrees in cooling mode during Summer.
You can add up to 12 custom scenes.
To create a new Custom Scene press the + button. This will bring up the Scene Editor page.
NOTE: The eye shows that an event(s) is included in the scene.
The Scene Editor screen as shown below is where you can configure any new or existing scenes.
A - Set the Scene Window
This window allows you to control what the scene will do to your aircon.
B - The air con status & temp, mode and fan speed can be change in this section.
C - The zone status & temp or airflow and the MainZone can be change in this section. The Fresh Air status can also be set to enabled or disabled.
D - Set the Time Window
This window allows you to set a time and choose which days for your scene to run and the time when the aircon will turn OFF. The schedule can be enabled and disabled.

All changes to a Scene must be saved by pressing the save button. You can run a scene from the editor screen by pressing the “Run Now” button. If the scene is no longer needed then it can be deleted by pressing the trash button.
Events give you the ability to set and run ‘tasks’ when specific events happen around your home during a designated period of time.
A - This shows what task is enabled on this event.
B - Press to edit an event.
C - This shows when an event is disabled.
D - Press the button to create an event.
E - This shows the time when an event is active.

F - Press the event name to display the summary of the event.

Events will monitor the selected event(s) during the selected time period and day(s). When the conditions are met, the selected task will run.

NOTE: Make sure your wall mounted touch screen is connected to your Wi-Fi. To start creating an event, set your post code first in options page.
These are the conditions that need to be met first before a task will trigger. This can trigger the task once per day. You can select multiple “single occurence” conditions and all of them must be met for the task to trigger.
These are the actions that will take place when a condition(s) is satisfied.
This is where you set the schedule when the event will be active.
D - Trash Button
Press to delete the event.
Press to save and exit the event.
This condition will be satisfied when the current temperature of your location is above or below the set temperature.
B - Zone Temperature
This condition will be satisfied when the zone temperature is above or below the set temperature.
C
This condition will be satisfied when the forecast in your location is “Sunny” or “Clear”.
This task will send a notifiaction to all paired phones. When you set a phone number in this task, a call button will appear after opening the notification. This will give you an option to have a quick call to the phone number set.
NOTE: The notification will not go to the number set. The number set will show in the notification on your paired phones.
This task will initiate your things to run according to the set configurations.
Press to edit the auto action.
NOTE: Don’t forget to press the [set] button to save the configuration made in the auto action.
The Setup Screen allows you to configure your anywAiR system. From this screen you can perform the following actions:
A - Rename zones;
B - Show the actual temperature in Zone page;
C - Advanced Information about your system;
D - Enable / Disable Remote Access.
This mode will automatically adjust your air conditioner from COOL to FAN mode overnight from 10pm to 6am, it will then adjust itself back. If you are looking to save energy during hot summer nights or help reduce noise for sleeping neighbours, this mode is for you.
This feature allows the zone controller to automatically adjust the unit fan speed based on the current number of open zones.
Select which temperature control option you want to use. For more information, click here.

Set the temperature range that AutoMode will maintain.
E
Set your suburb post code for Events to work properly.
F
This will let you see the actual room temperature measured by the sensor.


