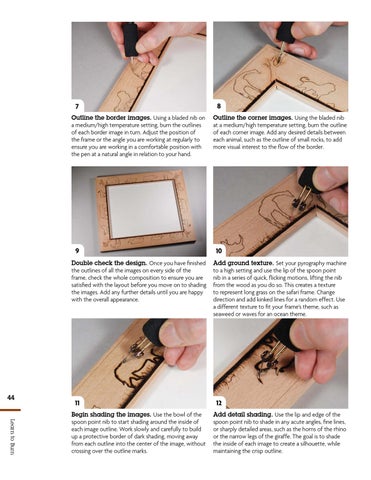
7 Outline the border images. Using a bladed nib on a medium/high temperature setting, burn the outlines of each border image in turn. Adjust the position of the frame or the angle you are working at regularly to ensure you are working in a comfortable position with the pen at a natural angle in relation to your hand.
9 Double check the design. Once you have finished the outlines of all the images on every side of the frame, check the whole composition to ensure you are satisfied with the layout before you move on to shading the images. Add any further details until you are happy with the overall appearance.
44
11
Learn to Burn
Begin shading the images. Use the bowl of the spoon point nib to start shading around the inside of each image outline. Work slowly and carefully to build up a protective border of dark shading, moving away from each outline into the center of the image, without crossing over the outline marks.
8 Outline the corner images. Using the bladed nib at a medium/high temperature setting, burn the outline of each corner image. Add any desired details between each animal, such as the outline of small rocks, to add more visual interest to the flow of the border.
10 Add ground texture. Set your pyrography machine to a high setting and use the lip of the spoon point nib in a series of quick, flicking motions, lifting the nib from the wood as you do so. This creates a texture to represent long grass on the safari frame. Change direction and add kinked lines for a random effect. Use a different texture to fit your frame’s theme, such as seaweed or waves for an ocean theme.
12 Add detail shading. Use the lip and edge of the spoon point nib to shade in any acute angles, fine lines, or sharply detailed areas, such as the horns of the rhino or the narrow legs of the giraffe. The goal is to shade the inside of each image to create a silhouette, while maintaining the crisp outline.