DIY Lure Making
Doc’s Shallow Minnow 70mm BRISBANE
LURE EYE
Greg Vinall support@makewoodenlures.com
My lure-making obsession has little to do with money and everything to do with adrenaline. If you reckon nailing a trophy fish on a ready-made store-bought lure is a rush, try it just once on a lure you designed and made with your own two hands! Over the next six months, I will be getting back to basics and sharing how to make six simple wooden lures. Lures that anyone can make and designed to catch bread-and-butter species like bream, lizards, small trevally, trout, bass and so
Twist eyes are ideal for beginners as they are simple to do. They are designed for small, light duty lures like the ones we’ll make in this series, but if you’re making lures that will be fished on lines greater than 6kg breaking strain you’d be better to use a through-wire and/or harder timber. on. There will be a total of two crankbaits, a stickbait, a lipless crankbait, a popper and a glider, which is enough to cover a wide range of fishing scenarios. The tools and materials list is super simple. In fact, it’s pretty much identical for all six lure designs. You probably already own the tools or you’ll get most of them pretty cheaply at Bunnings or online.
Template: 1 Square = 1cm
As for timber, I’m going to use balsa. Yes, it’s soft but it’s easy to work, readily available and gives lures an incredibly crisp action. Plus, balsa is pretty forgiving if your skills aren’t quite 100%. DOC’S SHALLOW MINNOW 70MM The 70mm shallow running minnow is a great pattern for slinging around rivers and estuaries. It’s great for casting up-current on the
flats during a run-out tide, then cranking it back just a little faster than the current – flathead city! Alternatively you can paint it brown trout colours and take it into the sweet water. PAINTING AND CLEAR COATING I use water-based airbrush acrylics to paint my lures, then I clear coat them with a super clear, tough PAINTING For a free beginners course on airbrushing lures, go to lure painting website: www.crazylureart.com/ free-lure-paintinglessons-register/
100% Scale
Tools Utility knife, battery drill and bits, hacksaw, pliers. Materials • 12.5mm x 75mm balsa plank • 120 and 240 grit sandpaper • 240 grit wet sanding paper • 1-1.2mm stainless steel wire • Epoxy adhesive (with syringes and mixing sticks) • Ball sinkers (size 00) • Methylated spirits • 1.5-2mm thick clear polycarbonate offcuts epoxy. If you have an airbrush or can borrow one, great! But if you’re just getting started then the odds are that you won’t have an airbrush – and that’s fine! Just get to work with artists brushes, aerosol packs or whatever you have. I know some awesome lure artists who use nothing but brushes and toothpicks to paint their wares.
One thing to watch out for though is that not all paints play nicely together. If you are going to use model makers enamels, for example, you’re best to use only these paints, not mix them with acrylics or urethanes. It can take some experimentation to figure out what works, so test paints on some scrap wood first and have fun figuring it out.
1
2
TOOLS AND MATERIALS
Cut out the template, place it on the balsa and trace the side profile onto the wood. Use an utility knife to slice between the outlines and separate the blanks.
3
4
Glue 120 grit sandpaper onto a square block of scrap wood. Then place the block on its edge on a flat surface like a table top. Keeping your lure blank flat on the table, rub it back and forth against the sandpaper to square up the sides. Use a curved sanding block to reach the concave part of the lure body.
Mark a centre line on the underside. Then lay your side profile template on the lure blank and mark the location of the tow point, hook hangers, weight and diving lip. Use the tip of a nail, small drill bit or pen to make a tiny dent for your drill bit to centre on.
5
6
7
Now make all the holes and slots for your hardware. These need to be properly aligned, or your lure will be off balance, which is why it’s best to do it while the wood is still square. I’m using a 1.5mm drill bit for the tow point and hook hangers and a 4mm one for the weight. These can be opened up with bigger drill bits later if necessary.
Use a thin bladed saw to cut the slot for the diving lip. A tenon saw is fine, but a band saw is better as it provides a more precise cut to ensure that this slot is as accurate as you can get it. A crooked diving lip can make it difficult or impossible to tune your lure when it’s finished. So if you’re not 100% happy, throw your lure out and start again – don’t waste time finishing it.
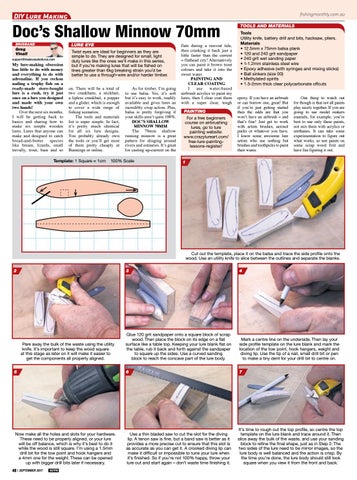
Pare away the bulk of the waste using the utility knife. It’s important to keep the wood square at this stage as later on it will make it easier to get the components all properly aligned.
48
SEPTEMBER 2017
It’s time to rough out the top profile, so centre the top template on the lure blank and trace around it. Then slice away the bulk of the waste, and use your sanding block to refine the final shape, just as in Step 2. The two sides of the lure need to be mirror images, so the lure body is well balanced and the action is crisp. By the time you’re done, the lure body should still look square when you view it from the front and back.