
12 minute read
Tech Tricks


DIY: How to build your own tackle centre
BRISBANE Gordon Macdonald
masterbaitertackle@hotmail.com Storing your tackle at home can often be difficult, especially if you do not have a shed or other designated area. When storing tackle inside in an office, rumpus room or other common area, partners often dictate that it needs to be presentable and tidy.
There are few functional options available commercially and while you might be able to find a decent rod holder, storing other tackle items can be more difficult.
You may have to store your items in several different areas of the house, which is annoying. While I have plenty of shed space to store my tackle, I know others are less fortunate, especially those who live in units, townhouses or rented properties where space is limited or there’s restrictions on what you can do.
In recent months I have noticed the huge amount of filing cabinets for sale or even offered for free collection when you browse selling sites like Gumtree and Facebook Marketplace.
With there being less hard copies of documents and general paperwork these days thanks to the electronic era, fewer people have need for these storage cabinets and they want to get rid of them. Both metal and timber filing cabinets and similar office shelving systems are now numerous and cheap. Luckily for us anglers, we can re-purpose these to store our tackle. How you set up these storage systems can vary depending on your tackle requirements, which is dictated by the type of fishing you do.
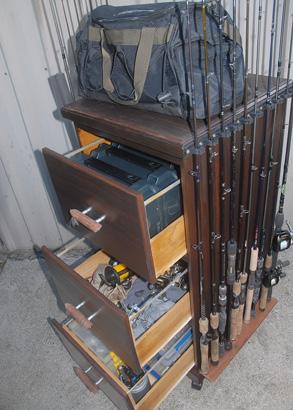
To show some of the options, I have created this tackle centre to demonstrate some storage ideas.


I scored this particular filing cabinet from Facebook marketplace for $20. I chose a timber filing cabinet as timber is easier to work with than metal, but both types can be made very functional with some additions. Even a decent set of shelves will suffice and will allow your tackle to be on display yet organised. Most add-ons can be attached with screws if you start with a timber cabinet but you will need nuts and bolts or pop rivets when pimping a metal cabinet.
2
The first thing I decided to do was add some 40mm caster wheels to the bottom so it can easily be moved around if necessary. Make sure you get some wheels with a decent load rating to avoid future problems of them breaking once you load the cabinet with tackle. You will need 4 casters, a drill, 16 timber screws and a drill bit a little thinner than the screws so you can pre-drill the holes (highly recommended in soft timber like pine to prevent splitting). The four casters cost $7.20 at Bunnings. For this filing cabinet I needed to add some timber chocks in two of the corners to screw the wheels onto. These were cut from a pine stud I had lying around. So long as you can get at least three corners of the caster base affixed then this should be sturdy enough.
3

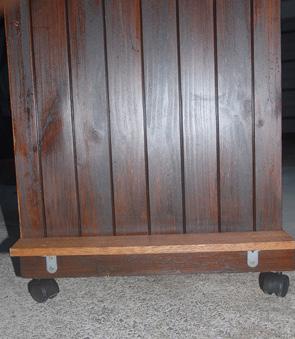
As the tackle centre was to be mobile, I needed to add a shelf close to the base on both sides so that the butts of the rods and other items were not sitting on the ground. Otherwise, the rods would have to all be taken off to shift the cabinet. Additionally, the rubber butts of some rods get soft with age and may mark the flooring over time. This mini shelf was made by cutting a piece of 69x15mm merbau (which was a close colour match for the cabinet that was already stained when I bought it). This 2.7m piece (I used less than half of it) cost $12.75 at Bunnings but you may even be able to find some suitable timber for free.
5
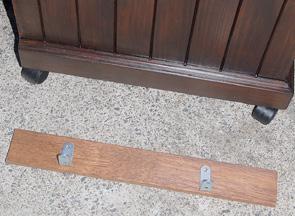
Using two 50x50mm right angle brackets ($3.50 at Bunnings) affix the shelf to the side (close to the base) with some timber screws. The screws should no be so long that they go too far through the cabinet or you may not be able to open the draws. Additionally you don’t want them to protrude out the top of the shelf. I used 12mm screws in this instance. I affixed a shelf on both sides of the cabinet near the base.
6
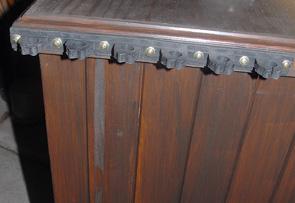
There are several options when it comes to racking to hold the rods near the top of the cabinet. Rubber rod racking comes in several styles for as little as $6 per strip. Berkley make some great twist lock, horizontal and vertical rod racks that come in several sizes. Which you use will depend on your requirements and the cabinet you are pimping. If you are storing heavier outfits with the reels attached to the rod, then you will need a better quality rack. I only wanted to store spare rods, mostly without reels so opted for the cheaper rubber racks with placements close together which maximised the number of rods.

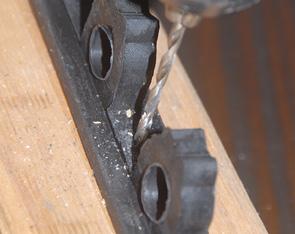
Pre-drill holes in the racking to accommodate the thickness of the screws. I opted to use 8g x 15mm button-head screws as they sit fairly flush. I pre-drilled holes between each rod placement so there was minimal movement in the rubber racking whilst removing rods.
8
Position the racking where you want it and mark the position of the hole on one end. Pre-drill this (with a drill bit just smaller than the 8g screw) and then insert the screw. Go from one side to the next completing each one before drilling the next. Do not over tighten the screws as you will flatten and distort the rubber. They just need to be firm enough to hold the rubber racking flat to the timber.
9
For storage of short rod tubes (common with fly and multi-piece rods) you can make a specific holder. This is made by using a hole saw (a simple one that attaches to a drill will work) to cut some circles out of the same merbau we used for the lower shelves. Make sure to leave enough space between holes to attach at least two of the same 50mm x 50mm brackets we used earlier. I used a 58mm hole saw that is large enough for most fly rod tubes, yabby pumps and other items like gaffs and landing nets.


10

Work out a decent height to mount this three-holed bracket and check by putting your items in and out to ensure it all works accordingly. Affix the 50x50mm bracket to the bottom of the shelf and the side of the cabinet (I used 10g x 12mm countersunk screws) after pre-drilling slightly smaller holes as previous.
11
I decided to bling up this cabinet by making a couple of new handles that looked like poppers. These are a simple design and similar to ones I made when I was young by cutting bits off the broom and rake handles. I turned these up on a lathe but you can easily make them using a basic sander. An easier option would be to use some hessian rope and driftwood or possibly make handles out of an old lure or two. New handles are not a necessity but they look better than the old handles and goes with the theme.
12
The poppers were set out from the drawers by using some 2cm pieces of aluminium tube which the screws passed through as shown. I pre-drilled small holes in the side of the popper so the tips of the screws entered the hardwood true and the handles would be parallel without the screw splitting the timber.
13

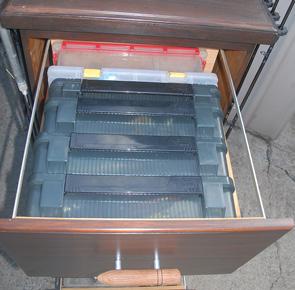
One attractive thing about filing cabinets for anglers is that the drawers are just wider than a 3700 sized stowaway box, which are very popular and supplied by virtually every major tackle company. They can be stored on their spine like this in the drawers and you can label them for easy identification of contents.
14
On one side of my cabinet I opted for all single rod storage (17 rods in fact). How many you can fit will depend on the size of the cabinet you acquire and whether your rods have reels affixed or not. What you store in each drawer can vary but all manner of small tackle trays, tools, reels and other tackle will fit in the ample drawers.
15
On the other size I had my rack to store a rod tube, yabby pump and multipiece rod as well as storage for another 7 single rods. You could even store a landing net, tag pole, gaff or similar items here. There is room on the top for a tackle bag, larger tackle box or other items. You may even want to put an angling trophy or your favourite framed fishing photo here. The options on how you set out your cabinet and what you store on and in it are up to you. This whole project cost me around $50 although I did have a few of the screws and ancillary items at hand already. There are plenty of filing cabinets being given away or very cheap and how much you adapt it is up to you. Hopefully this has given you some ideas to design your own tackle centre.
Tagged Lake Macquarie Bream Recaptured Nine Years Later!
About a decade ago, DPI Fisheries scientists were researching how recreational fish species were using the Lake Macquarie artificial reef.
Part of this work involved 39 yellowfin bream being implanted with internal acoustic tags and external T-bar tags. Some nine years later, keen angler Ken Peterson of the Teralba Lakesiders Fishing Club has recaptured one of these tagged bream. Ken found the small, battery-like transmitter when he cleaned the fish and reported his find to DPI.
Records indicated the fish was 23cm long when it was tagged on 14 May 2012 on the southern side of the Wangi Peninsula. At recapture an amazing nine years and eight days later, it had grown to 36cm. Based on its size, it’s possible that the bream was over 15 years old.
Long-term tag recaptures are comparatively rare for species such as yellowfin bream, and the fact that this fish was recaptured about 7.5km from the location where it was originally tagged almost 10 years ago, demonstrates the site fidelity that this species can display.
Maybe the great habitat in Lake Macquarie made it just too good to leave?

DPI’s RAP Program Needs Your Frames!

If you are taking snapper home this winter, why not drop the filleted frames to your local participating tackle store for DPI’s Research Angler Program?
Along with reds, there are seven other eligible RAP frame donation species, including mulloway, kingfish, dusky flathead, blue spot flathead, pearl perch, Spanish mackerel and spotted mackerel.
You don’t need to donate the frame from a trophy-sized specimen - any legal sized fish from the above list can provide researchers with valuable data. As well as playing a key role in a cool fisheries research program by donating your frames, you receive an entry into a monthly draw for each frame donated along with a certificate with your fish’s age. If you’re interested in learning more, including the location of your closest drop-off points, go to DPI’s website and search “NSW Research Angler drop off locations”.
Huge Jindabyne Brownie!

With trout fishing in rivers and streams now closed for the annual spawn run, the dedicated team at DPI’s Gaden Trout Hatchery are currently flat out collecting brown trout broodstock to ensure good supplies of fingerlings for stocking in rivers and dams next season.
A specially designed trap is used to collect the fish as they move up the Thredbo River from Lake Jindabyne. Most of the fish caught are average sized specimens but occasionally solid 50cm+ models are caught. Recently a massive 76cm female weighing in at 5.5kg (12.2lb in the old scale) is one of the biggest fish the hatchery has ever collected from the river.
As with the other trout collected as broodstock each season, the big old trophy brown was assessed for egg viability before being released back into the river.
Great to see such impressive specimens in the fishery!
Your Chance To Catch A Tiger Trout!

Recreational fishing opportunities at Lake Lyell, near Lithgow to the west of Sydney, have been given a major boost via the recent release of 1000 tiger trout, some more than 250mm in length!
Part of a three-year trial with nearby Thompsons Creek Dam which was stocked earlier this year to investigate the potential of tiger trout as new sportfish in NSW along with their abilities to compete with, and possibility eat redfin perch.
The juvenile tiger trout have been produced by the dedicated team at DPI’s Gaden Trout Hatchery at Jindabyne in southern NSW. The keen volunteers from the Wallerawang CAS have also lent a very appreciative hand during the stocking events.
If you’re fishing at Lake Lyell or Thompsons Creek Dam over the next few months and catch one of these spectacular-looking sportfish, please send the details (and hopefully a pic or two) to fisheries.info@dpi.nsw.gov. au.
You never know, you could be the first person ever to catch a tiger trout in NSW!


