
BOOTSTOURING
D ENG

Farbe black / grey Größen 25,5 / 26,5 … 29,5 Gewicht 980g

TSTRAVERSWS
Artikel Nr. U18222
TSTRAVERS
TRAVERS
Artikel Nr. U18922
Artikel Nr. U18722
Farbe dark blue / dark blue Größen 24,5 / 25,5 … 30,5 Gewicht 1080g
GRTRAVERS
LINE UP 22I23
CSTRAVERSYELLOW


Artikel Nr. U18422
CSTRAVERS

Farbe grey / black Größen 24,5 / 25,5 … 30,5 Gewicht 980g
Farbe black / black Größen 25,5 / 26,5 … 30,5 Gewicht 1190g
Artikel Nr. U18822
Farbe white / red Größen 23,5 / 24,5 … 27,5 Gewicht 1080g

Artikel Nr. U18622
Farbe white / blue Größen 23,5 / 24,5 … 27,5 Gewicht 1190g
GRTRAVERSWS

Farbe blue / blue Größen 25,5 / 26,5 … 30,5 Gewicht 1350g
Farbe black / black Größen 22,5 / 23,5 … 30,5 Gewicht 1380g
Artikel Nr. U18321
Farbe yellow / black Größen 22,5 / 23,5 … 30,5 Gewicht 1280g

Artikel Nr. U16521
Artikel Nr. U18021
PROTRANSALP

TSTRANSALP
Artikel Nr. U18121
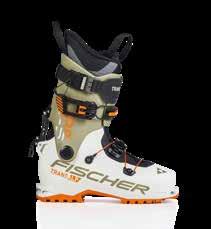
TRANSALP

TOURTRANSALP TOURTRANSALPWS
Farbe white / green Größen 22,5 / 23,5 … 27,5 Gewicht 1350g
Überprüfen Sie vor jeder Saison Ihre Ski/Bindung/Skischuh Kombination auf richtige Funktion und besuchen Sie im Zweifelsfall einen zugelassenen Fischer Fachhändler. Für jegliche Manipulationen an Ihrer Ausrüstung übernimmt Fischer Sports keine Haftung.
!
Skifahren ist ein anspruchsvoller und gefährlicher Sport, bei dem das Verletzungsrisiko nicht zuletzt durch das befahrene Gebiet sondern auch von den individuellen Fähigkeiten abhängig ist. Bei Systemen aus Skischuh, Ski und Bindung ist das rechtzeitige Lösen nicht immer garantiert.
sie daher die Bedienungsanleitung, eignen sie sich den Ge brauch des Produkts an und erlernen sie die richtige Technik für die Ausübung des Sports.
4 VorSICHERHEITSHINWEISEderVerwendungdesProduktslesen
• Trocknen sie den Innenschuh an einem warmen Ort, nicht aber in direktem Kontakt mit der Wärmequelle.
PFLEGEHINWEISE
DEUTSCH
5
• Halten Sie Ihre Schuhe und Bindungen sauber und eisfrei. Verschmutze/vereiste Schuhe oder Bindungen können zu unerwünschten Reibungen im System führen.
• Reinigen Sie Ihre Schuhe mit kaltem Wasser. Lösungs- und Bleichmittel können die Schuhe beschädigen.
• Lagern sie den Skischuh nicht über 55° C mit leicht geschlossenen Schnallen und an einem kühlen, dunklen und gut belüfteten Ort auf.
TRAVERS
TRANSALP Touring PIN bindings Binding marked „GW CA“ Binding marked „GW“ Binding marked „MN“ Hybrid bindings ✓ ✓ ✓ ✓
6 BINDUNGSKOMPATIBLITÄT
EINSTIEG / AUFSTIEG
PRODUKTANLEITUNG TRAVERS
Um bestmöglich in ihren Travers Schuh einsteigen zu können, wird zuerst das Boa® Fit System entriegelt und der Strap-Verschluss ganzheitlich geöffnet.

7 GEBRAUCHSANWEISUNG TRAVERS

GEBRAUCHSANWEISUNGfreizugeben. TRAVERS
8
Danach kippen Sie die bewegliche Manschette zurück, um den oberen Teil des Innenschuhes


9
Drücken Sie die Zunge des Innenschuhes nach vor. Ziehen Sie an der hinteren Zugschlaufe des Innenschuhes und steigen Sie in den Travers Schuh ein.

WICHTIG: Ziehen Sie Ihre Gamasche nach oben und befestigen diese mittels Kletterverschluss amGEBRAUCHSANWEISUNGInnenschuh.

TRAVERS
10
11
Nun die Manschette mit beiden Händen wieder nach vordrücken und den Strap in die gewünschte Abfahrtsverschlusshärte einstellen. Nachdem der Manschettenverschluss eingestellt wurde, öffnen Sie erneut die Schnalle um maximale Bewegungsfreiheit im Aufstieg zu gewährleisten.


GEBRAUCHSANWEISUNGverschaffen. TRAVERS
Falls Sie noch immer zu viel Druck im Unterschenkel verspüren, können Sie sich mit dem „Slider Buckle“ zusätzlichen Platz

12

Am Gipfel angekommen, schließen Sie die Schnalle ihres Straps. ABFAHRT / AUSSTIEG
13

TRAVERS
14
Passen Sie mit ihrem Boa® Fit System Ihren Schuh an ihren Rist an. WICHTIG: Drücken Sie die Gamaschen Zunge nach unten, um diese nicht bei der Abfahrt zu beschädigen und bessere Kraftübertragung zu GEBRAUCHSANWEISUNGerlangen!


15
Anschließend verschließen Sie Ihren „Hike/Ride“ Hebel. Sie können nun abfahren.


16
AUSSTIEG: Entriegeln Sie das Boa® Fit System und öffnen Sie Ihren Strap. TRAVERS

GEBRAUCHSANWEISUNG

17
Bringen Sie Ihre Manschette erneut in rückwertige Stellung, um Ihren Innenschuh freizugeben.

Schlüpfen Sie mit Gefühl aus ihrem Travers Schuh und unterstützen Sie diesen Vorgang durch das Halten ihrer GEBRAUCHSANWEISUNGManschette.


18
TRAVERS
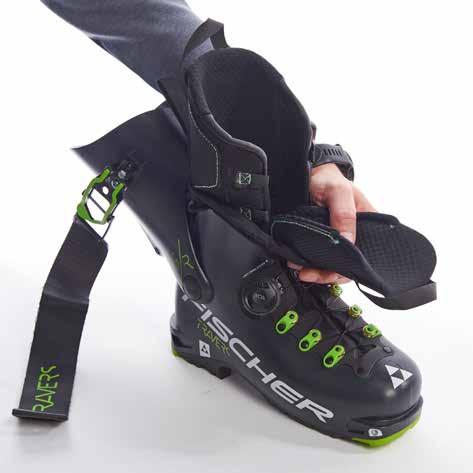
Um bestmöglich in ihren Transalp Schuh einsteigen zu können, öffnen sie das „Power Buckle System“ (Schalenschnalle) und alle weiteren Schnallen und Straps. Der „Quick Fix“ Verschlussmecha nismus kann durch einfaches Aushaken des Systems leicht geöffnet werden (rechte Abbildung).


PRODUKTANLEITUNG TRANSALP
GEBRAUCHSANWEISUNG TRANSALP
19
EINSTIEG / AUFSTIEG
20
Danach kippen Sie die bewegliche Manschette zurück, um den oberen Teil des Innenschuhes freizugeben. Ziehen Sie die flexible Gamasche nach unten, um den Einstieg zu erleichtern.

GEBRAUCHSANWEISUNG TRANSALP

21
Drücken Sie die Zunge des Innenschuhes nach vor. Ziehen Sie an der hinteren Zugschlaufe des Innenschuhes und steigen Sie in den Transalp Schuh ein.


GEBRAUCHSANWEISUNG TRANSALP
Ziehen Sie die Zunge des Innenschuhes nach oben, um Falten zu vermeiden. WICHTIG: Ziehen Sie Ihre Gamasche nach oben und befestigen diese mittels Kletterverschluss am Innenschuh.

22

Nun die Manschette mit beiden Händen wieder nach vordrücken, die Manschettenschnalle in einer lockeren Position einrasten lassen und den Strap in der gewünschten Aufstiegsverschlusshärte verzurren. Sie können nun aufsteigen.

23

24
ABFAHRT / AUSSTIEG
GEBRAUCHSANWEISUNG TRANSALP
Am Gipfel angekommen, irritieren Sie die Manschetten Schnalle auf ihre gewünschten Abfahrtsverschlusshärte, zusätzlich können Sie den Strap fester verzurren.


Schließen Sie den Ski-Walk Mechanismus. Passen Sie mit ihrem „Power Buckle System“ Ihren Schuh an ihren Rist an. WICHTIG: Drücken Sie die Gamaschen Zunge nach unten, um diese nicht bei der Abfahrt zu beschädigen und bessere Kraftübertragung zu erlangen! Sie können nun abfahren.

25

26
Ausstieg: Öffnen sie erneut alle Schnallen und Straps und kippen sie die bewegliche Manschette

GEBRAUCHSANWEISUNGzurück. TRANSALP

27
Ziehen Sie die Gamasche erneut nach unten. Schlüpfen Sie mit Gefühl aus ihrem Transalp Schuh und unterstützen Sie diesen Vorgang durch das Halten ihrer Manschette.


28 HINWEISE•
!
Besuchen Sie uns auch im Internet unter:
Youtube Fischer: youtube.com/fischersports
Fischer Twitter: twitter.com/fischersports
• Alle Schrauben nach dem Formprozess nachziehen.
Fischer Facebook: facebook.com/fischernordicfacebook.com/fischeralpine
Skischuhe nicht über 55° Celsius lagern.
Fischer Website: fischersports.com/vacuum
• Heiztaschen: Bitte nur den Innenschuh trocknen, nicht die Außenschale.
BOOTSTOURING
ENG
Color grey / black 24,5 / 25,5 … 30,5 980g
CSTRAVERS TSTRAVERS
Article no. U18922
24,5
Article no. U18622
Article no. U18222
Weight
Color dark blue / dark blue Sizes / 25,5 … 30,5 1080g
Article no. U18422
Weight
Sizes
Color white / blue Sizes 23,5 / 24,5 … 27,5 1190g
TSTRAVERSWS
GRTRAVERSWS
GRTRAVERS
Sizes
Weight
Weight
CSTRAVERSYELLOW
Color black / grey Sizes / 26,5 … 29,5 980g
Weight
LINE UP 22I23 TRAVERS
Article no. U18722
Color black / black 25,5 / 26,5 … 30,5 1190g
Article no. U18822
25,5
Weight
Sizes 23,5 / 24,5 … 27,5 1080g
Color white / red
Color blue / blue Sizes 25,5 / 26,5 … 30,5 Weight 1350g
Color yellow / black Sizes 22,5 / 23,5 … 30,5 Weight 1280g
TOURTRANSALP
Article no. U18021
TRANSALP
Article no. U18321
PROTRANSALP
TOURTRANSALPWS
Color black / black Sizes 22,5 / 23,5 … 30,5 Weight 1380g
Article no. U18121
TSTRANSALP
Article no. U16521
Color white / green Sizes 22,5 / 23,5 … 27,5 Weight 1350g
32
!
NOTES ON SAFETY
Before each season, check your ski/binding/ski boot combination for proper function and, if in doubt, visit an authorized Fischer dealer. Fischer Sports accepts no liability for any tampering with your equipment.
Skiing is a challenging and dangerous sport in which the risk of injury is influenced not only by the terrain you are in but also by individual abilities. With systems consisting of ski boot, ski and binding, release at the right time is not always guaranteed.
For this reason, read the instructions before you use the product, familiarise yourself with how it is used and learn the proper technique required for the sport.
ENGLISH
• Keep your boots and bindings clean. Dirty boots (walking plates) or bindings may lead to undesired friction in the system.
CARE INSTRUCTIONS
33
• Clean your boots with cold water. Solvents and bleaches can damage the boots.
• Store your boots with the buckles slightly closed in a cool, dark and well aired place at a temperature not above 55° C.
• Dry the boot liner in a warm place end ensure it is not directly touching the source of heat.
TRAVERS
TRANSALP Touring PIN bindings Binding marked „GW CA“ Binding marked „GW“ Binding marked „MN“ Hybrid bindings ✓ ✓ ✓ ✓
34 BINDING COMPATIBILITY
INSTRUCTIONS TRAVERS
To best enter their Travers boot, first unlock the Boa® fit system and open the strap closure completely.
35
PRODUCT INSTRUCTIONS TRAVERS
ENTRY / ASCENT
36
Then tilt the cuff back to release the upper part of the liner.
INSTRUCTIONS TRAVERS
37
Push the tongue of the liner forward. Pull the rear pull loop of the liner and step into the Travers shoe.
INSTRUCTIONS TRAVERS
38
IMPORTANT: Pull your gaiter up and attach it to the liner using the Velcro closure.
39
Now push the cuff forward again with both hands and adjust the strap to the desired desired downhill closure tension. After the cuff closure has been adjusted, open the buckle again to ensure maximum freedom of movement on the ascent.
If you still feel too much pressure in your lower leg, you can get extra room with the „Slider Buckle“.
INSTRUCTIONS TRAVERS
40
DESCENT / EXIT
Once at the top, close the buckle of the strap.
41
42
INSTRUCTIONS TRAVERS
Adjust your shell to your instep with the Boa® fit system. IMPORTANT: Press the gaiter tongue down as not to damage it on the descent and to obtain better power transmission!
Then lock your „Hike/Ride“ lever. You can now ski down.
43
EXIT: Unlock the Boa® fit system and open the strap.
INSTRUCTIONS TRAVERS
44
Rotate the cuff to the backward position to release the liner.
45
46
Slip out of your Travers boot with care and assist this process by holding the cuff.
INSTRUCTIONS TRAVERS
INSTRUCTIONS TRANSALP
ENTRY / ASCENT
47
PRODUCT INSTRUCTIONS TRANSALP
In order to get into your Transalp boot in the best possible way, first open the „Power Buckle System“ (shell buckle) and all other buckles and straps. The „Quick Fix“ closure mechanism can be easily opened by simply unhooking the clasp (right figure)

Then tilt the cuff back to reveal the upper part of the liner. Roll the flexible gaiter down to facilitate
48
INSTRUCTIONSentry. TRANSALP
Push the tongue of the liner forward. Pull the rear pull loop of the liner and step into the Transalp boot.
49
50
INSTRUCTIONS TRANSALP
Pull up on the tongue of the liner to avoid wrinkles. IMPORTANT: Pull the gaiter up and secure it to the liner using the Velcro closure.
51
Now push the cuff forward again with both hands, engage the cuff buckle in a loose position and secure the strap to the desired ascent closure tension. You can now ascend.
52
DESCENT / EXIT
Once at the summit, reposition the cuff buckle to the desired downhill closure tension, you can additionally pull the strap tighter.
INSTRUCTIONS TRANSALP
53
Close the ski walk mechanism. Adjust the shell to your instep with the „Power Buckle System“. IMPORTANT: Press the Double Lock Ski Walk Lever down as not to damage it on the descent and to obtain better power transmission! You can now ski down.
INSTRUCTIONS TRANSALP
54
Exit: Open all buckles and straps and rotate back the cuff.
Roll the gaiter down again. Slip out of your Transalp boot with care and support this process by holding the cuff.
55
• Skiboot heating bags: Please dry only the boot liners, NOT the outer shell.
IMPORTANT•Do
Fischer Facebook: facebook.com/fischernordicfacebook.com/fischeralpine
Fischer Twitter: twitter.com/fischersports
!
56
Youtube Fischer: youtube.com/fischersports
Fischer Website: fischersports.com/vacuum
• Tighten all screws after the moulding process.
Visit us on the internet, too:
not store boots at temperatures above 55 °Celsius.