5 minute read
Best Forex Pairs For Supply and Demand 2025

from Exness Guide

Supply and demand is one of the most powerful price action strategies in Forex. When applied correctly, it allows traders to identify high-probability reversal zones and trade with institutions — not against them.
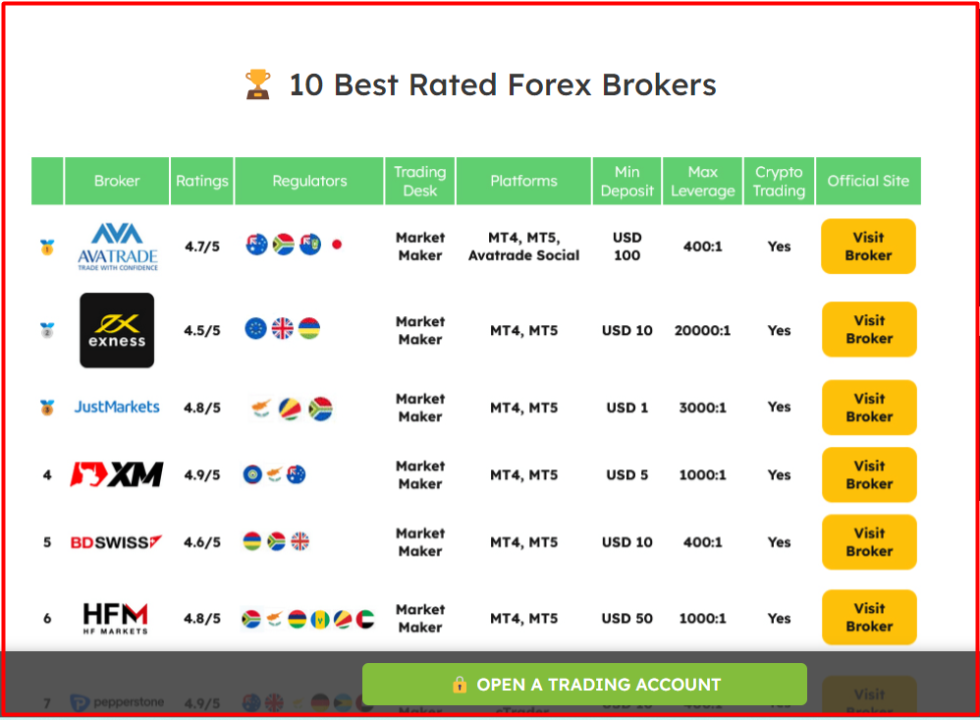
After identifying the best pairs for supply and demand trading, the next step is to find a reliable broker. Below is a list of the best Forex brokers in the world to get you started.
1️⃣ Exness: Open Account | Go to Website
2️⃣ JustMarkets: Open Account | Go to Website
3️⃣ XM: Open Account | Go to Website
5️⃣Avatrade: Open Account | Go to Website
But this method works best on pairs that respect price zones, offer clean structure, and avoid excessive manipulation or fakeouts.
In this guide, we’ll break down the best Forex pairs for supply and demand trading in 2025, how to select zones, and strategies to execute them for consistent profits.
What is Supply and Demand in Forex?
Supply and demand zones are areas on a chart where institutional traders (banks, hedge funds) have placed large buy or sell orders. These zones lead to:
Sharp reversals
Price consolidations
Breakout or rejection setups
Supply zone = strong selling area (resistance)Demand zone = strong buying area (support)
When price returns to these zones, it often reacts with momentum — giving traders a chance to enter before the big move.
Why Choosing the Right Forex Pair Matters
Not all Forex pairs react the same way to supply and demand zones. The best pairs for this strategy are:
✅ Highly liquid
✅ Technically clean
✅ Respect historical zones
✅ Less prone to erratic spikes
✅ Offer tight spreads for better risk-reward

Top 7 Best Forex Pairs for Supply and Demand Trading in 2025
1. EUR/USD (Euro / US Dollar)
Why It Works:
Most traded pair in the world
Respects historical zones with precision
Clean price action on all timeframes
Tight spreads for scalping and swing entries
Best Use:Long-term demand zone entries on D1 and H4 timeframes
2. GBP/USD (British Pound / US Dollar)
Why It Works:
Offers wide ranges and reacts sharply to supply/demand imbalances
Great for aggressive zone traders looking for higher reward
Volatile but technically responsive
Best Use:Intraday rejection trades on M30–H1 near prior breakout zones
3. USD/JPY (US Dollar / Japanese Yen)
Why It Works:
Strong institutional participation = clear zone creation
Often consolidates and breaks from clean demand/supply levels
Best during Asian and US session overlap
Best Use:Scalp rejections from newly formed supply on 15M–H1 charts
4. AUD/USD (Australian Dollar / US Dollar)
Why It Works:
Commodity-linked pair, reacts well to global sentiment zones
Strong respect for technical areas
Great for low-spread trading
Best Use:Zone-to-zone swing setups on H1–H4 with clear structure
5. USD/CAD (US Dollar / Canadian Dollar)
Why It Works:
Oil-sensitive pair, respects price zones linked to economic reports
Offers explosive reversals from institutional zones
Low spread and clear S&D levels on H4
Best Use:Daily chart S&D trading with confirmation candles
6. EUR/JPY (Euro / Japanese Yen)
Why It Works:
A bit more volatile but predictable with clean breaks from zones
Excellent for zone break + retest strategies
Highly reactive during London–Tokyo overlap
Best Use:Zone breakouts with retest confirmation on H1–H4
7. XAU/USD (Gold / US Dollar)
Why It Works:
Heavily influenced by institutional demand
Clear supply/demand levels on higher timeframes
Excellent for reaction-based entries
Best Use:Swing trades off D1 supply/demand zones with wide stops

See more: Is Exness Regulated in South Africa
How to Trade Supply and Demand Zones
Identify Fresh Zones:Look for sharp moves from price bases with imbalance.
Mark Zones Precisely:Use the last candle before the impulse (base candle) and draw the zone.
Wait for Retest:Do not enter blindly — wait for price to return and show confirmation.
Confirmation Tools:
Candlestick patterns (pin bar, engulfing)
RSI divergence
Volume spikes
Break of lower timeframe structure
Set Your Stop-Loss:Place below the demand zone or above supply zone for proper risk control.
Use Multi-Timeframe Analysis:Combine D1 for zone creation, H4 or H1 for entries.
FAQs: Best Forex Pairs for Supply and Demand 2025
1. Do all Forex pairs respect supply and demand?No. Stick to high-liquidity majors and crosses for cleaner reactions.
2. What timeframe is best for supply and demand?H4 and D1 give the cleanest zones, but entries can be refined on H1 or M30.
3. Is gold good for supply and demand trading?Yes — XAU/USD often respects institutional zones strongly.
4. Can I use indicators with supply and demand?Yes. Volume, RSI, and moving averages help confirm entries, but clean charts work best.
5. Are exotic pairs suitable for this method?Not recommended — too much spread and random volatility.
6. How many pairs should I focus on?3–4 pairs are ideal. Master a few rather than chasing every move.
7. Do supply/demand zones always work?No — they are high-probability areas, not guarantees. Always use stop-loss.
8. How long do zones remain valid?Zones can remain valid for weeks if price hasn’t returned to them yet.
9. What’s the difference between supply/demand and support/resistance?Supply/demand focuses on imbalance and order flow, while S/R are often historical price levels.
10. Can I day trade using supply and demand?Yes. Use 15M to H1 zones for intraday setups with confirmation.
Final Thoughts: Mastering Supply and Demand in 2025
Supply and demand trading remains a powerful and timeless approach in Forex. But to succeed, you need the right pairs. Focus on those that respect zones consistently — like EUR/USD, GBP/USD, USD/JPY, AUD/USD, and even XAU/USD.
Whether you're a swing trader or scalper, zone-based trading gives you a clear edge by aligning your entries with big institutional moves.
See more:
Best Forex Pairs for Day Trading 2025
Best Forex Pairs to Trade During Each Session 2025


