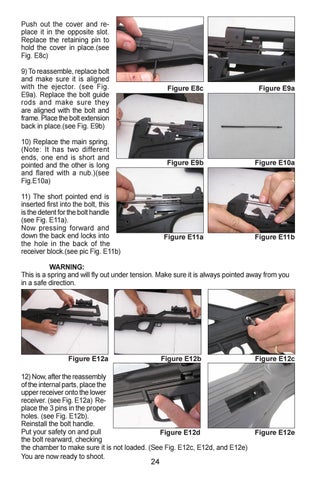
Push out the cover and replace it in the opposite slot. Replace the retaining pin to hold the cover in place.(see Fig. E8c) 9) To reassemble, replace bolt and make sure it is aligned with the ejector. (see Fig. E9a). Replace the bolt guide rods and make sure they are aligned with the bolt and frame. Place the bolt extension back in place.(see Fig. E9b) 10) Replace the main spring. (Note: It has two different ends, one end is short and pointed and the other is long and flared with a nub.)(see Fig.E10a) 11) The short pointed end is inserted first into the bolt, this is the detent for the bolt handle (see Fig. E11a). Now pressing forward and down the back end locks into the hole in the back of the receiver block.(see pic Fig. E11b)
Figure E8c
Figure E9a
Figure E9b
Figure E10a
Figure E11a
Figure E11b
WARNING: This is a spring and will fly out under tension. Make sure it is always pointed away from you in a safe direction.
Figure E12a
Figure E12b
Figure E12c
12) Now, after the reassembly of the internal parts, place the upper receiver onto the lower receiver. (see Fig. E12a) Replace the 3 pins in the proper holes. (see Fig. E12b). Reinstall the bolt handle. Put your safety on and pull Figure E12d Figure E12e the bolt rearward, checking the chamber to make sure it is not loaded. (See Fig. E12c, E12d, and E12e) You are now ready to shoot.
24