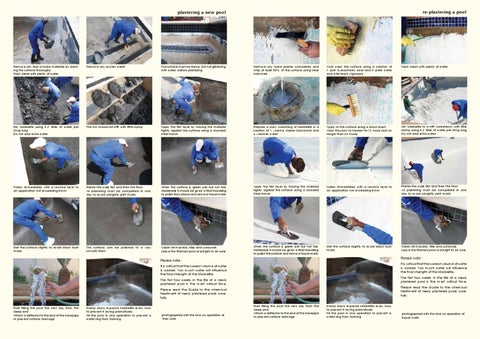
re-plastering a pool
plastering a new pool
Remove any dust or loose materials by brushing the surface thoroughly Flush clean with plenty of water
Remove any excess water
The surface must be damp, but not glistening with water, before plastering
Remove any loose plaster completely and chip at least 80% of the surface using steel hammers
Acid wash the surface using a solution of 1 part hydrochloric acid and 3 parts water and wire-brush vigorously
Flush clean with plenty of water
Mix Marbelite using 3.2 litres of water per 20kg bag Do not add extra water
The mix should be stiff, with little slump
Apply the first layer by forcing the material tightly against the surface using a rounded steel trowel
Prepare a slurry consisting of Marbelite in a solution of 1 volume Weber Slurrybond and 4 volumes water
Apply to the surface using a block-brush Allow the slurry to harden for 12 hours (but no longer than 24 hours)
Mix Marbelite to a stiff consistency with little slump using 3.2 litres of water per 20kg bag Do not add extra water
Follow immediately with a second layer to an application not exceeding 8mm
Plaster the walls first and then the floor All plastering must be completed in one day to avoid unsightly joint marks
When the surface is green (set but not fully hardened) it should be given a final trowelling to polish the surface and remove trowel marks
Apply the first layer by forcing the material tightly against the surface using a rounded steel trowel
Follow immediately with a second layer to an application not exceeding 8mm
Plaster the walls first and then the floor All plastering must be completed in one day to avoid unsightly joint marks
Wet the surface slightly to avoid black burn marks
The surface can be polished to a very smooth finish
Clean all mosaics, tiles and surrounds Leave the finished pool overnight to air cure
When the surface is green (set but not fully hardened) it should be given a final trowelling to polish the surface and remove trowel marks
Wet the surface slightly to avoid black burn marks
Clean all mosaics, tiles and surrounds Leave the finished pool overnight to air cure
Please note :
Please note :
It is critical that the correct volume of water is added. Too much water will influence the final strength of the Marbelite.
It is critical that the correct volume of water is added. Too much water will influence the final strength of the Marbelite.
The first four weeks in the life of a newly plastered pool is the most critical time.
The first four weeks in the life of a newly plastered pool is the most critical time.
Please read the Guide to the chemical treatment of newly plastered pools carefully.
Please read the Guide to the chemical treatment of newly plastered pools carefully. Start filling the pool the next day from the deep end Attach a deflector to the end of the hosepipe to prevent surface damage
Damp down exposed Marbelite every hour to prevent it drying prematurely Fill the pool in one operation to prevent a water-ring from forming
photographed with the kind co-operation of Ross Lurie
Start filling the pool the next day from the deep end Attach a deflector to the end of the hosepipe to prevent surface damage
Damp down exposed Marbelite every hour to prevent it drying prematurely Fill the pool in one operation to prevent a water-ring from forming
photographed with the kind co-operation of Russel Curtis