6 minute read

The Art of The Detail

By Gregg Mackell, CLD, IALD Principal, HLB Lighting Design

In my previous article, I spoke about the importance of finishing a project in order to deliver the promised result to a client.

Well-coordinated details are no less important than the fine-tuning of adjustable lights. Most high-end residential projects are filled with architecture and millwork just begging for integrated lighting details, from library bookshelves to kitchen cabinets, art niches to floating staircases, wine racks to acoustical theater walls, cove details, and closets with integrated lighting that would make Hannah Montana envious.

Whether you believe they’re occupied by God or the Devil, there’s no doubt about the influence a great detail or a botched detail can have on the ultimate success of a lighting design.

Detail coordination should begin with questions to bring out the intent.

Before you get to the detail, first, ask if this detail fits with the overall feel you’re trying to create in a space.

Home in Denver, CO
Photographer: Raul Garcia, Astula

If you are trying to make a dining room feel intimate, you may not want to create a cove light detail which brightens up the ceiling and makes it feel more public. In a lower-level rec room, you may want to use a cove light to create the illusion of expanded head height and the brightness that makes it feel less like a cave.

Is the detail’s purpose to rake light across a textured surface, or is it to float a backlit surface off the wall behind? Is the detail meant to functionally light a work surface, or does it need to create a moody indirect backdrop?

Now that you’ve determined the appropriateness of the detail for the feel of a space, it’s important to integrate the detail with the style of home. Is this a modern project where the source is meant to be visible and celebrated? Or, is this a Craftsman-style library where any modern architectural lighting should be completely hidden?

Answers to questions like these are critical to making sure you are creating a detail that meets your intent.

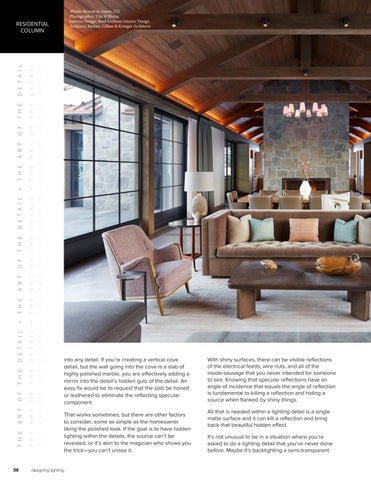
Winter Retreat in Aspen, CO
Photographer: Tim Williams, Interior Design: Brad Krefman and Architecture: Backen, Gillam & Kroeger Architects  

The most basic and, in my opinion, the most fundamental part of creating successful lighting details can be found in the understanding of sightlines. If a surface has an unobstructed or partially obstructed sightline to the source, light will directly transfer to that surface. If there is no direct sightline from a surface to a light source, the surface will only receive reflected photons.

At this border from sightline to no sightline, there will be a line. Controlling the location of that line by determining the relationship of light to valance to surface can be the difference between lighting half of a countertop and lighting the entire thing. It can be the difference between seeing a wavy line on a cove ceiling or seeing an elegant gradient fade across the architectural pop-up.

When hiding lighting within a detail, there needs to be some reason applied as well. To graze a wall from a perimeter cove pocket, where someone can stand in the space and see the strip, isn’t a great detail. However, if someone has to press their face against the wall and look up to see the strip, that should be considered a success, and that person might just deserve to see it. If the source lights what’s intended and is hidden from view for any normal movement or sedentary location within a space, that is a successful detail.

Properly setting the light within the geometry of a detail to control the sightline is important, but to verify you have the entire equation solved, you also must understand the materials and how they behave with the lighting in the detail. Are the surfaces within and adjacent to the lighting detail matte or specular, textured or smooth, dark or light, transparent, opaque or translucent?

Material choices can either validate or throw a wrench into any detail. If you’re creating a vertical cove detail, but the wall going into the cove is a slab of highly polished marble, you are effectively adding a mirror into the detail’s hidden guts of the detail. An easy fix would be to request that the slab be honed or leathered to eliminate the reflecting specular component.

That works sometimes, but there are other factors to consider, some as simple as the homeowner liking the polished look. If the goal is to have hidden lighting within the details, the source can’t be revealed, or it’s akin to the magician who shows you the trick—you can’t unsee it.

With shiny surfaces, there can be visible reflections of the electrical feeds, wire nuts, and all of the inside-sausage that you never intended for someone to see. Knowing that specular reflections have an angle of incidence that equals the angle of reflection is fundamental to killing a reflection and hiding a source when flanked by shiny things.

All that is needed within a lighting detail is a single matte surface and it can kill a reflection and bring back that beautiful hidden effect.

It's not unusual to be in a situation where you’re asked to do a lighting detail that you’ve never done before. Maybe it’s backlighting a semi-transparent stone. It could be lighting an art niche with a copper back. When in a situation like this, I always tell my team, “Don’t guess. Know the answer.”

How do you do that? Mock it up! There is no substitute for knowing the answer. Sure, there are times when we make educated guesses, but whenever possible, we mockup details to make sure we aren’t surprised by unintended reflections, visible sources or shadow lines.

Now that you’ve gone to all of the effort to mockup the details and you know the answers, it’s time to convey these details to the people who will implement them. This could be the millworker, a finish carpenter and/or an electrician.

Details can be done on different levels that are really project and fee dependent. Ideally, they’re drafted into a set that’s issued to the general contractor and then disseminated to the subcontractors who will complete the work.

Nove 2 in Aspen, CO
Photographer: Raul Garcia, Astula

But, in a world where just about everything is being designed throughout construction, creativity is a must. Details can be sketched and sent to the architect or interior designer. They could be coordinated in a cabinet shop with the fabricators, coordinated with shop drawings or even drawn with a sharpie on a stud on the site.

However the design is conveyed, it’s important that the actual people who are implementing the detail get it before they rout channels, install light channels, etc.

It takes a lot of time and effort to get this part of a lighting design looking great. If you’ve coordinated all these elements and have the details looking great, your design will feel amazing, and clients will rave about the results.

Click the image to learn more about QTL
This article is from: