341
11.2. Conditional Independence Figure 11.19
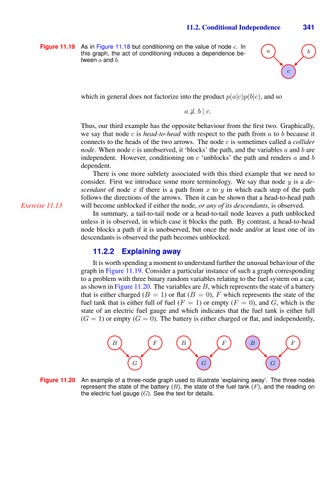
As in Figure 11.18 but conditioning on the value of node c. In this graph, the act of conditioning induces a dependence between a and b.
a
b c
which in general does not factorize into the product p(a|c)p(b|c), and so a 6⊥ ⊥ b | c.
Exercise 11.13
Thus, our third example has the opposite behaviour from the first two. Graphically, we say that node c is head-to-head with respect to the path from a to b because it connects to the heads of the two arrows. The node c is sometimes called a collider node. When node c is unobserved, it ‘blocks’ the path, and the variables a and b are independent. However, conditioning on c ‘unblocks’ the path and renders a and b dependent. There is one more subtlety associated with this third example that we need to consider. First we introduce some more terminology. We say that node y is a descendant of node x if there is a path from x to y in which each step of the path follows the directions of the arrows. Then it can be shown that a head-to-head path will become unblocked if either the node, or any of its descendants, is observed. In summary, a tail-to-tail node or a head-to-tail node leaves a path unblocked unless it is observed, in which case it blocks the path. By contrast, a head-to-head node blocks a path if it is unobserved, but once the node and/or at least one of its descendants is observed the path becomes unblocked.
11.2.2
Explaining away
It is worth spending a moment to understand further the unusual behaviour of the graph in Figure 11.19. Consider a particular instance of such a graph corresponding to a problem with three binary random variables relating to the fuel system on a car, as shown in Figure 11.20. The variables are B, which represents the state of a battery that is either charged (B = 1) or flat (B = 0), F which represents the state of the fuel tank that is either full of fuel (F = 1) or empty (F = 0), and G, which is the state of an electric fuel gauge and which indicates that the fuel tank is either full (G = 1) or empty (G = 0). The battery is either charged or flat, and independently,
B
F G
Figure 11.20
B
F G
B
F G
An example of a three-node graph used to illustrate ‘explaining away’. The three nodes represent the state of the battery (B), the state of the fuel tank (F ), and the reading on the electric fuel gauge (G). See the text for details.