68
We ❤ Sewing
Stitch a seasonal
Embroidery Hoop
Embrace rich autumnal tones with Bernadette Wainwright’s simple make
Free!
SKILL LEVEL
TEMPLATE DOWNLOAD createandcraft.com/gb/ members-downloads
1
2
W
hether you already love hand embroidery or you have always wanted to give it a go, this elegant hoop is a satisfying seasonal make that will welcome autumn into your home. Using just two basic stitches, it really couldn’t be easier – just take your time and enjoy creating something special!
Autumn wishes Kit List
b Template b 25cm cotton, linen or calico b 25cm medium weight bosal iron-on interfacing b 8" embroidery hoop b Air erasable pen or pencil b DMC embroidery floss: D743, D783, D402, D900, D920, D975 b Glue gun b Light box b Embroidery needle
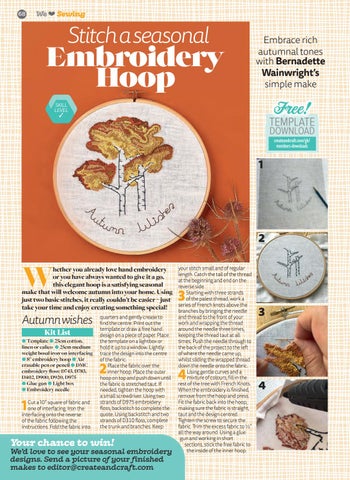
1
Cut a 10” square of fabric and one of interfacing. Iron the interfacing onto the reverse of the fabric following the instructions. Fold the fabric into
quarters and gently crease to find the centre. Print out the template or draw a free hand design on a piece of paper. Place the template on a lightbox or hold it up to a window. Lightly trace the design into the centre of the fabric. Place the fabric over the inner hoop. Place the outer hoop on top and push down until the fabric is stretched taut. If needed, tighten the hoop with a small screwdriver. Using two strands of D975 embroidery floss, backstitch to complete the quote. Using backstitch and two strands of D310 floss, complete the trunk and branches. Keep
2
Your chance to win!
We’d love to see your seasonal embroidery designs. Send a picture of your finished makes to editor@createandcraft.com 068 Simple Embroidery PD.indd 68
your stitch small and of regular length. Catch the tail of the thread at the beginning and end on the reverse side. Starting with three strands of the palest thread, work a series of French knots above the branches by bringing the needle and thread to the front of your work and wrapping the thread around the needle three times, keeping the thread taut at all times. Push the needle through to the back of the project to the left of where the needle came up, whilst sliding the wrapped thread down the needle onto the fabric. Using gentle curves and a mixture of colours, fill in the rest of the tree with French Knots. When the embroidery is finished, remove from the hoop and press. Fit the fabric back into the hoop, making sure the fabric is straight, taut and the design centred. Tighten the screw to secure the fabric. Trim the excess fabric to ½” all the way around. Using a glue gun and working in short sections, stick the free fabric to the inside of the inner hoop.
3
4
3
4
17/08/2020 08:32