
2 minute read
Power made to last.


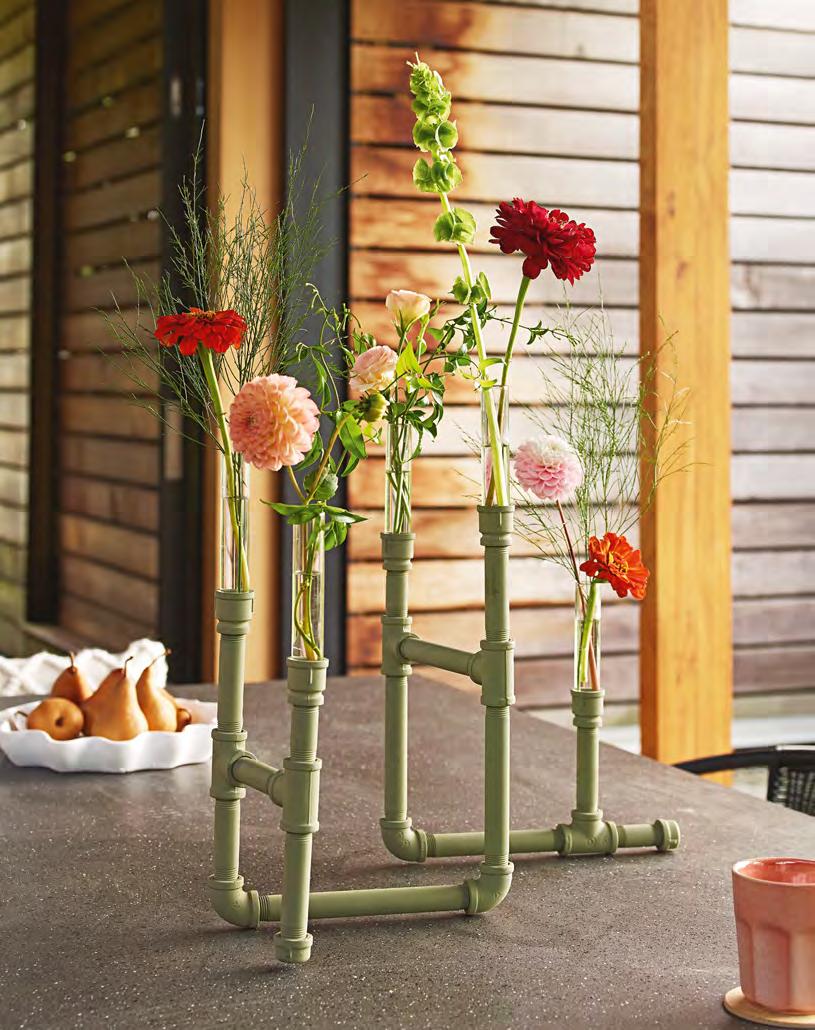
You could use standard 15-18mm diameter test tubes as vases in this industrial-style piece
Pipe Vase
Join short lengths of metal pipe with simple plumbing fittings to create a sculpture for mini bud vases
Tools & materials
n Safety equipment (mask, gloves and eye protection) n Five 20mm x 15mm brass reducers n Three 15mm x 60mm galvanised barrel nipples n Four 15mm x 100mm galvanised pipes n Five 15mm galvanised tees n Three 15mm galvanised female and female elbows n Two 20mm galvanised end caps n Two 15mm x 80mm galvanised barrel nipples n Four 15mm x 150mm galvanised pipes n 15mm x 200mm galvanised pipe n Multipurpose cleaner n Cloth n Non-reflective spray paint (we used Rustoleum ‘Camouflage’ in Khaki)
Note: The components are joined by twisting them together, tightening while adjusting them to ensure the assembly stands securely (see right). The nipples and pipes are referred to as lengths; reducers form the bud vase holders.

1 To set out this configuration, beginning with the lowest holder, add a reducer to a 100mm length. Attach a tee horizontally with a 60mm length and end cap to one side. To the other side, add a 150mm length, elbow, 150mm length, vertical tee, then a 60mm length and reducer.
From the side of the tee, attach a 150mm length and vertical tee, with a 100mm length and reducer facing up, and a 150mm length facing down. To this, add an elbow, 200mm length, elbow, 80mm length and a vertical tee, with a 100mm length and reducer facing up. From the side of the tee, add an 80mm length and a vertical tee. Add a 100mm length and end cap facing down and a 60mm length with reducer facing up.
2 Remove any labels and wipe all over using a multipurpose cleaner with a cloth. Let dry.
3 Working in a well-ventilated, covered area, apply light coats of spray paint, leaving to dry after each. Tip: Begin with the assembly upside down to apply the first coat, then apply as many coats as needed to cover thoroughly.
4 Position mini bud vases, fill with water and add flowers.
Bath Shelf
For a bespoke bath buddy, choose moistureresistant timber and stainless steel fasteners to avoid rust. Adjust the shelf length to fit your bath

Tools & materials
n Safety equipment (mask, gloves, ear and eye protection) n Tape measure and pencil n Circular saw with straightedge n Clamps n Drill with 3mm and square-drive bits n Cloth n 26mm-thick timber panel n 180-grit abrasive paper with sanding block n Timber adhesive n 8G x 50mm stainless steel square-drive screws n Tung oil n Robe hook
1 From the timber panel, use a circular saw with a clamped straightedge to cut a 840mm x 260mm shelf, a holder back 240mm x 80mm and front 240mm x 40mm, plus two 160mm x 40mm stoppers. Smooth the cuts and round over the edges slightly using 180-grit abrasive paper.
2 On the back of the shelf, make holes for the holders by marking 340mm in from the ends, then 35mm and 145mm in from one edge; drill right through with a 3mm bit.
3 Predrill into the side of the front and back holders, 40mm from the ends, avoiding going through, then apply adhesive. On the top of the shelf, centre the holders over the holes to secure with 50mm screws.
4 On the back of the shelf, centre the stoppers 90mm in from the ends. Predrill 40mm in from the ends of the stoppers, avoiding going all the way through the shelf. Apply adhesive and secure with 50mm screws.
5 Apply two coats of tung oil with a cloth to all sides, leaving to dry after each coat.
6 Attach a robe hook to the side for a hand towel, predrilling to secure with the supplied screws.
Keep in mind...
n When using cutting tools and sanding, wear the recommended safety gear and work in a well-ventilated area.
This project is a great way to put leftover hardwood timber offcuts to good use n When spray-painting, wear eye protection, a mask and gloves and work outside or in a well-ventilated area, covering surrounding areas with a drop sheet to avoid overspray.


