
4 minute read
Vehicle inspection procedure


As developed by D.O.T. Office of Motor Carriers
STEP 1: Left Side of Cab Area
Note general condition
Left front wheel o Condition of wheel, especially cracks, rim-missing, rims bent, or broken studs, clamps, lugs o Condition of tires - properly inflated, valve stem not touching wheel, rim or brake drum, valve cap in place, no serious cuts, bulges, tread wear, or any signs of misalignment o Wheel bearing and hub - no obvious leaking
Left front suspension o Condition ofspring, spring hangers, shackles, U-bolts - no cracks, breaks, shifting. o Shock absorber condition
Left front brake o Condition of brake drum o Condition of hoses o Check air chamber mounting o Check slack adjusters
STEP 2: Front of Cab Area
Condition offront axle
Condition of steering system
. No loose, worn, bent, damaged or missing parts
Condition of windshield o Check for damage and clean if dirty o Check windshield wiper arms for proper spring tension o Check wiper blades for any damage, "dead" rubber and securement to aim
Lights and reflectors o Cab parking, clearance and identification lights should be clean, operating and proper color o Reflectors clean and proper color o Right front turn signal light clean, operating and proper color
STEP 3: Right Side of Cab Area
Check all items as done on left side of cab area
STEP 4: Right Saddle Tank Area
Right fuel tank(s) o Securely mounted, not damaged or leaking o Fuel crossover line secure o Tank(s) full of fuel o Cap(s) on and secure
Condition of visible parts
Rear of engine - not leaking
. Transmission - not leaking
. Drive shaft - looks OK
. Exhaust system - secure, not leaking, not touching wires, fuel or air lines o Frame and cross members - no bends, cracks or breaks o Air lines and electrical wiring - secured against snagging, chahng
STEP 5: Trailer Frontal Area
Air and electrical connections o Glad hands properly mounted, free of damage. not leaking
. Electrical line receptacle properly mounted, free of damage; plug adequately seated and safety catch engaged to prevent accidental disconnect o Air and electrical lines properly secured against tangling, snagging, and chafing, with sufficient slack for turns
Lights and reflectors
. Front trailer clearance and identification lights - should be clean, operating and proper color o Reflectors, clean and proper color
STEP 6: Right Rear Tractor Wheels Area
Dual wheels o Condition of wheels and rims - no missing, bent or broken spacers, studs, clamps or lugs o Condition of tires - properly inflated; valve stems not touching wheels, rims or brake drum; valve caps in place; no serious cuts, bulges, tread wear, or any signs of misalignment and no debris stuck between them o Tires. same type, e.g., not mixed radial and bias types o Tires evenly matched (circumference) o Wheel bearing and hub - no obvious leaking
Tandem axles
. Repeat wheel/tire inspection as above
Suspension o Condition of spring(s), spring hangers, shackles and U-bolts o Axle alignment
Brakes o Condition of brake drum(s) o Condition of hoses - look for anv chafing o Check slack adjusters o Check air chamber mounting o Check spring brakes
STEP 7: Rear of Tractor Area
Frame and cross members not bent, cracked or otherwise damaged or missing Lights and reflectors
. Tail lights and turn signal lights operating, clean, and proper color Air and electrical lines properly secured to frame, not damaged or chafing
STEP 8: Coupling System Area
Fifth wheel 1ower) o Securely mounted to frame o No missing or damaged parts o No visible space between upper and lower hfth wheel o Lockingjaws around the shank and not the head of kingpin o Release lever properly seated and safety latch lock engaged
Fifth wheel (ypper) o Kingpin not worn, bent or damaged
Sliding Jifth wheel
. Mechanism not worn. bent. damaged or parts missing o Properly lubricated o All locking pins present and locked in place o If air operated - no air leaks o Check that fifth wheel not so far forward that tractor flrame will strike landing gear during turns
Air and electric lines visible from this pout o Should be secure from dangling, snagging and chafing o Should be free from damage, oil and grease
STEP 9: Right Side of Trailer Area
Front trailer support ([anding gear or dollies) o Fully raised, no missing parts, not bent or otherwise damaged
Crank handle present and secured (typically on left side)
. Ifpower operated, no air or hydraulic leaks
Spare tire(s)
. Carrier or rack not damaged o Tire and/or wheel securely mounted in the rack o Tire and wheel condition adequate for a spare, proper size, properly inflated
Lights and reflectors o Trailer side clearance lights clean, operating and proper color o Reflectors clean and proper color
Frame and Body o Frame and cross members not bent, cracked, damaged or missing o Body parts not damaged or missing
Proper placarding
STEP 10: Right Rear Trailer Wheels Area
Dual wheels o Conditions of wheels and rims - no cracks, missing or bent rims, broken spacers, studs, clamps or lugs o Condition of tires - properly inflated; valve stems not touching wheels, rims or brake drum; valve caps in place; no serious cuts, bulges, tread wear, or any signs of misalignment and no debris stuck between them o Tires same type, e.9., not mix radial and bias types on the same axle
Tires evenly matched (circumference) o Wheel bearing and hub - no obvious leaking
Tandem axles
. Repeat wheel and tire inspection as above o If equipped with sliding axles, check position and alignment; look for damaged, worn or missing parts; all locks present, fully in place and locked against fallout o Flexible air lines not cracked. cut. crimped or otherwise damaged; secured against tangling, dragging, chafing
Suspension o Condition of spring(s), spring hangers, shackles and U-bolts o Axle alignment o Condition of torque rod arms, bushings
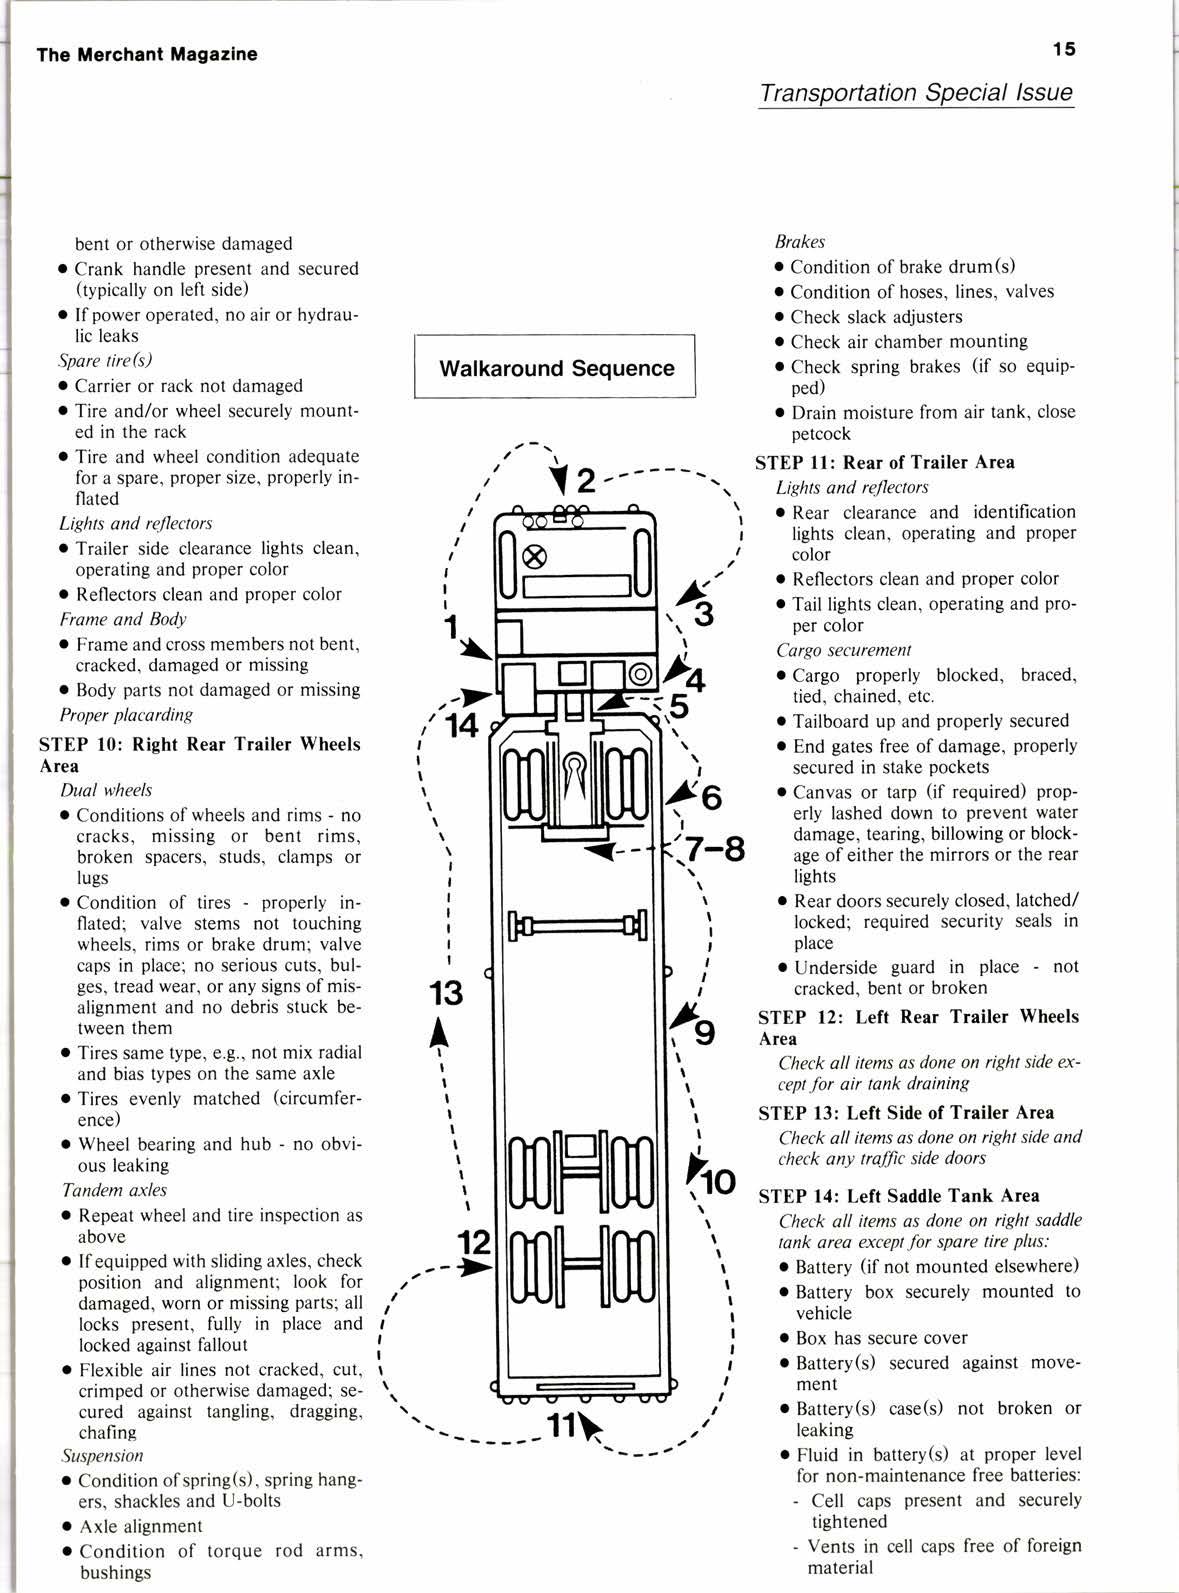
Walkaround Sequence


