HOW IT’S MADE
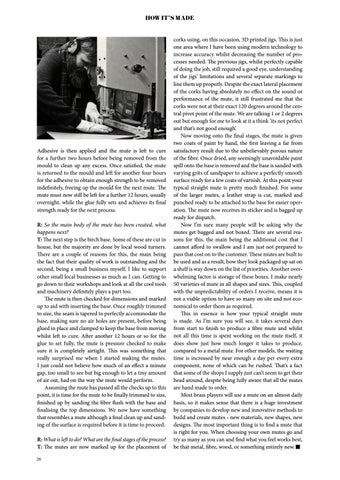
Adhesive is then applied and the mute is left to cure for a further two hours before being removed from the mould to clean up any excess. Once satisfied, the mute is returned to the mould and left for another four hours for the adhesive to obtain enough strength to be removed indefinitely, freeing up the mould for the next mute. The mute must now still be left for a further 12 hours, usually overnight, while the glue fully sets and achieves its final strength ready for the next process. R: So the main body of the mute has been created, what happens next? T: The next step is the birch base. Some of these are cut in house, but the majority are done by local wood turners. There are a couple of reasons for this, the main being the fact that their quality of work is outstanding and the second, being a small business myself, I like to support other small local businesses as much as I can. Getting to go down to their workshops and look at all the cool tools and machinery definitely plays a part too. The mute is then checked for dimensions and marked up to aid with inserting the base. Once roughly trimmed to size, the seam is tapered to perfectly accommodate the base, making sure no air holes are present, before being glued in place and clamped to keep the base from moving whilst left to cure. After another 12 hours or so for the glue to set fully, the mute is pressure checked to make sure it is completely airtight. This was something that really surprised me when I started making the mutes. I just could not believe how much of an effect a minute gap, too small to see but big enough to let a tiny amount of air out, had on the way the mute would perform. Assuming the mute has passed all the checks up to this point, it is time for the mute to be finally trimmed to size, finished up by sanding the fibre flush with the base and finalising the top dimensions. We now have something that resembles a mute although a final clean up and sanding of the surface is required before it is time to proceed. R: What is left to do? What are the final stages of the process? T: The mutes are now marked up for the placement of 26
corks using, on this occasion, 3D printed jigs. This is just one area where I have been using modern technology to increase accuracy whilst decreasing the number of processes needed. The previous jigs, whilst perfectly capable of doing the job, still required a good eye, understanding of the jigs’ limitations and several separate markings to line them up properly. Despite the exact lateral placement of the corks having absolutely no effect on the sound or performance of the mute, it still frustrated me that the corks were not at their exact 120 degrees around the central pivot point of the mute. We are talking 1 or 2 degrees out but enough for me to look at it a think ‘its not perfect and that’s not good enough’. Now moving onto the final stages, the mute is given two coats of paint by hand, the first leaving a far from satisfactory result due to the unbelievably porous nature of the fibre. Once dried, any seemingly unavoidable paint spill onto the base is removed and the base is sanded with varying grits of sandpaper to achieve a perfectly smooth surface ready for a few coats of varnish. At this point your typical straight mute is pretty much finished. For some of the larger mutes, a leather strap is cut, marked and punched ready to be attached to the base for easier operation. The mute now receives its sticker and is bagged up ready for dispatch. Now I’m sure many people will be asking why the mutes get bagged and not boxed. There are several reasons for this, the main being the additional cost that I cannot afford to swallow and I am just not prepared to pass that cost on to the customer. These mutes are built to be used and as a result, how they look packaged up sat on a shelf is way down on the list of priorities. Another overwhelming factor is storage of these boxes. I make nearly 50 varieties of mute in all shapes and sizes. This, coupled with the unpredictability of orders I receive, means it is not a viable option to have so many on site and not economical to order them as required. This in essence is how your typical straight mute is made. As I’m sure you will see, it takes several days from start to finish to produce a fibre mute and whilst not all this time is spent working on the mute itself, it does show just how much longer it takes to produce, compared to a metal mute. For other models, the waiting time is increased by near enough a day per every extra component, none of which can be rushed. That’s a fact that some of the shops I supply just can’t seem to get their head around, despite being fully aware that all the mutes are hand made to order. Most brass players will use a mute on an almost daily basis, so it makes sense that there is a huge investment by companies to develop new and innovative methods to build and create mutes - new materials, new shapes, new designs. The most important thing is to find a mute that is right for you. When choosing your own mutes go and try as many as you can and find what you feel works best, be that metal, fibre, wood, or something entirely new.
