
3 minute read
STEP BY STEP to using a CM Seal tanking kit


iKBBI MEMBER BENEFITS
Independent accreditation from a government-sanctioned institute provides enormous credibility and subsequent commercial opportunities for professional installers.
Advertisement
Marketing
• Exclusive use of the iKBBI logo to promote your business • ID card and certificate to demonstrate accreditation • Access to a range of promotional material, including a free vehicle sticker • Full listing on our find-amember consumer search tool ● Opportunities to work with our Retail Installation Standards Partners

For more information on member benefits please visit;
www.ikbbi.org.uk


WATERPROOFING THE WET AREAS IN A BATHROOM WITH A CM SEAL TANKING KIT
CM Seal can be used as a stand alone product or as part of the CM Seal Tanking Kit. The CM Seal membrane has been designed to have a fleeced outer layer, which makes CM Seal fully compatible with liquid sealing membranes and tile adhesives.
STAGE 1
Applying CM Seal - takes just 5 mins
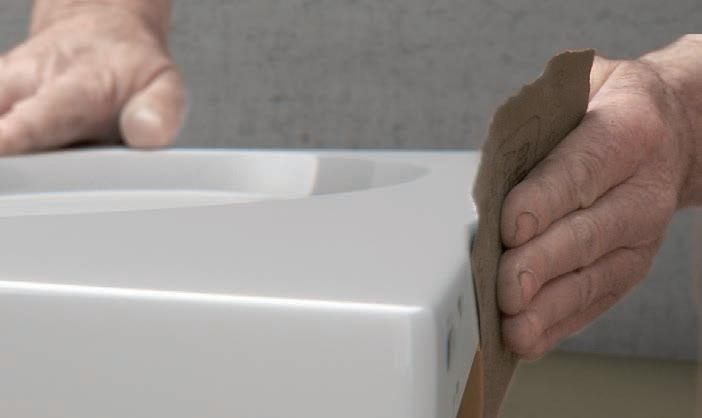
Step 1 Thoroughly roughen and clean the sides of the tray or bath that the CM Seal is to be attached.
2 3
Step 2 Remove the backing paper 100mm at a time and align the top of the adhesive strip with the top edge of the shower tray or bath and firmly press on by hand. Step 3 Before applying around the corners, pinch the CM Seal to allow extra material in the corners - this helps with subsequent tiling. When finished applying, give the CM Seal one last rub all the way around to ensure the perfect seal - paying special attention to the corners.
Stage 1 is complete. You are now ready to apply the wall membranes.
STAGE 2
Applying the CM Seal Tanking Membranes - Takes less than one hour
The membranes are bonded to the already primed walls with C2 powder mix tile adhesive, which is applied to the wall with a 4mm square notched trowel. (Bucket ready tile adhesive should not be used as it requires air to cure). Depending on the application the membranes can be applied horizontally or vertically, with all overlaps being at least 75mm wide. The CM Seal wall membrane should not be put around corners, the supplied 200mm wide elastomeric strip is used instead.

1 3
4
Step 1 Apply adhesive to wall behind CM Seal upstand. Press upstand into adhesive with the back of the trowel ensuring there are no air pockets.
2
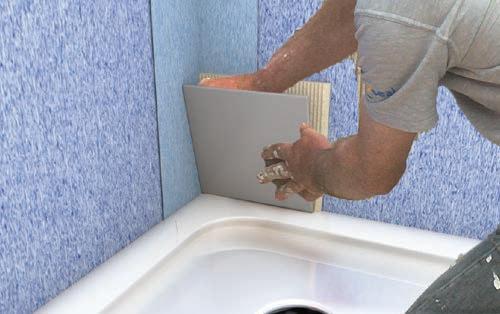
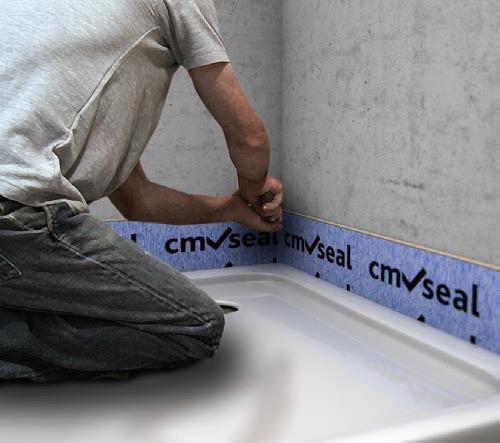
Step 2 Apply tile adhesive over upstand and wall. Apply membrane print side out starting at the bottom ensuring a minimum of 75mm overlap, and a gap of approx 20mm from the corner. Press on firmly with the back of the trowel ensuring there are no air pockets. Step 3 Apply elastomeric strip to the corners ensuring at least 75mm of overlap on membrane and upstand.

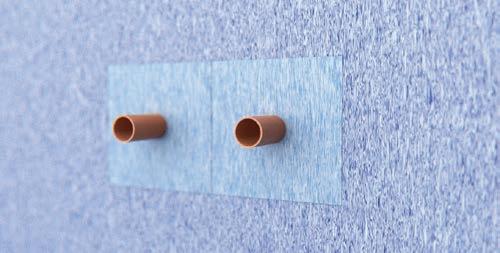
Step 4 Using excess elastomeric strip, cut out a 100mm x 100mm piece per pipe and cut a small hole in the centre. Push over pipes and bond the membrane to the wall with tile adhesive.
5
Step 5 As soon as the CM Seal membranes are applied to the wall, tiling can begin in the normal way.
CM Seal is a product of Classic Marble
02885 568 081 www.cm-seal.com info@classic-marble.com


Solutions for retailers
Do you retail kitchens, bedrooms and/or bathrooms?
The Institute of Kitchen, Bedroom & Bathroom Installers (or iKBBI as we’re better known) is the UK’s first and only government sanctioned and not-for-profit institute dedicated to KBB installation sector.
With over 3,500 accredited members nationally* we already represent the largest independent population of KBB installers in the UK… and we’re growing.
The innovative iKBBI Installation Standards Partnership (iSP) initiative allows retailers to support positive change within the industry through independent accreditation of their installers, with lots of commercial benefits to be had including support with recruitment & legislative management. Find out more by visiting our website.
watch the video here


