Behind every new development is a team of engineers, contractors, and fabricators, that when looked at holistically through the lens of the approaching posterity and their ever-expanding, modern technology driven mindsets, we see not only the ability for adaptation for the utilization of what the future will bring for our current processes, but we also see an opportunity. The ubiquity of these initiatives is staggering, and this article will outline various components required when adopting automatic documentation to fabrication. The article will also show, more specifically, the Dynamo graphs that can be used to quickly implement this automated process in the Revit environment.
SPLITTING THE SYSTEMS INTO ASSEMBLIES Starting off the fabrication process, we can look at the modeled ductwork system below in Figure 1. This ductwork was split automatically into Revit Fabrication Parts using the “Design to Fabrication” tool.
Figure 1: Duct by Design to Fabrication and Automatic Tagging with Dynamo
Some firms have different standards of splitting systems into assemblies for electrical, mechanical, and plumbing, and we have a lot of options for going about making these distinctions. For ductwork, we can set limits on duct length and be sure to split the duct at distances optimal to the takeoffs from any duct lines. For electrical, the conduit will most likely already be split, and we look more to setting parameters to the conduit based on necessities at the start and end of the conduit, necessities based on the conduit bending process, and we can write some Dynamo graphs that will algorithmically set parameters for creating assemblies of conduit systems. The final point to mention about Figure 1 is the ability to automatically tag the fabrication parts in this 3D view. Although there is the “Tag All Not Tagged” tool that is provided out of the box, we can clearly see how we can achieve a more clean and controlled tagging through the Revit API, either through a Dynamo graph or an add-in.
GATHERING OUR FABRICATION PARTS FROM REVIT
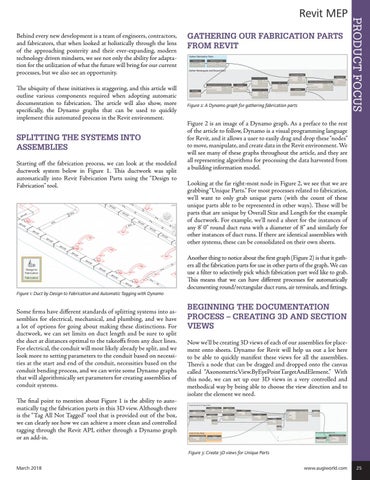
Figure 2: A Dynamo graph for gathering fabrication parts
PRODUCT FOCUS
Revit MEP
Figure 2 is an image of a Dynamo graph. As a preface to the rest of the article to follow, Dynamo is a visual programming language for Revit, and it allows a user to easily drag and drop these “nodes” to move, manipulate, and create data in the Revit environment. We will see many of these graphs throughout the article, and they are all representing algorithms for processing the data harvested from a building information model. Looking at the far right-most node in Figure 2, we see that we are grabbing “Unique Parts.” For most processes related to fabrication, we’ll want to only grab unique parts (with the count of these unique parts able to be represented in other ways). These will be parts that are unique by Overall Size and Length for the example of ductwork. For example, we’ll need a sheet for the instances of any 8’ 0” round duct runs with a diameter of 8” and similarly for other instances of duct runs. If there are identical assemblies with other systems, these can be consolidated on their own sheets. Another thing to notice about the first graph (Figure 2) is that it gathers all the fabrication parts for use in other parts of the graph. We can use a filter to selectively pick which fabrication part we’d like to grab. This means that we can have different processes for automatically documenting round/rectangular duct runs, air terminals, and fittings.
BEGINNING THE DOCUMENTATION PROCESS – CREATING 3D AND SECTION VIEWS Now we’ll be creating 3D views of each of our assemblies for placement onto sheets. Dynamo for Revit will help us out a lot here to be able to quickly manifest these views for all the assemblies. There’s a node that can be dragged and dropped onto the canvas called “AxonometricView.ByEyePointTargetAndElement.” With this node, we can set up our 3D views in a very controlled and methodical way by being able to choose the view direction and to isolate the element we need.
Figure 3: Create 3D views for Unique Parts March 2018
www.augiworld.com 25