AutoCAD
AutoCAD 2011 8. In the Finish list, find and select the Glossy finish.
25.
9. Click in the blue tile texture to open the tool palette Texture Editor. In this tool palette, you can define the size and the rotation of a texture. 10. In the upper section of Texture Editor, you will see a sample of the texture and two numbers that present the final vertical and horizontal sizes of the texture. 11. In the Source section, find the name of the texture’s file. 12. In the Brightness section you can change the material brightness. Type 100.
Now we will create a polished ceramic tile texture to apply to the floor and a wallpaper texture to apply to the walls. 1. Click in Render tab. 2. Click Materials Browser in Materials panel. The tool palette Materials Browser will appear. 3. In the tool palette Materials Browser, click in Create Material list and select Stone. The tool palette Materials Editor will open specifically to the stone material.
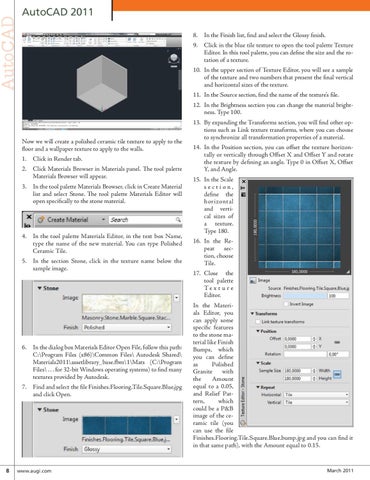
4. In the tool palette Materials Editor, in the text box Name, type the name of the new material. You can type Polished Ceramic Tile. 5. In the section Stone, click in the texture name below the sample image.
6. In the dialog box Materials Editor Open File, follow this path: C:\Program Files (x86)\Common Files\ Autodesk Shared\ Materials2011\assetlibrary_base.fbm\1\Mats (C:\Program Files\ . . . for 32-bit Windows operating systems) to find many textures provided by Autodesk. 7. Find and select the file Finishes.Flooring.Tile.Square.Blue.jpg and click Open.
8
www.augi.com
13. By expanding the Transforms section, you will find other options such as Link texture transforms, where you can choose to synchronize all transformation properties of a material. 14. In the Position section, you can offset the texture horizontally or vertically through Offset X and Offset Y and rotate the texture by defining an angle. Type 0 in Offset X, Offset Y, and Angle. 15. In the Scale section, define the horizontal and vertical sizes of a texture. Type 180. 16. In the Repeat section, choose Tile. 17. Close the tool palette Te x t u r e Editor. In the Materials Editor, you can apply some specific features to the stone material like Finish Bumps, which you can define as Polished Granite with the Amount equal to a 0.05, and Relief Pattern, which could be a P&B image of the ceramic tile (you can use the file Finishes.Flooring.Tile.Square.Blue.bump.jpg and you can find it in that same path), with the Amount equal to 0.15.
March 2011