Autodesk
Revit MEP PROJECT PARAMETERS Shared parameters can be made into project parameters by going to the Manage tab of the ribbon and selecting the Project Parameters tool. The advantage of project parameters is that they are automatically attached to categories of Revit families. If a project parameter of mounting is created and assigned to the category of lighting fixtures, every light fixture inserted into the project will contain the parameter of mounting. This is helpful when a combination of company families is being used with out-of-the-box content and families found from other sources. They can all be scheduled the same. If project parameters are placed in the company standard template, the user need only place fixtures to start making the lighting fixture schedule. The downside may be that normal MEP firm may have 100-200 different standard schedules. The parameters required for the schedules may number in the thousands, making the shared parameters file quite large and difficult to navigate. A good naming convention can help alleviate this problem.
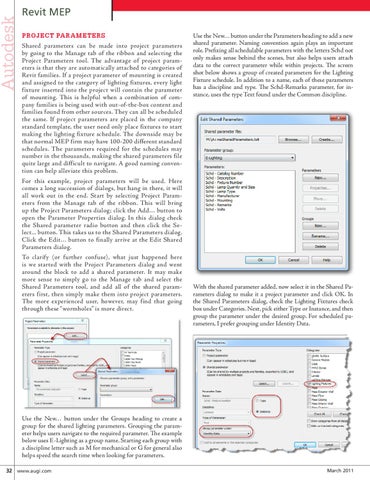
Use the New… button under the Parameters heading to add a new shared parameter. Naming convention again plays an important role. Prefixing all schedulable parameters with the letters Schd not only makes sense behind the scenes, but also helps users attach data to the correct parameter while within projects. The screen shot below shows a group of created parameters for the Lighting Fixture schedule. In addition to a name, each of these parameters has a discipline and type. The Schd-Remarks parameter, for instance, uses the type Text found under the Common discipline.
For this example, project parameters will be used. Here comes a long succession of dialogs, but hang in there, it will all work out in the end. Start by selecting Project Parameters from the Manage tab of the ribbon. This will bring up the Project Parameters dialog; click the Add… button to open the Parameter Properties dialog. In this dialog check the Shared parameter radio button and then click the Select... button. This takes us to the Shared Parameters dialog. Click the Edit… button to finally arrive at the Edit Shared Parameters dialog. To clarify (or further confuse), what just happened here is we started with the Project Parameters dialog and went around the block to add a shared parameter. It may make more sense to simply go to the Manage tab and select the Shared Parameters tool, and add all of the shared parameters first, then simply make them into project parameters. The more experienced user, however, may find that going through these “wormholes” is more direct.
With the shared parameter added, now select it in the Shared Parameters dialog to make it a project parameter and click OK. In the Shared Parameters dialog, check the Lighting Fixtures check box under Categories. Next, pick either Type or Instance, and then group the parameter under the desired group. For scheduled parameters, I prefer grouping under Identity Data.
Use the New… button under the Groups heading to create a group for the shared lighting parameters. Grouping the parameter helps users navigate to the required parameter. The example below uses E-Lighting as a group name. Starting each group with a discipline letter such as M for mechanical or G for general also helps speed the search time when looking for parameters. 32 www.augi.com
March 2011