and 50 square feet, he or she will provide the worse case value of 16.1. By doing this, the window or door manufacturer may have to provide a more expensive product to meet that design value. If an engineer wants to have the opportunity to pass value along to the client, he/she needs to be more accurate with the design pressures they provide. The formula shown in Figure 2 takes the values in the chart and interpolates the design pressures based on the actual size of the opening. if((Opening) = 10, 18, if((Opening) = 20, 17.2, if((Opening) = 50, 16.1, if((Opening) = 100, 15.3, if((Opening) = 500, 13.4, if(and((Opening) > 10, (Opening) < 20), (18 - (Opening - 10) * 0.08), if(and((Opening) > 20, (Opening) < 50), (17.2 - (Opening - 20) * 0.0367), if(and((Opening) > 50, (Opening) < 100), (16.1 - (Opening - 50) * 0.016), if(and((Opening) > 100, (Opening) < 500), (15.3 - (Opening - 100) * 0.00475), 0)))))))))
We just broke down the partial formula shown above. Keep in mind that the formula is only for 100mph wind speed and exposure B. If you have seen a United States wind speed chart, you know there are several wind speeds and exposures that need to be addressed.
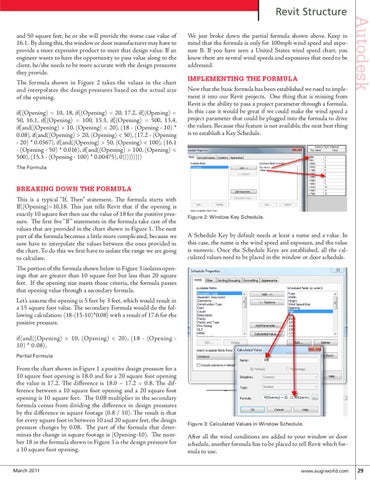
IMPLEMENTING THE FORMULA Now that the basic formula has been established we need to implement it into our Revit projects. One thing that is missing from Revit is the ability to pass a project parameter through a formula. In this case it would be great if we could make the wind speed a project parameter that could be plugged into the formula to drive the values. Because this feature is not available, the next best thing is to establish a Key Schedule.
Autodesk
Revit Structure
The Formula
BREAKING DOWN THE FORMULA This is a typical “If, Then” statement. The formula starts with If((Opening)=10,18. This just tells Revit that if the opening is exactly 10 square feet then use the value of 18 for the positive pressure. The first five “If ” statements in the formula take care of the values that are provided in the chart shown in Figure 1. The next part of the formula becomes a little more complicated, because we now have to interpolate the values between the ones provided in the chart. To do this we first have to isolate the range we are going to calculate. The portion of the formula shown below in Figure 3 isolates openings that are greater than 10 square feet but less than 20 square feet. If the opening size meets those criteria, the formula passes that opening value through a secondary formula. Let’s assume the opening is 5 feet by 3 feet, which would result in a 15 square foot value. The secondary Formula would do the following calculation: (18-(15-10)*0.08) with a result of 17.6 for the positive pressure.
Figure 2: Window Key Schedule.
A Schedule Key by default needs at least a name and a value. In this case, the name is the wind speed and exposure, and the value is numeric. Once the Schedule Keys are established, all the calculated values need to be placed in the window or door schedule.
if(and((Opening) > 10, (Opening) < 20), (18 - (Opening 10) * 0.08), Partial Formula
From the chart shown in Figure 1 a positive design pressure for a 10 square foot opening is 18.0 and for a 20 square foot opening the value is 17.2. The difference is 18.0 – 17.2 = 0.8. The difference between a 10 square foot opening and a 20 square foot opening is 10 square feet. The 0.08 multiplier in the secondary formula comes from dividing the difference in design pressures by the difference in square footage (0.8 / 10). The result is that for every square foot in between 10 and 20 square feet, the design pressure changes by 0.08. The part of the formula that determines the change in square footage is (Opening-10). The number 18 in the formula shown in Figure 3 is the design pressure for a 10 square foot opening. March 2011
Figure 3: Calculated Values in Window Schedule.
After all the wind conditions are added to your window or door schedule, another formula has to be placed to tell Revit which formula to use.
www.augiworld.com 29