systems in each of the options. This will work fine if you are just using the systems for filters. If you are using systems for equipment loads, schedules, or any calculations, than I would suggest picking your worst-case design option.
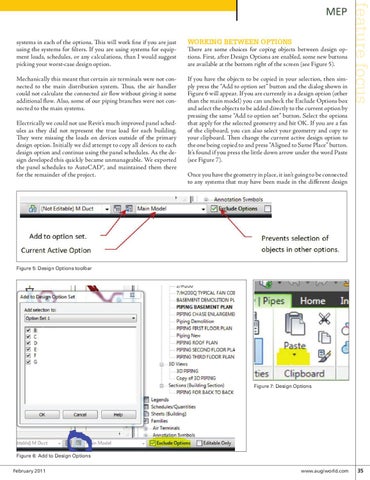
Working between options There are some choices for coping objects between design options. First, after Design Options are enabled, some new buttons are available at the bottom right of the screen (see Figure 5).
Mechanically this meant that certain air terminals were not connected to the main distribution system. Thus, the air handler could not calculate the connected air flow without giving it some additional flow. Also, some of our piping branches were not connected to the main systems.
If you have the objects to be copied in your selection, then simply press the “Add to option set” button and the dialog shown in Figure 6 will appear. If you are currently in a design option (other than the main model) you can uncheck the Exclude Options box and select the objects to be added directly to the current option by pressing the same “Add to option set” button. Select the options that apply for the selected geometry and hit OK. If you are a fan of the clipboard, you can also select your geometry and copy to your clipboard. Then change the current active design option to the one being copied to and press “Aligned to Same Place” button. It’s found if you press the little down arrow under the word Paste (see Figure 7).
Electrically we could not use Revit’s much improved panel schedules as they did not represent the true load for each building. They were missing the loads on devices outside of the primary design option. Initially we did attempt to copy all devices to each design option and continue using the panel schedules. As the design developed this quickly became unmanageable. We exported the panel schedules to AutoCAD®, and maintained them there for the remainder of the project.
feature focus
MEP
Once you have the geometry in place, it isn’t going to be connected to any systems that may have been made in the different design
Figure 5: Design Options toolbar
Figure 7: Design Options
Figure 6: Add to Design Options February 2011
www.augiworld.com 35