feature focus
Cross-Discipline As a model author, try to keep in mind your project team members downstream who will be receiving your model. The visibility of each category under these tabs is also affected by which option is chosen on the Basics tab. If you choose By host view, then all of the categories listed under these tabs will be controlled the same as they are in the Visibility/Graphics Overrides of this view. If you choose By linked view, then all categories will be controlled the same as they are in the Visibility/ Graphics Overrides of the view to which they are linked. If Custom is selected, you will have the option to choose for each tab either By host view, By linked view, or Custom. If you choose Custom on the Basics tab, then your options really begin to multiply. You could decide to set your Model Categories to By host view and your Annotation Categories to By linked view, or vice versa. Alternatively, you could set any of them to Custom, which allows you to control each category and subcategory individually. Here, I hope you are able to see how powerful this can be. There is also a check box at the upper left corner of each of these tabs that is active when set to Custom. This allows you the option of turning off the entire tab. If, for instance, you have an electrical model linked in but you don’t need to see any electrical annotations, just set to Custom and uncheck that box.
your drawings. We won’t spend any time on the categories you already know you want to turn off. The tricks begin when you find something that you do not know off the top of your head how to adjust. If you select the link in your view and right-click, you can choose Override Graphics In View, By Category. This will take you to the Revit Links Tab of the Visibility/Graphics Overrides dialog and it will highlight the link that you selected. You will want to set your display settings to Custom before we go on. Also each individual tab in the RVT Link Display Settings dialog should be set to Custom.
Overriding visibility of linked elements by category Once you have gone through and set your linked file to By Link and linked the correct view, and set it to Custom and adjusted all of the known categories you need to turn off or change, then you are ready to try and identify some of the more difficult issues. Here, the most important thing to remember is that the tab key is your friend. If you position your mouse over any element in the linked file and press the tab key, it will select just that element from within the link. With just that element selected you can see in the Type Selector which family and type it is. You can also right-click and Override Graphics In View, By Category. Or from the ribbon, on the View panel, select the paintbrush icon. This will take you directly to the correct category on the correct tab within the RVT Link Display Settings dialog. Just uncheck the box and the category goes away. Lather, Rinse, Repeat.
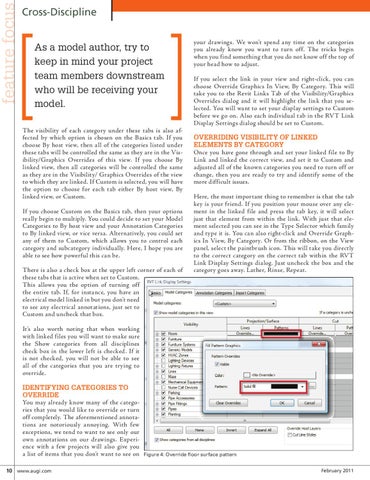
It’s also worth noting that when working with linked files you will want to make sure the Show categories from all disciplines check box in the lower left is checked. If it is not checked, you will not be able to see all of the categories that you are trying to override.
Identifying categories to override You may already know many of the categories that you would like to override or turn off completely. The aforementioned annotations are notoriously annoying. With few exceptions, we tend to want to see only our own annotations on our drawings. Experience with a few projects will also give you a list of items that you don’t want to see on 10 www.augi.com
Figure 4: Override floor surface pattern February 2011